Introduction: Why Build a Backyard Solar Dehydrator?
As sustainable living gains momentum, more individuals are seeking ways to reduce food waste, preserve seasonal harvests, and lower energy consumption. One powerful yet often overlooked solution is solar dehydration—a natural, energy-free method to preserve fruits, vegetables, herbs, and even some proteins. Building your own backyard solar dehydrator not only reduces your reliance on energy-intensive electric dehydrators but also empowers you to harness the sun’s abundant energy for year-round food security. This in-depth guide walks you through building a practical and efficient solar dehydrator, from choosing the right design and sourcing materials to assembly, safety, and ongoing maintenance. Whether you grow your own produce, support local farmers, or simply want to minimize your carbon footprint, you’ll find actionable advice to create a functional dehydrator that suits your climate and needs. Let’s get started on this rewarding project that blends DIY craftsmanship with sustainable technology.
Understanding Solar Dehydration: Basics and Benefits
How Solar Dehydrators Work
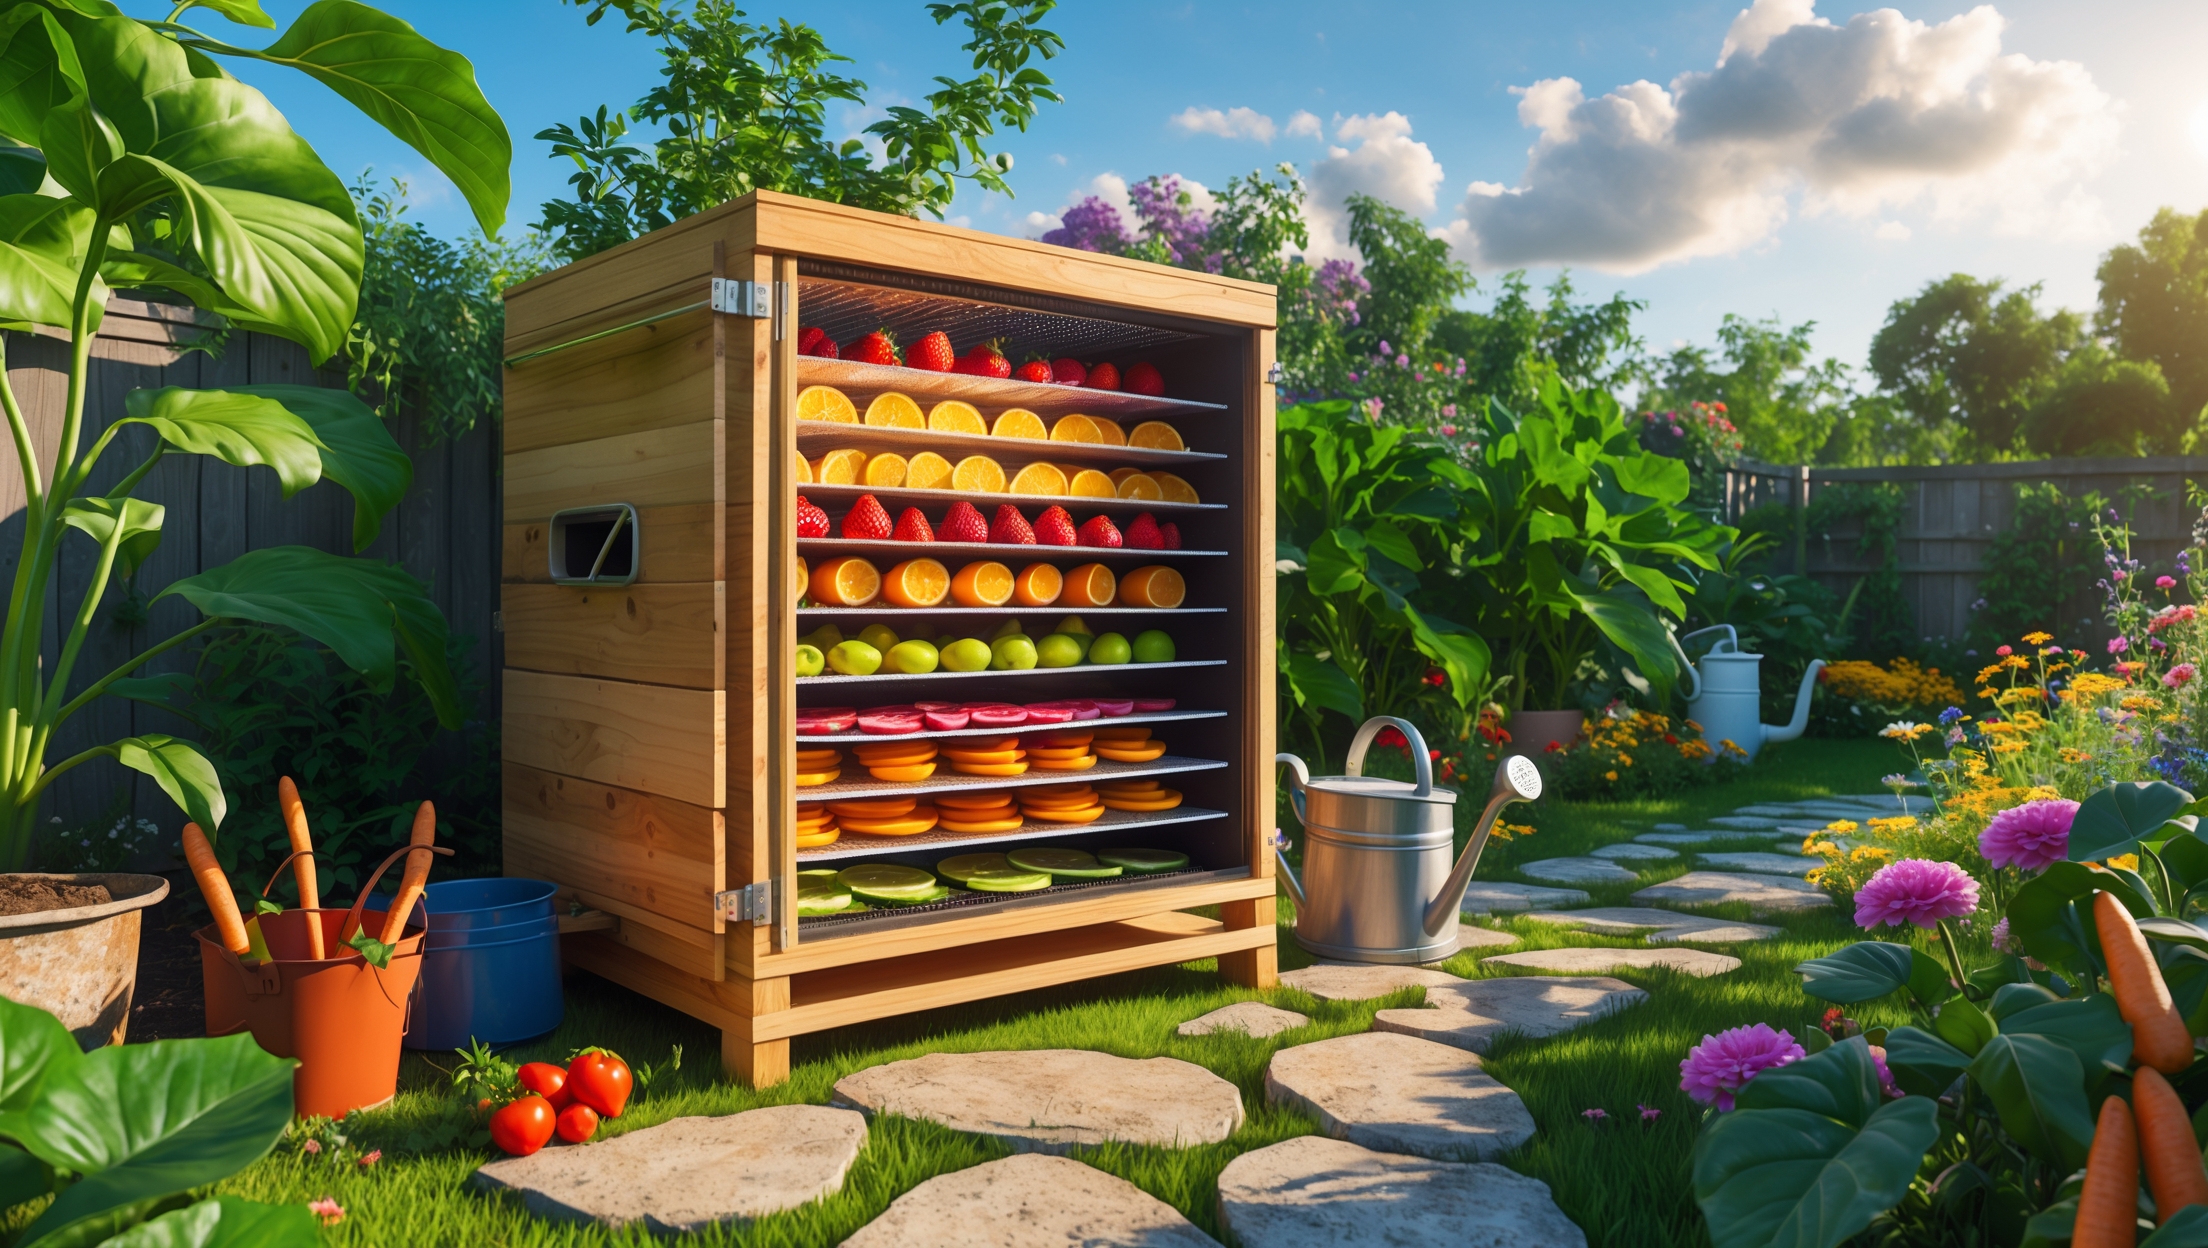
Solar dehydrators use the sun’s heat and natural airflow to remove moisture from food. The process inhibits spoilage, preserves nutrients, and concentrates flavors—without requiring electricity. A well-designed unit combines a solar collector (to capture and concentrate heat), trays for the food, a drying chamber, and vents or chimneys for airflow.
Advantages Over Electric Dehydrators
- Energy Savings: No grid power needed—ideal for off-grid or eco-conscious households.
- Lower Emissions: Reduces your carbon footprint by utilizing renewable solar energy.
- Preserving Nutrients: Gentle temperatures help retain vitamins and enzymes.
- Versatility: Suitable for fruits, vegetables, herbs, flowers, and some proteins like fish or jerky.
Choosing the Right Solar Dehydrator Design
Popular Designs Explained
- Box-Style (Indirect) Dehydrator: Features a solar collector that preheats air, which then flows into a separate food chamber. Offers more consistent drying and protection from direct sunlight.
- Direct Solar Dehydrator: Food is placed directly in the path of sunlight, often inside a vented greenhouse-like box. Simpler but may cause uneven drying or nutrient loss from UV exposure.
- Vertical Chimney Dehydrator: Uses a tall chimney to enhance warm air convection, increasing drying efficiency and airflow.
Which Design is Right for You?
For reliable results and food safety, this guide focuses on building a box-style (indirect) solar dehydrator. This design protects food from insects, dust, and rain, and provides more control over temperature and airflow—making it suitable for most climates and a wide range of foods.
Materials, Tools, and Budget Breakdown
Essential Materials
- Wood: Untreated pine, cedar, or plywood for frame and trays (avoid chemically treated lumber).
- Clear Glazing: Polycarbonate or glass sheet for solar collector cover.
- Black Matte Paint: Non-toxic, heat-resistant paint for the collector interior (to maximize heat absorption).
- Food-Safe Mesh: Stainless steel or food-grade plastic mesh for drying trays.
- Hinges and Handles: For access doors.
- Weatherproof Screws and Nails
- Thermometer: Optional, for monitoring internal temperature.
- Screen or Mesh: For vent covers to block insects.
Recommended Tools
- Circular saw or handsaw
- Drill and bits
- Screwdriver
- Measuring tape and square
- Sandpaper
- Paintbrush
- Staple gun (for mesh)
Budget Estimate
- Lumber: $30–$60
- Glazing (polycarbonate/glass): $20–$40
- Mesh for trays: $10–$25
- Hardware & paint: $10–$20
- Total DIY Cost: $70–$145 (prices may vary by region)
This is typically much less expensive than commercial solar dehydrators, which can cost $200 or more.
Step-by-Step Guide: Building Your Solar Dehydrator
Step 1: Planning and Sizing
Decide how much food you want to dry at once. For most households, a chamber with 4–6 trays (each about 12″ x 18″) is sufficient. The collector should be about the same footprint as the drying chamber for efficient heat transfer.
Step 2: Building the Frame
Construct a rectangular box for the drying chamber using wood. Height should accommodate multiple trays with at least 2″ clearance between them. Add horizontal supports for the trays. Assemble a separate, slanted box (the solar collector) and attach it to the bottom front of the main chamber at a 30–45° angle (optimized for your latitude).
Step 3: Installing the Solar Collector
- Line the collector’s interior with black matte paint for maximum heat absorption.
- Install the clear glazing on top, creating a tight seal to prevent heat loss.
- Ensure the collector is airtight except for the intake vent at the bottom.
Step 4: Assembling Trays
- Build wooden frames sized to fit inside the chamber.
- Stretch and staple food-safe mesh across each frame to support food and allow airflow.
- Leave a small gap at the back for warm air to pass over the food.
Step 5: Adding Vents and Chimney
- Install intake vents at the bottom of the collector (facing prevailing wind, if possible).
- Add a screened exhaust vent or a short chimney at the top rear of the drying chamber to enhance convection.
- Cover all vents with fine mesh to keep insects out.
Step 6: Doors and Access
- Build a hinged door for the chamber front to load trays and check progress.
- Add weatherproofing strips to reduce heat loss and prevent rain intrusion.
Step 7: Final Assembly and Placement
Assemble the collector and chamber, ensuring all joints are tight and vents are unobstructed. Place the dehydrator on a stable, level surface oriented south (in the Northern Hemisphere) for maximum sun exposure. Elevate slightly to protect from ground moisture.
Operating Your Solar Dehydrator: Practical Tips
Best Practices for Loading Food
- Slice produce uniformly (¼” or thinner) for even drying.
- Blanch vegetables briefly to preserve color and nutrients.
- Arrange pieces in a single layer, without overlap.
- Rotate trays periodically for consistent results.
Monitoring Temperature and Humidity
- Ideal dehydration temperature: 120–145°F (49–63°C).
- Use a thermometer to check internal temps, especially during your first few batches.
- If temperatures rise above 160°F, prop open the door slightly or add additional venting.
- Drying time varies by food (4–18 hours)—check dryness by texture rather than time alone.
Weather Considerations
- Choose sunny, low-humidity days whenever possible.
- Bring trays inside overnight or if rain is forecasted.
- In humid climates, finish drying with a short oven cycle if needed.
Safety and Food Quality Checklist
- Sanitation: Wash and sanitize trays before each use. Clean produce thoroughly.
- Protection: Keep all vents screened to prevent insects and rodents from accessing food.
- Moisture Control: Avoid overloading trays; excess moisture can cause spoilage.
- Storage: Store dried foods in airtight containers in a cool, dark, dry place.
- Inspection: Regularly inspect dried foods for signs of mold or spoilage before consumption.
Maintenance and Longevity
Routine Maintenance Tasks
- Clean trays and interior surfaces after each use to prevent mold and residue buildup.
- Check and repair mesh screens and seals periodically.
- Inspect for wood rot, especially if the dehydrator is exposed to rain or dampness.
- Repaint the solar collector interior every few years to maintain heat efficiency.
- Store the dehydrator indoors or under a tarp during the off-season to prolong its lifespan.
Advanced Tips: Enhancing Efficiency and Yield
- Add Reflectors: Attach aluminum foil or mirrored panels to the sides of the collector to increase sunlight capture.
- Automate Ventilation: Use a small solar-powered fan to enhance airflow in humid conditions.
- Modular Trays: Design trays to swap or stack for different batch sizes.
- Built-in Thermometer: Install a permanent thermometer or temperature sensor for hands-free monitoring.
Common Mistakes to Avoid
- Using Treated Wood: Avoid pressure-treated or painted lumber for food-contact surfaces.
- Poor Airflow: Inadequate venting can lead to uneven drying and spoilage.
- Insufficient Sealing: Gaps in the collector or chamber can cause heat loss.
- Overcrowding Trays: Leads to longer drying times and potential mold growth.
- Neglecting Weatherproofing: Rain or dew can damage both food and the dehydrator itself.
Case Study: Solar Dehydrator in Action
In a suburban backyard in Georgia, the Smith family built a box-style solar dehydrator using reclaimed cedar and old window glass. Over one summer, they dried over 50 pounds of apples, tomatoes, peppers, and herbs—enough to stock their pantry for the winter. The dehydrator paid for itself in saved electricity and reduced food waste within the first season. A simple roof overhang and periodic oiling of the wood allowed the unit to withstand heavy summer rains. Their advice: “Start small, experiment with your favorite foods, and tweak the design for your local climate.”
Conclusion: Empowering Sustainable Food Practices
Building and using a backyard solar dehydrator is more than a rewarding DIY project—it’s a gateway to sustainable food practices that benefit your household, your wallet, and the environment. By harnessing the sun’s power, you reduce reliance on fossil fuels and commercial food preservation systems, cut down on food waste, and enjoy nutrient-rich, shelf-stable snacks made from your own garden or local farmers’ markets. The skills and knowledge gained from this project can be shared with neighbors or scaled up for community initiatives. With thoughtful design, regular maintenance, and attention to food safety, your dehydrator will serve you for years, transforming the way you approach seasonal abundance and self-sufficiency. Embrace the possibilities—your sustainable kitchen awaits, powered by nothing more than sunlight and ingenuity.


You talk about harnessing the sun’s energy and using a solar collector in the dehydrator. What materials are best for building the collector part if I’m on a budget and want something easy to find locally?
For a budget-friendly solar collector, you can use an old window frame or picture frame as the base, fitted with clear glass or sturdy plastic. For the absorber, black-painted metal sheets like aluminum flashing or even baking trays work well, as they absorb heat efficiently. Use common materials like wood for the frame and black non-toxic paint. Most of these items can be found at hardware stores or reused from home materials.
I noticed the article mentions preserving some proteins like fish or jerky. Are there specific safety precautions or modifications needed in the design if I want to dehydrate meats safely with solar power?
When dehydrating meats like fish or jerky using a solar dehydrator, it’s important to ensure food safety. Meat requires higher, consistent temperatures—ideally above 160°F (71°C)—to prevent bacteria growth. You may need to modify the design with better insulation, additional reflectors, or supplemental heat sources. Always pre-cook meats to an internal temperature of 160°F before drying, and monitor temperatures closely during dehydration to stay in the safe range.
I’m new to DIY projects—could you give a rough estimate of the total cost to build a basic but efficient backyard solar dehydrator with commonly available materials? I want to make sure this is budget-friendly before I start sourcing parts.
For a basic but efficient backyard solar dehydrator, you can usually expect to spend between $50 and $100 if you use commonly available materials like wood, a clear polycarbonate sheet or old glass window, hardware, and mesh trays. Most of these items are available at local hardware stores or even as repurposed materials, which can help keep costs down.
The article mentions using a solar collector for concentrating heat, but I wasn’t clear on what materials would work best for this part on a budget. Are there low-cost or upcycled options that are still efficient?
You can definitely build an efficient solar collector using low-cost or upcycled materials. Black-painted metal sheets (like old baking trays or roofing tin) work well because they absorb heat effectively. For the cover, repurposed glass windows or clear acrylic panels let sunlight in while trapping heat. Old picture frames can also be used to hold the glass in place. These options keep costs down and make good use of items you might already have on hand.
Could you explain the main differences in performance or maintenance between box-style (indirect) dehydrators and other designs mentioned? Are certain styles easier to clean or more resilient to backyard weather over time?
Box-style (indirect) solar dehydrators generally offer more consistent drying because the food isn’t exposed directly to sunlight, which can help preserve flavor and nutrients. They’re usually more weather-resistant thanks to their enclosed design, protecting food from dust and rain. Cleaning is often easier with simpler panel or tent-style dehydrators since they have fewer interior surfaces, but these open designs may require more frequent cleaning due to exposure to outdoor elements. Over time, box-style units tend to last longer outdoors if well-built, especially if you use weatherproof materials.
For those of us in more humid parts of the US, would you recommend any modifications to the basic solar dehydrator designs described here to ensure foods dry thoroughly and safely? I’m curious how to prevent mold when the air has a lot of moisture.
In humid areas, it helps to add extra ventilation to your solar dehydrator by increasing the number and size of air vents. You can also use a small, solar-powered fan to boost airflow and remove moisture faster. Choosing thinner food slices and drying on sunny days further reduces the risk of mold. If humidity remains high, consider finishing the drying process indoors using an oven or electric dehydrator to ensure safe results.
How many hours of direct sunlight per day are typically required for a homemade solar dehydrator to work efficiently, and does the design you recommend work in regions with frequent cloudy weather?
A homemade solar dehydrator usually needs about 6 to 8 hours of strong, direct sunlight each day to operate efficiently and dry food properly. The design in the article is most effective in sunny regions, but in areas with frequent cloudy weather, drying times will be longer and results less predictable. You may want to consider a hybrid design that incorporates an auxiliary heat source for consistent performance in those conditions.
The article mentions the box-style (indirect) dehydrator design—can you clarify how it performs in cooler climates or on days with inconsistent sun? Are there simple modifications you’d recommend to maximize drying efficiency under those conditions?
The box-style (indirect) dehydrator can still work in cooler climates or on cloudy days, but drying will be slower. To boost performance, you can increase insulation around the box to retain heat, use reflective materials (like foil) inside the collector to concentrate sunlight, and add adjustable vents to control airflow. Raising the dehydrator slightly can also help air circulation. If needed, you might use a small backup heat source, like a low-wattage bulb, for particularly chilly or overcast periods.
Once the dehydrator is set up, how much ongoing maintenance is typically required? Are there specific sanitation or repair issues that I should keep an eye out for when using the dehydrator long-term?
After your solar dehydrator is up and running, maintenance is relatively simple. Regularly clean the trays and interior surfaces to prevent mold or food residue buildup. Inspect for signs of pests or insects, especially around vents and screens. Over time, check for any warping or damage to wooden parts and replace any torn mesh or broken glass panels. Sanitize components before each use to keep your food safe, and periodically check hardware to ensure stability.
When it comes to the materials for the drying trays, is there a particular type that works best for both durability and food safety? I want to avoid anything that might react with the food or break down in the sun.
For drying trays, stainless steel mesh is an excellent choice because it’s both durable and food-safe, with no risk of reacting with acidic foods or breaking down in sunlight. Another safe option is food-grade polypropylene or polyethylene mesh. Avoid galvanized metal, regular steel, or any trays with non-food-safe coatings, as these can react with food or degrade over time in the sun.
Does the article cover what kinds of materials are safest for making the food trays, especially for preserving proteins like fish or jerky, or should I look for something heat-resistant and food-grade in particular?
The article does touch on tray material options but doesn’t go into detail specific to proteins like fish or jerky. For those, it’s safest to use heat-resistant, food-grade materials such as stainless steel mesh or food-grade polypropylene. These prevent chemical leaching and withstand higher drying temperatures needed for protein preservation.
About sourcing materials: are there budget-friendly options for building a durable solar collector and drying chamber, especially for those of us starting a business on a tight budget?
Absolutely, you can keep costs down by repurposing materials without sacrificing durability. For the solar collector, consider using old window panes or clear acrylic sheets for glazing, and paint scrap metal sheets black for heat absorption. For the drying chamber, reclaimed wood or food-grade barrels can work well. Check local classifieds or building supply reuse centers for materials at a fraction of retail prices. Just make sure all surfaces that touch food are safe and easy to clean.
What kind of ongoing maintenance does a backyard solar dehydrator require? The article touches on this briefly, but I’m curious how often I’ll need to clean or repair the unit to keep it running efficiently.
A backyard solar dehydrator generally needs minimal maintenance. Clean the trays and the interior after each use to prevent mold and insect buildup. Wipe down glass or plastic covers every few weeks to keep sunlight coming through. Once or twice a season, check for cracks, warping, or loose seals and repair as needed. Inspect all parts before each drying season and after any heavy rain or wind.
With a busy family schedule, how much food can you realistically process with one backyard solar dehydrator at a time, and does it require a lot of hands-on time during the drying process?
A single backyard solar dehydrator can typically handle a few trays of produce at once, enough for small batches like a basket of apples or several handfuls of herbs. The hands-on time is minimal after setup—mainly arranging the food and occasional checking or rotating trays. Most of the drying time is passive, letting you fit it around a busy schedule without constant supervision.
After assembling the solar dehydrator, how long does it usually take to dry something like apple slices compared to using an electric dehydrator? I’m trying to estimate the time commitment for batch processing.
Apple slices typically take about 1–3 days to dry in a backyard solar dehydrator, depending on sun intensity, humidity, and slice thickness. In contrast, an electric dehydrator usually dries apple slices in 6–12 hours. Solar dehydrators are slower because they rely on natural sunlight and ambient conditions, so it’s wise to plan for longer drying times when batch processing.
Can you elaborate on the safety aspects, particularly when drying proteins like fish or jerky? Are there different temperature or ventilation requirements I should be aware of compared to just dehydrating fruits and veggies?
Drying proteins like fish or jerky requires extra care compared to fruits and veggies. It’s important to reach and maintain a temperature of at least 145°F (63°C) to prevent bacterial growth. Good airflow is critical to evenly dry proteins and reduce spoilage risks. Unlike fruits, always pre-cook or steam meats and fish before dehydrating, and never rely solely on solar heat if temperatures fluctuate. Regularly check for signs of spoilage and use your dehydrator only during consistently sunny, hot conditions when working with proteins.
I noticed you mention that the solar dehydrator can be used for proteins like fish or jerky. Are there any extra safety steps or design changes needed when dehydrating meats compared to fruits and veggies?
When dehydrating meats like fish or jerky, extra care is needed compared to fruits and vegetables. It’s important to ensure the dehydrator can reach and maintain higher temperatures, ideally above 160°F (71°C), to safely destroy bacteria. You may also want to add a thermometer for monitoring, pre-cook meats to recommended temperatures before dehydrating, and use thinner slices for more consistent drying. Regular cleaning and sanitizing of all surfaces are also vital when processing meats.
Could you go into more detail on how to pick the right design based on local climate? For example, would a box-style dehydrator work better in cooler regions, or is there a certain type that’s best for really humid areas?
Choosing the right solar dehydrator design depends a lot on your local climate. In cooler or less sunny regions, a box-style dehydrator with good insulation and a clear cover helps trap heat efficiently. For very humid areas, a design with strong airflow—such as a tent or cabinet dehydrator with multiple vents or a fan—can help remove moisture more effectively. Prioritize insulation for cool climates and ventilation for humid ones.
How do you decide between a box-style (indirect) dehydrator and other designs if your main goal is preserving herbs and leafy greens, since the article mentions different options?
For preserving herbs and leafy greens, a box-style (indirect) solar dehydrator is usually the better choice. This design provides gentle, indirect heat and shaded airflow, which helps preserve color, flavor, and delicate textures. Other designs, like direct-sun dehydrators, may be too harsh and can cause herbs to dry too quickly or lose quality. If gentle drying and quality are your priorities, go with the box-style model.
If I want to try dehydrating fish or jerky, are there any extra safety steps or modifications needed to the basic solar dehydrator design you described? I’m a little concerned about food safety when working with proteins.
You’re right to be cautious with proteins like fish or jerky, as they require higher temperatures to prevent bacterial growth. For these foods, consider adding a thermometer to monitor internal temperature, and aim for at least 160°F (71°C). You might also need to pre-cook or pre-salt the meat to further ensure safety. Enhancing airflow and using insect-proof mesh are also important to keep the process sanitary.
When selecting materials to build the solar collector and drying trays, are there any specific types or brands that you recommend to ensure durability and food safety, particularly for someone in a humid climate like the Southeast US?
For the solar collector, use UV-resistant polycarbonate or tempered glass for durability in humid climates. For the drying trays, opt for food-grade stainless steel mesh or plastic labeled BPA-free and UV-stable. Both resist corrosion and mold in moist environments. Avoid galvanized metal and standard window screening, as these can leach harmful substances when in contact with food.
Could you explain a bit more about the differences between the box-style (indirect) dehydrator and other designs? I’m not sure which type would be more efficient for a humid climate like mine.
The box-style (indirect) dehydrator uses a separate solar collector to heat air, which is then channeled into an insulated drying box. This design protects food from direct sunlight and helps air circulate, making it more effective in humid climates because it removes moisture more efficiently. Direct designs, where food sits in the sun, can struggle in high humidity since moisture doesn’t escape as easily. For humid areas, the box-style indirect dehydrator is generally a better and more consistent choice.
Could you break down what kind of maintenance is usually required to keep a backyard solar dehydrator working efficiently throughout the year, especially if it gets exposed to a lot of rain or sunlight?
To keep your backyard solar dehydrator working efficiently, check and clean the panels and trays regularly to remove dust, debris, or mold. Inspect the frame for any weather damage, tightening bolts and resealing wood joints as needed. After heavy rain, make sure all parts are dry to prevent rust or wood rot. If sunlight is intense, consider reapplying UV-protective finish to wood surfaces each season. Regularly check screens or mesh for tears and replace them if needed.
Could you elaborate on how solar dehydrators handle varying weather conditions, especially in more humid regions? Are there specific design features you recommend for climates that experience frequent rain or high humidity to ensure effective drying?
Solar dehydrators in humid or rainy areas benefit from features that enhance airflow and protect against moisture. Consider adding screened vents at both the top and bottom for better air circulation, using dark materials to absorb more heat, and building a sloped or overhanging roof to keep rain out. Including a small, solar-powered fan can actively pull humid air out, speeding up drying even when the weather is less ideal.
I see you mentioned both box-style (indirect) solar dehydrators and other designs. For someone in a humid climate, is one design better at preventing mold or spoilage during the drying process?
In humid climates, a box-style (indirect) solar dehydrator is usually more effective at preventing mold and spoilage. This design keeps food out of direct sunlight while promoting better airflow and higher internal temperatures, which help remove moisture more efficiently. The controlled environment reduces the risk of condensation and ensures quicker, safer drying compared to open or direct designs.
How much time should I typically set aside for the entire building process, from sourcing materials through to completion and the first test batch? I want to plan this project for a weekend but am not sure if that’s realistic.
For most backyard solar dehydrator builds described in the article, you should plan to dedicate about 1 to 2 full days. Sourcing all materials in advance can save time, as construction itself typically takes 6–10 hours depending on your experience and the complexity of the design. Running your first test batch will require a few more hours, but that can overlap with finishing touches. A weekend should be enough if you’re well-prepared.
About how long does the whole build typically take for someone with basic DIY skills, and are there any steps you found unexpectedly tricky during your construction process?
For someone with basic DIY skills, building the backyard solar dehydrator usually takes a full weekend—about 8 to 12 hours total, depending on your pace and preparation. The trickiest part is often sealing the joints well to prevent heat loss, and ensuring the mesh racks fit snugly. Cutting the glazing material without cracks can also be unexpectedly challenging, so taking your time with measurements and cuts really helps.
Could you clarify how the recommended airflow system in the solar dehydrator design prevents mold, especially during humid days? I want to make sure the food won’t spoil if we have a stretch of cloudy weather.
The article’s airflow system uses passive vents or a small solar-powered fan to keep air moving through the dehydrator at all times. Good airflow helps carry away moisture released from the food, which prevents damp spots where mold could grow. On humid or cloudy days, using the fan is especially important—it boosts air movement even when the sun is weak, helping to keep food safe from spoilage. If needed, you can finish drying indoors or restart the process when sunnier weather returns.
The article references both box-style (indirect) and other designs. How do indirect solar dehydrators compare to direct ones in terms of drying speed and overall food quality, especially in more humid climates?
Indirect (box-style) solar dehydrators generally dry food more slowly than direct ones because the food isn’t exposed to direct sunlight. However, this gentler process helps preserve color, nutrients, and flavor, which is especially valuable for fruits and herbs. In humid climates, indirect designs perform better because the heated air circulates and carries moisture away more efficiently, reducing the risk of mold and spoilage compared to direct models.
Between the indirect box-style dehydrator and other designs, how do I decide what’s best for preserving proteins like fish or jerky without risking spoilage? Are there specific safety steps I should take?
For proteins like fish or jerky, an indirect box-style solar dehydrator is safer because it keeps food out of direct sunlight, reducing the risk of spoilage from overheating. It also allows better airflow and more even drying. To ensure safety, always slice meat thinly, pre-treat it with salt or marinade, and aim for a consistent drying temperature above 145°F (63°C). Use a food thermometer to check temperatures and only store the dried proteins once they’re fully dried and cooled.
How much does it typically cost in materials to build a functional solar dehydrator like the ones you describe, especially if I’m aiming for a box-style indirect design?
For a box-style indirect solar dehydrator, the typical material costs range from $50 to $150. This depends on the quality of wood, plexiglass or glass for the collector, hardware like hinges and mesh trays, and paint or sealant. Using salvaged or recycled materials can reduce the cost further. Most DIY builds fall comfortably within this range.
Could you provide a rough estimate of the total cost for sourcing materials for a basic, functional solar dehydrator? I’m hoping to try this project on a tight budget and want to know if there are ways to keep expenses low without sacrificing safety.
For a basic solar dehydrator, material costs can range from $30 to $80, depending on what you already have at home. Using repurposed items like old window frames, leftover wood, or trays can keep costs down. The key expenses are usually clear glazing (like plexiglass or old glass), food-safe mesh, and some hardware. Prioritize sturdy, food-safe materials for trays and covers to ensure safety without overspending.
For someone living in a humid climate, are there any specific design recommendations or maintenance steps to ensure an efficient dehydration process and to prevent mold growth?
In humid climates, it’s important to maximize airflow in your solar dehydrator. Use screened vents at both the top and bottom to encourage good circulation, and consider adding a small, solar-powered fan if natural airflow isn’t sufficient. Arrange food items in single layers with space between them. After each use, clean and dry the trays thoroughly to minimize mold risk, and store the dehydrator in a dry spot when not in use.
I’m trying to keep this project affordable. Are there suggested ways to source the solar collector and other materials for cheap without compromising the efficiency of the dehydrator?
To keep costs down, consider repurposing materials like old storm windows or glass doors for the solar collector, and use scrap wood for the frame. For the trays, food-safe mesh or upcycled oven racks work well. Make sure your collector still has a tight seal and dark interior for maximum efficiency. Visiting local salvage yards and online community marketplaces can help you find suitable materials without spending much.
Are there any budget-friendly options for sourcing the materials listed in the article? I’d love to keep costs down without sacrificing efficiency, so any tips on repurposing or using common household items would be really helpful.
You can definitely keep costs down by repurposing materials for your solar dehydrator. For the frame, old wooden pallets or unused picture frames work well. Clear plastic or glass from old windows can substitute for new glazing. Baking trays or oven racks make good drying surfaces, and even old window screens (thoroughly cleaned) can be reused. Just make sure any repurposed items are free from chemicals or residues to keep your food safe.
After building the dehydrator, how often do you typically need to do maintenance, and what are some signs that the unit isn’t working as efficiently as it should?
Routine maintenance for a backyard solar dehydrator is usually needed every few months, depending on usage. Key tasks include cleaning the trays and checking for insect or mold buildup. Signs of reduced efficiency include slower drying times, unevenly dried food, or a musty odor inside the unit. If you notice these, inspect for blockages, ensure the ventilation is clear, and check for any damage to the solar collector.
I noticed you mentioned preserving some proteins like fish or jerky. Are there different food safety precautions I should take when dehydrating proteins compared to fruits and vegetables with a solar dehydrator?
Yes, dehydrating proteins like fish or jerky does require extra food safety precautions compared to fruits and vegetables. Proteins are more prone to bacterial growth, so it’s important to pre-cook meats to a safe internal temperature before dehydrating. Also, make sure the dehydrator consistently reaches higher temperatures (at least 145°F or 63°C) and minimize humidity. Always store dried proteins in airtight containers and consider refrigeration for longer shelf life.
I’m curious about the safety aspects you mention—once the solar dehydrator is built, how do you ensure the food dries thoroughly enough to prevent spoilage, especially in a humid climate?
To ensure food dries thoroughly in humid climates, slice produce uniformly and keep pieces thin for better airflow. Monitor the dehydrator’s internal temperature—it should stay between 120–140°F. Rotate trays periodically and check food texture for dryness (it should feel leathery, not sticky). If needed, finish drying indoors using an oven or electric dehydrator during very humid spells to guarantee safe moisture levels.
If I want to use a solar dehydrator to preserve larger batches of garden produce at once, how can I figure out what size design would actually suit my family’s needs without overbuilding or wasting materials?
To determine the right size for your solar dehydrator, start by estimating the average amount of produce your family wants to preserve at one time. Weigh a typical harvest, then calculate the total drying surface area needed by arranging the produce in a single layer, leaving space for airflow. Once you know the surface area per batch, you can design shelves or trays to match this need, avoiding unnecessary extra space and materials.
If I want to keep costs down, what are some affordable materials that still work well for the solar collector and drying trays? I’m hoping to use items I can easily find or repurpose.
For an affordable solar collector, you can use black-painted cardboard, old window glass, or even aluminum baking trays to help absorb and retain heat. For the drying trays, repurpose old window screens or use food-safe mesh stretched over wooden frames. Both options are inexpensive and often available from thrift stores, recycling centers, or around your home. Just make sure all materials are clean and non-toxic before using them with food.
When it comes to ongoing maintenance, are there specific cleaning steps or seasonal checkups I should be doing to keep the dehydrator working efficiently and make sure food stays safe?
Yes, regular maintenance is important for both efficiency and food safety. Clean the trays and interior with warm, soapy water after each use to prevent mold or residue buildup. At the start of each season, inspect for any cracks, damaged screens, or buildup in vents that could affect airflow. Also, check for insect nests or debris inside. Make sure all parts are fully dry before reassembling to prevent moisture issues.
When sourcing materials for the solar collector and drying trays, do you have recommendations for affordable options that still work well in a humid climate? I’m hoping to build mine on a budget but want to avoid mold issues.
For a budget-friendly solar collector, corrugated metal or dark-painted aluminum sheets can work well and resist moisture in humid climates. For drying trays, food-grade stainless steel mesh or plastic mesh (like polypropylene) is affordable and easy to clean, helping to prevent mold. Make sure trays are spaced for good airflow and consider removable mesh liners for easy washing. Regularly cleaning all parts and keeping the dehydrator well-ventilated will also reduce mold risk.
I’m curious about the differences between box-style (indirect) dehydrators and other designs when it comes to efficiency and ease of construction for beginners. Is there a design you’d particularly recommend for someone in a humid climate?
Box-style (indirect) dehydrators are generally more efficient in humid climates because they keep the drying food separate from direct sunlight and help channel warm air more evenly, which speeds up moisture removal. Other designs, like simple screen racks, are easier to build but can struggle in high humidity, since the air flow is less controlled. For beginners in humid areas, I recommend the box-style dehydrator—the construction is a bit more involved, but you’ll get better, more consistent results.
The article mentions preserving proteins like fish or jerky. Are there any special safety precautions or modifications needed when dehydrating animal products compared to just fruits and vegetables?
Dehydrating animal products like fish or jerky requires extra care to ensure food safety. It’s important to pre-cook or heat meat to recommended internal temperatures before dehydrating to kill any bacteria. Use thinner cuts for even drying, and make sure the dehydrator consistently maintains a temperature above 160°F (71°C) for meats. Unlike fruits and vegetables, animal products are more prone to spoilage, so monitoring time and temperature is crucial.
In the article, you mention both box-style and other solar dehydrator designs. Could you break down which type works best in more humid climates? I want to make sure our garden veggies actually dry out properly and not just spoil.
In humid climates, the box-style solar dehydrator is generally more effective. Its enclosed design allows better airflow control and higher internal temperatures, which helps moisture escape faster and minimizes the risk of spoilage. Make sure to include adjustable vents and a fan if possible, as this improves air movement and further aids drying in damp conditions.
For someone trying to keep costs low, are there recommended places to find affordable or repurposed materials for building the solar dehydrator? How much should I expect to spend if I’m just using salvaged or secondhand supplies?
You can often find affordable or free materials for a solar dehydrator at local salvage yards, Habitat for Humanity ReStores, garage sales, or even by checking online classifieds for items like old windows, scrap wood, and spare hardware. If you’re mainly using repurposed supplies, your total cost could be as low as $20 to $50, mostly for hardware or small new items you can’t find used.
After assembling the dehydrator, what’s the recommended way to clean and maintain it, especially if you use it for both fruits and proteins? Do you have to take anything apart or can most cleaning be done in place?
To clean your solar dehydrator after use, remove all trays and wash them with warm, soapy water—this is especially important when switching between fruits and proteins to avoid cross-contamination. Wipe down the interior surfaces with a damp cloth. You usually don’t need to take the dehydrator apart, but inspect any hard-to-reach corners or vents for residue and clean as needed. Make sure all parts are completely dry before reassembling and storing.
Once the solar dehydrator is built, how long does it generally take to fully dry a typical batch of apples or tomatoes? Are there any signs I should look for to tell when the food is sufficiently dehydrated?
Drying time for apples or tomatoes in a solar dehydrator usually ranges from 1 to 3 days, depending on sun strength, humidity, and how thickly the slices are cut. You’ll know the food is done when it’s leathery and pliable but not sticky or wet. For apples, bend a slice; it should not release moisture. For tomatoes, they should feel dry yet flexible.
I love the idea of reducing my carbon footprint, but I’m worried about mold or spoilage if there are a few cloudy days in a row. What’s the best way to handle this, and are there any signs that food isn’t drying properly?
If you experience several cloudy days while using your solar dehydrator, bring the partially dried food indoors and use your oven on a very low setting to finish drying, or wait until the sun returns. Signs that food isn’t drying properly include softness, stickiness, or any off smells. Mold can develop if food feels damp or looks fuzzy. Always make sure food is fully dry before storing to prevent spoilage.
The article mentions that solar dehydrators are good for preserving fruits, veggies, and even proteins like fish or jerky. Are there any special safety steps or extra precautions I need to take when trying to dehydrate proteins, especially in a variable climate?
When dehydrating proteins like fish or jerky, it’s important to pre-cook or pre-treat them to kill harmful bacteria before dehydration. Ensure the dehydrator maintains a steady high temperature (at least 160°F/71°C for meats) throughout the process. In variable climates, you might need to finish drying indoors or use a backup heat source if sunlight is insufficient. Always store the finished product in airtight containers and refrigerate or freeze for best safety.
If someone lives in a humid climate, does the solar dehydrator still work effectively, or are there any modifications you would recommend for better results compared to drier regions?
In humid climates, solar dehydrators can still work, but the drying process will be slower due to higher moisture in the air. To improve results, you can add extra ventilation to increase airflow, use a small fan to help move humid air out, and consider placing the dehydrator in the sunniest, breeziest spot available. You might also want to cut food into thinner pieces to speed up drying.
You mentioned gentle temperatures help preserve nutrients, but how can I be sure my dehydrator isn’t getting too hot, especially for delicate herbs? Is there a way to monitor or regulate the temperature inside the drying chamber?
To make sure your dehydrator stays at safe, nutrient-preserving temperatures, place an oven or grill thermometer inside the drying chamber. Check it periodically, especially on sunny days. If the temperature rises above 110°F (43°C) for herbs, you can adjust airflow by propping open vents or the door slightly. Adding shade cloth over the glazing can also help reduce excess heat.
When it comes to maintaining a solar dehydrator, what are the key safety or cleaning issues I should watch out for, especially if I plan to dry proteins like fish or jerky?
When drying proteins like fish or jerky, it’s important to clean all trays and surfaces thoroughly after each use to prevent bacteria buildup. Always check for any signs of mold or residue inside the dehydrator. Ensure all parts dry completely before reassembling, and periodically inspect for insects or pests. Use food-safe cleaners, and store the dehydrator in a clean, dry place when not in use.
Based on the guide, how much time should I plan to spend building a backyard solar dehydrator from start to finish if I only have weekends free? I’m juggling work and kids, so I’d love a realistic estimate.
Building a backyard solar dehydrator as described in the guide typically takes about six to eight hours, depending on your experience and whether you have all the materials ready. If you’re only working on weekends and have a busy schedule, you can expect to complete the project over two or three weekends, breaking the work into manageable chunks like gathering materials, cutting and assembling, and then finishing touches.
If I want to build a backyard solar dehydrator for a small family garden, what would be a reasonable expectation for how long it will take to fully dry, say, apple slices or herbs? Does drying time vary a lot based on outdoor temperature?
For apple slices, you can generally expect them to fully dry in about 2 to 4 days using a solar dehydrator, depending on slice thickness and weather. Herbs usually dry faster, often within 1 to 2 days. Yes, outdoor temperature and humidity make a big difference—warmer, sunnier, and less humid days will speed up drying, while cool or cloudy conditions will slow it down.
Once the dehydrator is up and running, what kind of ongoing maintenance does it actually need throughout the year? Are there common issues like mold or pests I should watch out for, and how can I prevent them?
Ongoing maintenance for your backyard solar dehydrator mainly involves regular cleaning and inspections. After each use, remove any food debris and wipe down the trays and interior to prevent mold growth. Check periodically for any signs of pests, like insects or rodents, and seal any gaps or entry points you find. Ensure that the dehydrator remains dry inside; if you notice condensation, improve airflow or sun exposure. These steps will help you avoid common issues and keep your dehydrator working efficiently.
About how much time should I set aside for the whole build if I’m a beginner with basic tools? Also, is it realistic to try building the dehydrator in a weekend, or does it typically take longer?
If you’re a beginner with basic tools, you should set aside about 8 to 10 hours for the entire build, including material prep and assembly. Many people find it realistic to complete the solar dehydrator over a weekend, especially if you gather your materials ahead of time. Taking your time and double-checking measurements will help ensure a successful project.
If I want to start with an easy, beginner-friendly version before building something more advanced, which design from the guide would you suggest for someone who’s never done a DIY project before?
For a beginner-friendly start, the basic box dehydrator design described in the article is a great choice. It uses simple materials like a cardboard box, plastic wrap, and mesh, so you won’t need any special tools or skills. This lets you get familiar with solar dehydrating before moving on to more advanced wooden or mixed-material versions.
How do you decide which type of solar dehydrator design is best suited for different climates, especially if I live somewhere with a lot of humidity? Are there specific materials or features that help improve performance in less-than-ideal weather?
For humid climates, a solar dehydrator with active airflow, such as a design using a solar-powered fan, is especially effective. Look for models with good ventilation, dark-colored interior surfaces to absorb more heat, and clear glazing for maximum sun exposure. Using moisture-resistant materials like treated wood, metal mesh, or food-grade plastic also helps maintain durability and performance in damp conditions.
Once the solar dehydrator is built, how much ongoing effort does it take to maintain and clean it throughout the year, especially if I’m using it regularly to dry herbs and vegetables from my garden?
Maintaining a backyard solar dehydrator is pretty straightforward, even with regular use. After each batch, brushing out plant debris and wiping down trays with a damp cloth is usually enough. Every few months, a deeper clean with mild soap and water helps prevent mold or residue buildup. Check for insects or dust inside and around vents, and ensure moving parts, like doors or vents, stay functional. Overall, expect to spend about 10–15 minutes on light cleaning after each use, plus an hour or so for a thorough seasonal clean.
If I mostly want to dehydrate herbs and delicate leafy greens, are there specific design tweaks or materials you would recommend to prevent them from blowing away or overdrying in the solar dehydrator?
For herbs and delicate leafy greens, use fine mesh trays to keep smaller pieces from falling through or blowing away. You can also add a layer of cheesecloth over the trays. To prevent overdrying, position the trays further from the hottest part of the dehydrator and monitor drying times closely. Adjustable vents can help you regulate airflow and temperature for gentler drying.
I’m interested in lowering my energy use, but I live in a region with lots of humidity. Does your guide suggest any particular design or materials that perform better in humid climates for solar dehydration?
Yes, the guide does address challenges of high humidity. It suggests using well-ventilated designs with ample airflow, such as incorporating screened vents at both the bottom and top of the dehydrator. Using materials like dark metal sheets for the collector can also help boost internal temperatures, which is important for effective drying in humid conditions. Sealing the chamber well against outside moist air is also recommended.
If I’m mainly interested in preserving herbs and delicate fruits, do I need to adjust the solar collector design or drying chamber size compared to a standard box-style dehydrator?
For herbs and delicate fruits, you don’t need a large solar collector or drying chamber. In fact, a smaller collector lets you control the temperature better and avoid overheating, which helps preserve color and flavor. Consider using mesh trays with good airflow and a shallower chamber to prevent fragile items from piling up and bruising.
For someone with limited DIY experience, how long does the entire building process usually take, and are there any specialized tools you found particularly useful when assembling the dehydrator?
For someone new to DIY projects, building the backyard solar dehydrator typically takes a weekend—about 6 to 8 hours spread over two days. The most helpful specialized tools are a power drill and a jigsaw, though you can manage with basic hand tools if needed. Having clamps and a measuring tape nearby also makes the assembly process much smoother.
In your step-by-step guide, could you clarify what materials work best for the trays—especially when drying stickier foods like berries or herbs? I want to make sure they’re food-safe, durable, and easy to clean.
For the trays, stainless steel mesh is an excellent choice—it’s food-safe, resists rust, and is easy to clean even after drying sticky foods. Alternatively, food-grade plastic mesh can work well, but make sure it’s BPA-free and heat-resistant. Avoid galvanized metal, as it can leach harmful substances. For easier cleanup with very sticky foods, you can line trays with reusable silicone mats or parchment paper.
I see the article covers both direct and indirect dehydrator designs. Could you elaborate on which design works better for drying proteins like fish or jerky safely, and what additional steps should I consider for food safety?
For drying proteins like fish or jerky, the indirect solar dehydrator is generally safer because it protects food from direct sunlight and insects, while allowing for better airflow and more consistent temperatures. To ensure food safety, pre-treat meats by marinating or pre-cooking them to reduce bacteria, and aim for temperatures above 160°F (71°C) during drying. Always slice meats thinly and evenly, and store the finished product in airtight containers.
The article mentions drying some proteins like fish or jerky. Are there any additional safety precautions or design tweaks I should consider for handling meat in a solar dehydrator, especially in humid climates?
When dehydrating meat like fish or jerky in a solar dehydrator, especially in humid climates, it’s important to pre-cook or pre-treat the meat to a safe internal temperature before drying to kill bacteria. Maintain higher airflow in the design, consider using food-safe screens, and monitor internal temperature to ensure it stays above 140°F (60°C) throughout the process. Also, slice meat thinly and keep the trays spaced for even drying.
I’m curious about sourcing materials for this project. Are there any budget-friendly alternatives to common materials for the solar collector or trays that still ensure good efficiency and food safety?
For budget-friendly options, you can use reclaimed window glass or clear acrylic for the solar collector, ensuring they’re clean and free of coatings. For trays, untreated wood frames with food-safe mesh like stainless steel or even clean, food-grade plastic mesh work well. Avoid galvanized or painted metals, as they can leach chemicals. These alternatives keep costs down without compromising efficiency or safety.
When it comes to building the box-style dehydrator mentioned in the guide, do you think there are affordable materials you’d recommend for someone on a student budget, or is it possible to upcycle household items?
You can absolutely build the box-style dehydrator on a student budget by upcycling materials. Cardboard boxes, old picture frames for the screen, and leftover window screens can all work well. For the trays, food-safe mesh or even repurposed oven racks are good options. Just make sure any paints or adhesives you use are non-toxic and safe for food contact. This approach keeps costs low while making use of items you might already have around the house.
What materials do you recommend for the trays inside the drying chamber, especially if I’m trying to keep overall costs low but still want it to be food safe and durable?
For affordable, food-safe, and durable trays, consider using stainless steel mesh or food-grade plastic mesh. Stainless steel costs a bit more upfront but lasts longer and is easy to clean. Food-grade polypropylene mesh is lighter and less expensive. Avoid galvanized metal since it can react with food. Unfinished wood slats can also work if you sand them well and avoid using toxic finishes.
If I want to try preserving some homemade jerky, are there special food safety steps I need to be aware of compared to just drying fruits and vegetables?
Yes, making jerky requires extra food safety precautions compared to drying fruits and vegetables. Meat should be heated to 160°F (71°C) before dehydrating to kill bacteria. Always use lean cuts, trim visible fat, and marinate the meat in the refrigerator. After dehydrating, store jerky in airtight containers and refrigerate or freeze for longer shelf life. Clean all surfaces and equipment thoroughly to prevent contamination.
When building a solar dehydrator for a humid climate, are there specific materials or construction tips you would recommend to prevent mold during the drying process?
In humid climates, it’s important to ensure good airflow in your solar dehydrator. Use screens made of food-safe stainless steel or nylon mesh rather than solid trays, as these allow better air movement. Build the dehydrator with multiple vents—both intake and exhaust—to boost ventilation. Opt for UV-resistant, waterproof materials for the frame and avoid wood that can absorb moisture. Regularly check and clean the interior, and consider adding a small fan to enhance air circulation if the humidity is persistently high.
If I want to use the dehydrator to preserve both fruits and proteins like fish or jerky, are there special precautions or design tweaks I should consider to avoid any cross-contamination or food safety issues?
When dehydrating both fruits and proteins like fish or jerky, it’s best to use separate trays for each type of food and thoroughly clean all surfaces between uses. You might also want to include removable or washable liners for easy cleaning. Consider designing the dehydrator with separate sections, or at least dehydrate proteins and fruits at different times to prevent cross-contamination and ensure proper food safety.
Could you give more details on sourcing materials? I’m trying to keep this project low budget, so I’m wondering what common items I could repurpose for the trays or the solar collector.
For a budget-friendly build, you can repurpose old window frames or storm windows as the solar collector cover. For trays, look for old oven racks, wire shelving, or even wooden picture frames with mesh stapled tightly across. Food-safe window screens or mesh (avoid anything coated with chemicals) work well for tray surfaces. Salvaged plywood, pallet wood, or leftover lumber can be used for the dehydrator’s frame and housing.
Can you clarify what safety measures are needed for solar dehydrating proteins like fish or jerky? I want to ensure we follow best practices in our backyard setup, especially since we’d potentially be selling dried goods to customers.
When solar dehydrating proteins like fish or jerky, it’s crucial to pre-cook or pre-treat them to kill harmful bacteria before dehydration. Use food-safe thermometers to ensure meats reach safe internal temperatures, typically at least 160°F for beef and 165°F for poultry. Keep your dehydrator clean and protected from pests. Regularly monitor humidity and airflow, and only store finished products in airtight containers. If selling to customers, review local food safety regulations to ensure full compliance.
I’m really interested in minimizing my environmental impact, but sourcing materials sustainably can be tricky. Do you have suggestions for affordable, eco-friendly materials that work well for building the collector and the drying chamber?
For the collector, consider using salvaged window glass or reclaimed polycarbonate from old greenhouses, which are often available at local reuse centers. For the drying chamber, untreated wood from pallets or FSC-certified lumber is a good choice. You can also repurpose food-grade metal screens or stainless steel mesh for the drying racks. These materials reduce waste and are generally affordable or even free if sourced locally.
I’m interested in building a solar dehydrator for preserving fruit and herbs from my garden, but I’m a little concerned about food safety, especially with proteins like jerky or fish. Are there any recommended temperature monitoring methods or best practices to make sure everything dries thoroughly and safely?
When drying proteins like jerky or fish, it’s important to reach and maintain temperatures above 160°F (71°C) to prevent bacterial growth. Using a food-safe thermometer to regularly check the internal temperature of your dehydrator is recommended. Pre-cooking meats to the safe temperature before dehydrating adds extra safety. Also, cut foods into uniform pieces to ensure even drying, and rotate trays during the process for consistent results.
If I want to preserve a larger harvest, is it better to scale up the size of a single solar dehydrator or build multiple smaller units? I’m wondering which approach works better for efficient airflow and even drying.
If you have a large harvest, building multiple smaller solar dehydrators usually gives better airflow and more even drying. Smaller units are easier to manage, rotate, and clean, which reduces the risk of uneven drying or mold. Large single units can sometimes have airflow issues, especially in the center trays, unless you invest extra effort in design and ventilation.
When sourcing materials for this project, are there any budget-friendly alternatives for the solar collector or drying trays without compromising safety or effectiveness? Any tips for keeping costs down for someone just starting out?
For the solar collector, you can repurpose old storm windows or clear acrylic panels instead of buying new glass. For drying trays, food-safe window screens or baking racks work well and are inexpensive. Wooden frames can be made from reclaimed pallets or scrap lumber, just make sure all materials are clean and untreated. Check local classifieds, thrift stores, or recycling centers for free or low-cost supplies.
Once the dehydrator is built, how long does it typically take to dry things like apple slices or tomatoes using just solar power compared to an electric dehydrator?
With a backyard solar dehydrator, drying times for apple slices or tomatoes can vary depending on sunlight, temperature, and humidity. Typically, it takes 1 to 3 days to fully dry apple slices or tomatoes using solar power. In contrast, an electric dehydrator usually takes 6 to 12 hours. Solar drying is slower and more weather-dependent, but it’s energy-free and gentle on the food.
If I want to set up several drying trays at once for bigger harvests, are there design considerations to prevent uneven drying or airflow issues in a box-style solar dehydrator?
When stacking multiple drying trays, it’s important to space them evenly so that air can circulate around each tray. Consider using a mesh or slatted design for the trays to allow better airflow. Adding adjustable vents at both the intake and exhaust points can help control airflow, and placing a small gap between the trays and the dehydrator walls prevents stagnant air. Rotating trays during drying can also promote even results.
You mention box-style and other dehydrator designs. For someone just starting out with a smaller garden, is there a particular style that’s easier to build or more budget-friendly?
For beginners with a smaller garden, a box-style solar dehydrator is usually the easiest and most cost-effective option. It requires simple materials like wood, mesh, and a clear cover, and the plans are straightforward to follow. Smaller, stacked tray designs can also work well if you want a compact build. Both styles are great for manageable garden harvests and don’t require advanced tools or skills.
You mention both box-style and other designs—do you recommend one type over another if I’m in a humid climate, like the Southeast? I’m a bit worried about mold and getting things to dry properly.
In humid climates like the Southeast, a box-style solar dehydrator is generally more effective. Its enclosed design helps keep out moisture, maintain higher temperatures, and boost airflow, all of which are important for faster drying and preventing mold. Make sure to include good ventilation and perhaps a small fan to ensure steady air movement inside the box.
Could you clarify what sorts of materials are best for building the drying trays to keep everything food-safe and easy to clean? I want to make sure we use something durable but not too expensive.
For food-safe and easy-to-clean drying trays, stainless steel mesh is one of the best options—it’s durable, resistant to rust, and simple to wash. If stainless steel is above your budget, uncoated food-grade plastic mesh is a good alternative. Avoid galvanized or regular metal, since they can react with food and are harder to keep clean. Make sure any wood used is untreated, since treated wood may contain chemicals that aren’t safe for food contact.
The article mentions using a solar collector to capture and concentrate heat. For someone living in a cooler or more humid climate, are there any design modifications you’d recommend to ensure efficient dehydration?
In cooler or more humid climates, consider increasing the insulation around the solar collector to retain more heat, and use a double-glazed or polycarbonate cover to boost temperature inside. Adding adjustable air vents can help control airflow and speed up moisture removal. You might also want to position the collector at a steeper angle to maximize sun exposure. These tweaks should improve performance in less ideal weather.
You talk about box-style (indirect) dehydrators as one of the popular designs. For someone living in a humid climate, is there a particular design that would work better for effective drying?
In humid climates, box-style (indirect) dehydrators are actually a good choice because they protect food from outside moisture and use heated air to drive off humidity. To boost performance, make sure your dehydrator has good airflow with multiple vents and possibly a small fan to keep air moving. Using dark-colored materials for the collector can also help raise internal temperatures for faster drying.
I’m trying to set a budget for this project. Could you outline what the most cost-effective design would look like for a beginner, including any tips for sourcing affordable materials locally or repurposing items?
A cost-effective solar dehydrator for beginners often uses a simple wooden frame with recycled window panes for the collector and old wire racks or mesh for trays. Consider using scrap lumber from local hardware stores or construction sites, and check community online boards for free windows or materials. Repurposing items like old screen doors for ventilation and using dark paint to increase heat absorption can also save money. Start small and expand as needed to keep your initial investment low.
Is there a specific maintenance routine you suggest to keep the solar dehydrator functioning efficiently year after year, especially regarding cleaning or checking for wear on the collector and vents?
To keep your solar dehydrator working efficiently, clean the collector glass and vents regularly to remove dust and debris, ideally once a month during frequent use. Inspect seals, screens, and joints each season for signs of wear or gaps that could let in pests or moisture. Tighten any loose hardware, and check that the airflow remains unobstructed. Repaint or reseal wooden surfaces every couple of years to prevent weather damage.
When sourcing materials for this project, are there any affordable alternatives to the recommended trays or collector parts? I’m hoping to keep the overall cost low but still build something sturdy and effective.
You can definitely use affordable alternatives for both trays and collector parts. For trays, old oven racks, baking sheets, or repurposed wire shelving work well, as long as they allow airflow. For the collector, salvaged window panes or clear plastic sheets can replace new glass, and reclaimed wood or even sturdy cardboard (weatherproofed) can be used for framing. Just make sure all materials are food safe and can withstand outdoor conditions.
Once the dehydrator is built, are there recommended first foods to try drying that are more forgiving for beginners? I want to avoid spoilage or wasted produce while learning the process and understanding my climate’s impact on drying times.
When starting out with your solar dehydrator, it’s a good idea to try foods that are naturally less prone to spoilage and dry evenly. Sliced apples, herbs, banana chips, and tomatoes are great choices for beginners—they’re easy to prep and forgiving if drying times aren’t perfect. Avoid high-moisture foods like melons at first. Be sure to cut produce evenly and check progress daily as you learn how your local climate affects the process.
Once I’ve built the dehydrator, how much time should I expect to spend on maintenance each season to keep it running efficiently?
You can expect to spend about 1 to 2 hours each season on maintenance for your solar dehydrator. This includes cleaning the trays and surfaces, checking for and repairing any cracks or warping, and ensuring the ventilation and screens are clear of dust or debris. Regular upkeep like this will help keep your dehydrator working efficiently.
The article talks about utilizing vents and chimneys for airflow. If my backyard gets humid in late summer, will I need to tweak the design or do extra maintenance to prevent mold or moisture buildup inside the dehydrator?
In humid conditions, it’s important to enhance airflow in your solar dehydrator to prevent mold and moisture buildup. You might consider adding extra vents or making the chimney taller to improve air circulation. Regularly check and clean any screens or vent openings to keep them clear. Also, space your food items farther apart to allow better air movement inside the dehydrator.
You mention ongoing maintenance for the solar dehydrator. What are the most common issues you’ve run into over a few seasons of use, and how do you keep pests out of the drying chamber?
Over several seasons, the most common issues have been dust buildup on the collector panel, occasional mold if airflow isn’t optimal, and some screws loosening from temperature changes. To keep pests out, make sure all vents and openings are covered with fine mesh screening and check for gaps around doors or panels. Regularly inspecting and cleaning the chamber, especially after each use, helps ensure everything stays pest-free and functioning well.
You mentioned that solar dehydrators can be used for proteins like fish or jerky. Are there any additional safety steps or modifications to the basic design that should be considered when dehydrating meats?
When dehydrating meats such as fish or jerky, it’s important to ensure food safety by reaching higher internal temperatures. Consider adding a small electric fan or heat source to the dehydrator design to maintain consistent airflow and temperatures above 160°F (71°C). Also, pre-cook or briefly heat the meat before dehydrating to kill bacteria. Use thinner slices and monitor the process closely to avoid under-drying.
If I want to build a unit that can handle large harvests or possibly serve a small group, how would I scale up the recommended design? Does increasing the size significantly affect drying efficiency or the amount of necessary airflow?
To scale up the solar dehydrator for larger harvests or group use, increase the tray area and possibly add more tiers. However, a bigger unit needs more airflow to ensure even drying; you may need larger or multiple vents, or even a small fan if passive airflow isn’t enough. Also, make sure sunlight can still reach all trays evenly, as larger sizes can create shaded spots if not designed carefully.
Could you share some guidance on how to adapt the solar dehydrator design for regions that have high humidity or frequent cloudy days? I’m concerned about whether it will work effectively in less-than-ideal weather conditions.
To improve a solar dehydrator’s performance in humid or cloudy climates, consider adding a small, low-wattage electric fan to increase airflow and help remove moisture. Using double glazing or a larger solar collector can also boost heat retention. You might also want to check and rotate food more often to prevent spoilage and experiment with thinner food slices to speed up drying. If cloudy days persist, a back-up electric heating element may be helpful for finishing the drying process indoors.
The article mentions using solar dehydrators for some proteins like fish or jerky. Are there any specific safety precautions or extra steps required to ensure those foods dry properly and don’t spoil?
Yes, drying proteins like fish or jerky safely requires a few extra precautions. Make sure to pre-treat meats by marinating them in a salty or acidic solution, which helps inhibit bacteria. Slice the meat thinly and evenly for consistent drying. Maintain a high enough temperature—ideally above 140°F—throughout the process to prevent bacterial growth. Finally, store the dried meat in airtight containers and refrigerate or freeze if not used quickly.
When it comes to year-round use, how does a backyard solar dehydrator perform during cloudy or colder months? Are there modifications suggested in your guide to boost efficiency during those times?
During cloudy or colder months, a backyard solar dehydrator will generally dry food more slowly because of reduced sunlight and lower temperatures. In the guide, there are suggestions to improve efficiency, such as using dark-colored absorber plates to retain more heat, adding extra insulation, and positioning the dehydrator to maximize sun exposure. For particularly challenging weather, you can supplement with a small electric fan or heater, but these additions move away from a purely solar solution.
Could you provide more specifics on choosing between a box-style indirect dehydrator and other designs? I want to build one with my kids, and I’m looking for something beginner-friendly that still works efficiently.
A box-style indirect dehydrator is perfect for beginners, especially with kids helping. It keeps the food out of direct sunlight, which preserves flavor and nutrients, and is safer since hot air, not the sun, does the drying. The box design is sturdy and easy to build using materials like wood and clear plastic. Tray access is straightforward, making loading and cleaning simpler than with stacked or tent-style dehydrators. For a family project, the box design balances efficiency and ease of construction very well.
Could you elaborate on how well a backyard solar dehydrator works in climates that are often humid? I’m concerned about whether it’s effective enough to prevent spoilage on really muggy days.
In humid climates, solar dehydrators can still work, but they may take longer to dry food since moisture in the air slows down evaporation. To improve effectiveness, try slicing food thinner, spacing pieces apart, and starting the process on days with the lowest humidity possible. Good airflow is crucial—consider adding extra vents or a small fan to help move moist air out more quickly and reduce the risk of spoilage.
I grow a lot of herbs and soft fruits, and I’m wondering if the same solar dehydrator setup works for both, or if I need to make adjustments to the design depending on what I’m drying most often.
You can use the same basic solar dehydrator setup for both herbs and soft fruits, but you might want to adjust a few things. Herbs dry faster and at lower temperatures, so placing them on upper racks with better airflow is ideal. Soft fruits may need more time and slightly higher temperatures, so keep them on lower racks and slice them thinly. Adjustable trays or removable shelves can help you switch between different types of produce easily.
I noticed the article mentions both fruits and proteins like jerky. Are there any special safety or maintenance steps recommended when dehydrating proteins, compared to just drying produce or herbs?
Yes, dehydrating proteins like jerky requires extra care compared to fruits or herbs. Proteins should be pre-treated by heating to a safe internal temperature before drying to reduce the risk of harmful bacteria. Clean all surfaces and tools thoroughly before and after use, and check that your dehydrator consistently maintains the recommended temperature for meats, usually around 160°F (71°C). Also, store finished jerky in airtight containers and refrigerate or freeze for longer shelf life.
Are there particular types of fruits or vegetables that don’t work as well in a solar dehydrator? If so, what do you recommend for preserving those, especially if we have a lot from our garden?
Some fruits and vegetables with very high water content, like watermelon, cucumbers, and some leafy greens, can be tricky to dehydrate effectively in a solar dehydrator because they may spoil before fully drying. For these, consider freezing or pickling as alternative preservation methods. Blanching and then freezing can help preserve texture and nutrients, while pickling works well for cucumbers and similar produce.
When it comes to building a solar dehydrator for a smaller backyard, how can I determine which design will work best for my limited space, and are there any modifications that help with efficiency in shadier climates mentioned in the article?
To choose the best solar dehydrator design for a small backyard, measure your available space and consider vertical or compact designs like the stackable box type described in the article. For shadier climates, the article suggests using reflective materials inside the dehydrator to boost sunlight concentration and adding extra vents to improve airflow. You can also try placing the dehydrator in the sunniest spot and monitoring temperatures to ensure effective drying.
If I build this dehydrator, how should I go about keeping it clean and safe for food use over time, especially if I want to use it for both fruits and proteins like jerky?
To keep your solar dehydrator clean and safe, always wash racks, trays, and surfaces with hot soapy water after each use, especially when switching between fruits and proteins. Disinfect with a food-safe solution like diluted vinegar. Let everything dry completely before reassembling. It’s also important to clean any debris from the air vents and check for mold or insect buildup regularly. Store your dehydrator in a dry spot when not in use to prevent contamination.
I see that solar dehydrators help reduce energy costs, which is appealing. Could you share a rough estimate of what the upfront material costs might be versus buying an electric dehydrator, and how soon a small business owner might break even?
Building a backyard solar dehydrator typically costs between $50 and $200 for materials, depending on size and materials chosen. Commercial electric dehydrators usually range from $150 to $500. For a small business, if you regularly dehydrate large batches, the solar option could pay for itself within one season, especially since ongoing energy costs are virtually zero. Your break-even point will depend on how much you dehydrate and current electricity prices.
Could you clarify what types of proteins besides fish and jerky are suitable for preservation in a backyard solar dehydrator? Are there any special precautions or preparation steps needed when dehydrating animal products in a solar unit compared to fruits and vegetables?
Other proteins like poultry and lean cuts of red meat can be dehydrated, but extra care is needed. Animal products are riskier to dehydrate than fruits and veggies because of potential bacteria. Always pre-cook meats to a safe internal temperature before dehydrating, slice them thinly, and ensure the dehydrator reaches at least 160°F (71°C) during drying. Unlike fruits and vegetables, meat products should be stored in airtight containers and used within a shorter timeframe to ensure safety.
Once the solar dehydrator is built, how often should I expect to do maintenance or cleaning on it, and what parts tend to need the most attention over time?
You can expect to do basic maintenance and cleaning on your solar dehydrator every few weeks during heavy use, and at least once per season during lighter use. The parts that usually need the most attention are the screens and trays, which can collect food particles and residue, and the solar collector, which may gather dust or debris. Regularly check for signs of mold, clean surfaces with mild soap and water, and make sure the ventilation remains unblocked for best performance.
I’m interested in reducing my energy use, but I’m also on a tight budget. Are there any tips or modifications for sourcing low-cost or recycled materials to build a backyard solar dehydrator without sacrificing performance or food safety?
Absolutely, you can build an effective solar dehydrator with budget-friendly or recycled materials. Consider using old window frames or glass for the collector, repurposed metal screens (make sure they’re food-safe and not coated with lead or zinc), and salvaged wood for the frame. For insulation, clean cardboard or repurposed foam boards work well. Just be sure all materials are clean, non-toxic, and safe for food contact, especially the surfaces that will touch your produce.
I really like the sustainable aspect, but I’m concerned about the initial cost. About how much should I budget for materials if I want to build a practical solar dehydrator at home, and are there suggested ways to source affordable or recycled materials?
For a practical backyard solar dehydrator, you can expect to spend anywhere from $30 to $150 on materials, depending on the size and the quality of components you choose. To keep costs down, consider using reclaimed wood, salvaged window panes, and leftover hardware from local recycling centers or construction sites. Many builders also repurpose old screens and trays from household items. Checking local online marketplaces for free or inexpensive materials can help further reduce your expenses.
If I try drying homemade jerky or fish, are there special steps or safety considerations I should follow compared to dehydrating fruits and vegetables, especially since the article mentioned proteins?
Drying jerky or fish does require special care compared to fruits and vegetables. You should pre-cook meats or fish to a safe internal temperature before dehydrating to kill bacteria and parasites. Trim off as much fat as possible since fat can spoil. Use thin, uniform slices and marinate with salt or curing agents if recommended. Always ensure the dehydrator reaches and maintains a temperature of at least 160°F (71°C) for jerky and 145°F (63°C) for fish. Store finished products in the fridge or freezer for longer shelf life.
I live in a region with pretty high humidity in the summer. Are there modifications or maintenance tips from your guide that help ensure food actually dries out thoroughly in those conditions?
In high-humidity areas, improving airflow is key. You can add more ventilation openings or use a small solar-powered fan to keep air moving through the dehydrator. Also, choose mesh trays for better air circulation around your food. Regularly check and rotate the food to help it dry evenly, and consider dehydrating on sunnier, less humid days if possible for best results.
Could you elaborate on how to choose the right dehydrator design for a humid climate? Does the airflow setup or materials need to be different to prevent mold, or will standard box-style designs work just as well?
In humid climates, it’s important to select a dehydrator design that maximizes airflow and uses moisture-resistant materials. A box-style design can work, but make sure it has adjustable vents at both the intake and exhaust points to encourage strong air circulation. Opt for trays made of plastic or stainless steel, as wood can absorb moisture and harbor mold. Adding a small solar-powered fan can also help keep humidity low inside the dehydrator, reducing the risk of mold growth.
I’m curious about the drying times for different foods with a solar dehydrator like this. For example, how long would it usually take to dehydrate apple slices or herbs compared to using an electric dehydrator?
Drying times in a solar dehydrator can vary depending on sunlight, temperature, and humidity. Typically, apple slices take about 1 to 3 days to dry fully in a solar dehydrator, whereas herbs may take just 1 day or less. In comparison, electric dehydrators usually dry apple slices in 6 to 12 hours and herbs in 2 to 4 hours. Solar dehydrators are slower but offer an energy-saving alternative.
Can this solar dehydrator design handle larger batches, or should I plan to build a second unit if I want to dry a lot of produce at once? I usually get a big haul from my garden at the end of the season.
The solar dehydrator in the article is ideal for small to medium batches, but if you often have large garden hauls, you might find it more efficient to build a second unit or scale up the design. You could also consider adding more trays or making the drying chamber bigger, but keep in mind that good airflow and even sun exposure are important for effective drying.
I’m curious about the best way to source the materials for the solar collector mentioned in the article. Are there any specific recommendations for affordable or reclaimed materials that still perform well for building an efficient dehydrator?
For the solar collector, you can repurpose old storm windows, clear acrylic sheets, or even glass from discarded doors for the glazing layer. For the interior, flat scrap metal sheets like aluminum from old signs or baking trays work well to absorb and transfer heat. Using reclaimed wood for the frame also keeps costs down and is environmentally friendly. Just ensure all materials are clean and safe for food-related use to maintain efficiency and safety.
After assembling the solar dehydrator, what signs should I look for to know it’s maintaining the correct airflow and temperature? I want to be sure I’m actually preserving my produce safely and not risking mold or spoilage.
To make sure your solar dehydrator is working properly, watch for steady airflow coming out of the exhaust vents, which you can check by holding a strip of lightweight paper near the opening. The internal temperature should ideally stay between 120°F and 145°F, which you can monitor with a simple oven thermometer placed inside. If you notice moisture buildup, condensation, or any stale smell, airflow may be inadequate. Dried produce should feel leathery, not sticky or soft.
Could you elaborate on the best ways to source affordable or recycled materials for building the tray and drying chamber without compromising food safety?
For the trays, consider using untreated wood like pine from old pallets, making sure they’re stamped HT (heat-treated) and not chemically treated, which could be unsafe. For screening, stainless steel mesh from discarded window screens works well if thoroughly cleaned. For the drying chamber, repurpose clear glass from old windows or use food-safe plastic panels. Always avoid materials with paint, chemical residues, or signs of mold, and scrub everything before assembly to maintain food safety.
In the section about preserving different types of foods, you mention some proteins like fish or jerky can be dehydrated. Are there any specific safety guidelines or modifications needed when using a solar dehydrator for these foods compared to fruits and vegetables?
Yes, dehydrating proteins like fish or jerky does require extra care compared to fruits and vegetables. It’s important to ensure these foods reach a safe internal temperature—usually at least 160°F (71°C) for meats and 145°F (63°C) for fish—to prevent bacterial growth. Solar dehydrators may need modifications such as additional insulation, reflective surfaces, or backup heat sources to reliably achieve these temperatures. Also, pre-treating meats with marinades or curing salts can enhance safety.
If I want to dry small batches of jerky or fish, do I need to modify the basic box-style dehydrator design, or is it safe to use as-is for proteins?
When drying jerky or fish, it’s important to ensure the dehydrator reaches a high enough temperature—ideally above 160°F (71°C)—to safely dry proteins and prevent bacterial growth. The basic box-style solar dehydrator may not reliably achieve or maintain these temperatures, especially in cooler or cloudy weather. For proteins, consider adding a backup heat source like an electric fan heater or using a thermometer to monitor temperatures closely. This helps ensure food safety when drying meats or fish.
Could you clarify how the solar collector should be sized or angled to maximize efficiency in northern states where sunlight can be limited, especially during fall, as I want to get the most use out of my dehydrator?
In northern states, you’ll get the best efficiency by angling the solar collector so it’s perpendicular to the sun’s rays at midday. A good rule is to set the collector tilt equal to your latitude plus 10–15 degrees for fall use. If sunlight is very limited, consider making the collector surface larger—about 1.5 to 2 times the drying area—to capture more light and heat.
Could you share more details about how to choose between a box-style (indirect) dehydrator and other popular designs? What factors should guide that decision for different climates or food types?
Choosing between a box-style (indirect) dehydrator and other designs, like direct solar dehydrators, depends on your climate and what foods you plan to dry. Box-style dehydrators are best for humid or cooler climates because they protect food from moisture and pests. They also prevent sunlight from directly hitting delicate foods, preserving color and nutrients. Direct designs are simpler and work well in hot, dry areas but may cause discoloration in some foods. If you plan to dry herbs or fruits with sensitive flavors or colors, an indirect model is ideal.
If I start this dehydrator project on a weekend, how much time should I realistically set aside for the full build and initial testing? Are there steps that typically take longer than expected for beginners?
For most beginners, setting aside a full weekend—about 10 to 12 hours over two days—should be sufficient to complete the build and do some initial testing. Cutting and assembling the frame and fitting the trays tend to take longer, especially if you’re new to using tools or working with wood. Allow extra time for any glue or paint to dry if you include those steps. Testing the dehydrator can be done the same day you finish assembling, but plan for an additional hour or two to monitor its performance with your first batch.
After building the dehydrator, what kind of ongoing maintenance is actually necessary to keep it running safely and effectively year-round, especially if it’s exposed to the elements?
To keep your solar dehydrator functioning well year-round, regularly check for and remove any debris or dust from the vents and screens. Inspect for rust, mold, or insect nests, and clean or repair as needed. Make sure all seals remain intact to prevent water intrusion, and reapply weatherproof coatings annually if your dehydrator uses wood. Tighten any loose bolts or fasteners and ensure the glass or plastic cover stays clear for optimal sunlight absorption.
Can you give a rough estimate of the total cost for building a basic but efficient solar dehydrator using commonly available materials? I want to keep this affordable, so knowing about any budget-friendly alternatives for the main parts would help me plan.
A basic but efficient solar dehydrator can typically be built for $40 to $100, depending on the size and materials you choose. Plywood or reclaimed wood for the frame, old window glass or clear plastic for the cover, and inexpensive mesh or repurposed oven racks for trays are budget-friendly options. Using salvaged or leftover materials from other projects can bring costs down further while still ensuring good performance.
Can you clarify the maintenance involved in keeping a backyard solar dehydrator running efficiently? For example, do the trays or vents require routine cleaning, or are there issues with pests trying to access the food during the drying process?
Maintaining your backyard solar dehydrator is quite simple but important for efficiency and food safety. Yes, trays and vents should be cleaned regularly to prevent mold and food residue build-up—usually after each use. It’s also wise to check for and remove any debris or dust inside. To keep pests out, inspect the mesh screens for any holes and make sure all access points are sealed well before each use.
In your guide, do you address how well solar dehydration works for proteins like fish or jerky compared to fruits and vegetables, and are there any extra precautions for food safety when drying proteins?
The guide mainly focuses on dehydrating fruits and vegetables, where solar methods are safest and most effective. Drying proteins like fish or jerky requires extra caution because they’re more prone to spoilage and foodborne illness if not dried thoroughly and quickly. For proteins, it’s important to ensure higher temperatures, pre-cook meats when possible, and use additional food safety measures. If you plan to dry proteins, consider using a solar dehydrator design that consistently reaches higher internal temperatures and always follow recommended food safety guidelines.
If the dehydrator isn’t drying food evenly or seems to be running cooler than expected, what troubleshooting steps would you recommend to improve airflow or heat retention?
To improve uneven drying or low temperatures in your solar dehydrator, first check that the trays aren’t overcrowded and food pieces are spaced out for good airflow. Make sure intake and exhaust vents are clear and not blocked. If it’s cooler than expected, consider sealing gaps in the frame to prevent heat loss, using darker interior surfaces to absorb more sunlight, or repositioning the dehydrator to maximize sun exposure during the day.
For someone on a tight budget, are there ways to repurpose household items or scavenged materials when building a solar dehydrator, without sacrificing efficiency or food safety?
Absolutely, you can build an efficient solar dehydrator using items like old picture frames or window panes for the glazing, and wooden pallets or crates for the frame. Food-grade mesh, such as clean window screens (not fiberglass), works well for trays. Just make sure all materials touching food are non-toxic, easy to clean, and free from paint or chemicals. Repurposing materials is both budget-friendly and effective if you pay attention to cleanliness and safety.
After building and starting to use a solar dehydrator, how long does it typically take to fully dry batches of produce? Does drying time vary a lot based on the design or is it mostly dependent on the types of food and sun exposure?
Drying time for produce in a solar dehydrator usually ranges from one to three days. The specific time depends mostly on the type and thickness of the food, as well as the amount of sunlight and outdoor humidity. While dehydrator design can have some effect, factors like sun exposure and the kind of produce you’re drying play a much bigger role in how quickly things finish.
If someone is new to DIY projects, are there any common mistakes to watch out for during assembly, especially regarding airflow or insulation, to make sure the dehydrator works efficiently?
When assembling your solar dehydrator, two common beginner mistakes are blocking airflow and using too little or too much insulation. Make sure the intake and exhaust vents are not obstructed, as proper airflow is key for even drying. For insulation, use enough to keep heat in, but avoid sealing the box too tightly—there still needs to be a path for warm air to escape. Measure and double-check vent placements before final assembly.
When sourcing materials for the solar collector part, is it worth investing in tempered glass versus using repurposed old windows? Have you noticed a big difference in heat retention and overall drying speed?
Tempered glass is more durable and safer, especially if your dehydrator will be exposed to children or pets, and it generally retains heat a bit better due to its thickness and sealing properties. However, using old window glass is a cost-effective option and can work well if it’s intact and seals tightly. You might see slightly faster drying with tempered glass, but many users find old windows adequate for small to medium batches.
You mention that solar dehydrators can be used for some proteins like fish or jerky. Are there special steps or modifications needed in the dehydrator setup to safely handle meats, and how do you monitor for food safety?
When dehydrating meats like jerky or fish, it’s important to ensure your solar dehydrator reaches and maintains higher temperatures—ideally above 160°F. Using a food thermometer helps monitor this. You might need to add extra insulation or reflectors to boost heat, and pre-cooking meats to an internal temperature of at least 160°F before dehydrating is recommended for safety. Always slice meats thinly and use clean equipment to minimize contamination risks.