Introduction: Why Solar Water Pasteurization Belongs in Every Sustainable Home
Access to clean, safe drinking water is a fundamental aspect of sustainable living. While many households rely on municipal supplies, off-grid homes, cabins, and communities in water-stressed regions often require reliable, low-energy solutions for water purification. Solar water pasteurization is a simple yet effective method of making water safe to drink, using only the power of the sun. Unlike boiling, which requires water to reach 100°C (212°F), pasteurization only needs to heat water to about 65°C (149°F) for a sufficient period to deactivate pathogens. This makes it much more energy efficient and perfectly suited for solar heating. In this comprehensive guide, we’ll walk you through the process of installing a home-scale solar water pasteurization system. We’ll cover everything from selecting the right collector and storage, to monitoring temperatures, maintenance practices, safety considerations, and maximizing efficiency year-round. Whether you’re looking to supplement your current water system, create a resilient emergency backup, or take another step toward self-sufficiency, this guide will provide the technical know-how and practical tips you need to set up a robust, reliable solar water pasteurization system at home.
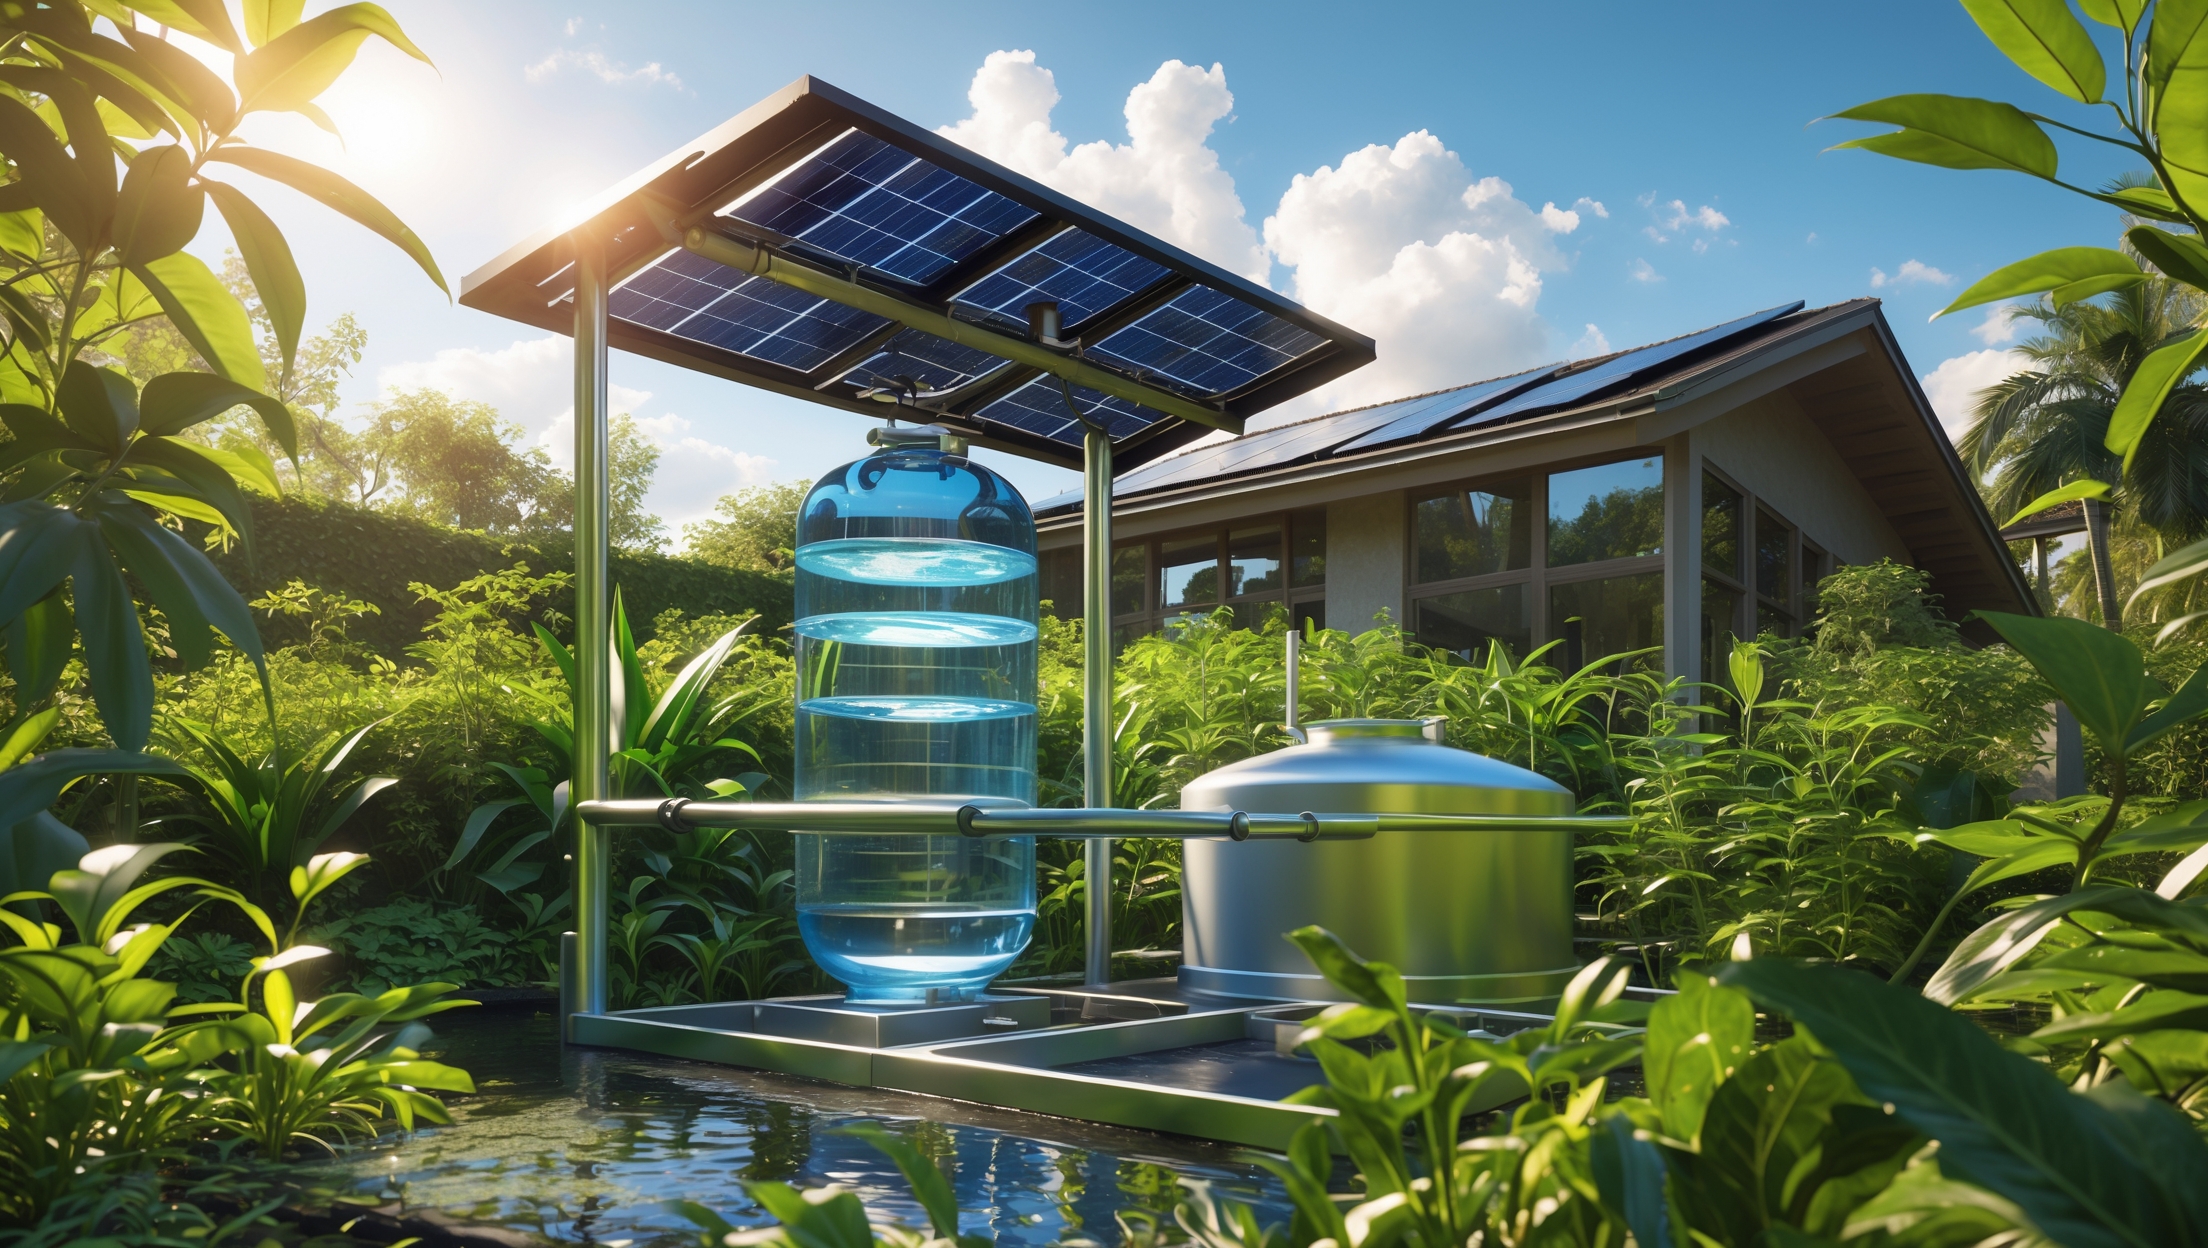
How Solar Water Pasteurization Works
The Science Behind Pasteurization
Solar water pasteurization leverages the principle that most waterborne pathogens are killed at temperatures well below boiling. Heating water to at least 65°C (149°F) for 20 minutes is sufficient to deactivate bacteria, viruses, and protozoa. This is significantly less energy-intensive than boiling, making solar methods viable even in areas with modest sunlight.
Key Components of a Solar Pasteurization System
- Solar Collector: Captures and concentrates sunlight to heat water. Can be flat-plate, evacuated tube, or parabolic trough designs.
- Pasteurization Chamber: Where water is held as it is heated, often integrated with the collector.
- Temperature Indicator: Ensures water reaches pasteurization temperature; can be a simple wax-based indicator or digital sensor.
- Storage Tank: Holds pasteurized water until use.
- Filtration Pre-Treatment: Removes particulates to improve clarity and efficiency (sediment filter or cloth filter recommended).
Planning Your Home-Scale Solar Pasteurization System
Site Assessment and Sizing
Begin by evaluating your daily water needs. For drinking and cooking, allow at least 3–5 liters per person per day. Next, assess your available sunlight. South-facing roofs or open yards with minimal shading are ideal. Measure available space for the collector and storage tank. Ensure accessibility for maintenance and refilling.
System Sizing Example
- For a family of 4: 20 liters/day is a practical target.
- Collector area: Around 1.5–2 m² of flat-plate collector or equivalent evacuated tubes for this volume in most temperate climates.
- Storage: At least 25–30 liters, allowing for pasteurization and storage.
Permits and Compliance
Check local building codes before installation, especially if mounting collectors on your roof or connecting to your home’s plumbing. Some areas may require permits for structural changes or water system modifications. If you plan to use the pasteurized water in your home’s plumbing, backflow prevention devices may be required by code.
Choosing Your Solar Collector and Pasteurization Method
Flat-Plate Collectors
Flat-plate solar collectors are affordable and widely available. They consist of an insulated, glazed panel that absorbs sunlight and transfers heat to water flowing through pipes. Suitable for moderate climates and household-scale systems.
Evacuated Tube Collectors
Evacuated tube collectors are more efficient in colder climates and on cloudy days. They use glass tubes with a vacuum layer for superior insulation, allowing higher water temperatures and faster pasteurization.
Batch (Integrated Storage) Heaters
Batch heaters combine the collector and storage tank into one insulated container. Simple and robust, but can be heavy and require careful support if roof-mounted. Suitable for smaller systems or climates with high solar gain.
DIY Parabolic Troughs
For those seeking higher efficiency, parabolic troughs focus sunlight onto a pipe, rapidly heating water. They require careful alignment and safety precautions but can pasteurize water quickly even in winter.
Safety Note: Materials Matter
Use only food-grade, UV-resistant materials for all water-contacting parts. Stainless steel, copper, or certified potable water-grade plastics are recommended. Avoid PVC or metals that may leach contaminants when heated.
Step-by-Step Setup: Installing Your Solar Water Pasteurization System
1. Assemble Materials and Tools
- Solar collector (flat-plate or evacuated tube, sized per your needs)
- Insulated storage tank (food-grade, 30+ liters)
- Temperature indicator (solar water pasteurization indicator, digital thermometer, or wax-strip indicator)
- Pre-filter (sediment filter or clean cloth)
- Food-grade piping and fittings (PEX, copper, or stainless steel)
- Check valves and backflow preventer (if connecting to pressurized plumbing)
- Mounting hardware (roof or ground frame, concrete anchors if needed)
- Basic hand tools (wrenches, screwdrivers, pipe cutter, drill)
- Optional pump (for non-gravity-fed systems or large installations)
2. Prepare the Site
Choose a location with unobstructed southern exposure (northern hemisphere) or northern (southern hemisphere). Ensure the collector is tilted at an angle equal to your latitude for optimal year-round performance. Secure the mounting frame to the roof or ground, ensuring stability in wind and weather.
3. Install the Collector
- Lift the collector into place and secure it to the frame.
- Connect inlet and outlet pipes, using Teflon tape or food-grade sealant for leak-free joints.
- Install insulation on all exposed piping to minimize heat loss.
4. Install Pre-Filtration
- Attach a sediment filter or cloth pre-filter at the system’s water source.
- This step improves water clarity and system efficiency by preventing scale buildup and fouling inside collector pipes.
5. Connect Storage Tank
- Position the insulated storage tank so that gravity can feed water back to your home or point of use, or use a small pump if necessary.
- Install a food-grade float valve to prevent overflow.
- Add a spigot for easy filling of bottles or jugs.
6. Install Temperature Indicator
- Place a solar water pasteurization indicator (often a wax-based device that changes position when pasteurization temperature is reached) inside the collector’s outlet or storage tank.
- Alternatively, use a digital probe thermometer for real-time monitoring.
7. Leak and Pressure Testing
- Fill the system with clean water.
- Check all joints and fittings for leaks.
- Test the pressure if connecting to a pumped source.
8. Commission the System
- Allow water to circulate in full sun for several hours.
- Verify that the temperature indicator or thermometer registers at least 65°C (149°F) for 20 minutes before transferring water to the storage tank.
- If using a batch system, wait for the indicator to confirm pasteurization before use.
Maximizing Efficiency and Output
Insulation and Heat Retention
Insulate all pipes and the storage tank to reduce heat loss. Use UV-resistant foam or fiberglass pipe wrap designed for high temperatures. For batch systems, use reflective insulation around the tank’s exterior to trap additional heat.
Seasonal Adjustments
- In winter, increase collector tilt by 10–15° to capture lower-angle sunlight.
- In summer, reduce tilt to minimize overheating and maximize daily output.
- Monitor for potential freezing in collector pipes. Drain or use freeze-resistant piping in cold climates.
Water Quality Considerations
Solar pasteurization will not remove chemical contaminants, heavy metals, or salts. Always start with the cleanest available source. Consider pre-treatment (activated carbon, ceramic filters) if your source water contains chemical pollutants.
Operation and Maintenance Best Practices
Daily Operation Checklist
- Check water levels in the collector and storage tank.
- Verify temperature indicator is functioning.
- Clean pre-filters as needed.
- Inspect for leaks, especially after freeze/thaw cycles or storms.
Weekly and Monthly Maintenance
- Flush collector and pipes to remove sediment and biofilm buildup.
- Wipe down collector glass to maximize solar gain.
- Check insulation for damage or degradation.
Annual System Review
- Disinfect storage tank with a dilute chlorine solution and rinse thoroughly.
- Replace worn gaskets and seals.
- Test water quality periodically for peace of mind.
Troubleshooting Common Issues
- Water not reaching pasteurization temperature: Check for collector shading, clean collector surfaces, and inspect for insulation gaps.
- Slow output: Increase collector area, improve insulation, or reduce daily water load.
- Biofilm or algae in tank: Reduce light exposure to the tank, increase cleaning frequency, and ensure pasteurization is complete before storage.
Safety Considerations
System Safety
- Always use food-grade materials for all water-contact surfaces.
- Protect glass collectors from accidental breakage, especially in homes with children or pets.
- Install backflow preventers if connecting to household plumbing to prevent contamination of potable water lines.
- Label all pasteurized water storage clearly to avoid confusion with non-pasteurized water.
Health and Water Testing
- Test water for bacteria and contaminants at least twice per year, especially after major system modifications.
- Consider test strips for coliform bacteria as a quick check.
- Never use the system for water containing hazardous chemicals, heavy metals, or industrial pollutants.
Integrating Solar Pasteurization with Other Sustainable Systems
Solar water pasteurization can complement rainwater harvesting, greywater recycling, and off-grid renewable energy systems. Use pasteurized water for drinking, cooking, and brushing teeth, while untreated rainwater can supply irrigation and toilet flushing. For maximum resilience, combine solar pasteurization with filtration and regular water quality monitoring. In emergencies, solar pasteurization provides a reliable backup when power is unavailable or conventional filters run out.
Conclusion: Empowering Sustainable Living with Solar Pasteurization
Installing a home-scale solar water pasteurization system is a practical, empowering step for anyone pursuing sustainable, resilient living. By harnessing the sun’s energy, you ensure a continuous supply of safe drinking water with minimal ongoing costs and environmental impact. This guide has outlined the key design choices, step-by-step setup, and maintenance practices that will help you build a reliable, efficient system tailored to your household’s needs. Remember, water quality and safety are paramount—always use the cleanest source water possible and monitor your system’s performance regularly. As you integrate solar pasteurization into your home, you not only reduce reliance on nonrenewable energy and municipal infrastructure but also increase your household’s preparedness for emergencies and environmental challenges. With careful planning and consistent maintenance, your solar pasteurization system will provide peace of mind and a tangible contribution to a greener, more self-sufficient future. Start small, learn through hands-on experience, and share your knowledge with neighbors and community members—together, decentralized water solutions can become a vital pillar of truly sustainable living.


I run a small campground and I’m interested in using a solar pasteurization setup for our off-grid cabins. In your experience, is there a particular type of solar collector (flat-plate, evacuated tube, or parabolic trough) that works best for areas with frequent cloudy days?
For areas with frequent cloudy days, evacuated tube collectors are usually the best choice. They’re more efficient at capturing and retaining heat in diffuse sunlight compared to flat-plate or parabolic trough designs. This makes them particularly effective in less sunny conditions, which should help keep your water pasteurization system running reliably at your campground.
The article says you only need to heat water to 65°C for pasteurization. How do you accurately monitor and control the temperature in a home setup without expensive equipment? Is there a recommended thermometer or fail-safe method to make sure water isn’t under-heated?
To ensure your water reaches at least 65°C for pasteurization, you can use an affordable food-grade thermometer, which is widely available at kitchen supply stores. Many models are reliable and cost-effective. For a low-tech solution, Water Pasteurization Indicators (WAPIs) are simple devices that show when water has reached the safe temperature. Whichever method you choose, make sure to test at the center of the water volume to avoid under-heating.
Could you elaborate on how to accurately monitor and maintain the necessary temperature of at least 65°C for the required 20 minutes? Are there specific types of thermometers or timer setups you recommend for home-scale solar pasteurization systems?
To accurately monitor the temperature, use a waterproof digital thermometer with a clear display and a probe you can secure inside the water container. Make sure it’s rated for temperatures up to at least 100°C. For timing, a simple kitchen timer or a digital timer with an alarm works well. Start timing when the water first reaches 65°C and only consider the pasteurization complete after a continuous 20 minutes at or above that temperature. Regularly check both the thermometer and timer during the process.
Can this pasteurization setup work reliably in northern US states where sunlight and outdoor temperatures can be inconsistent, especially in winter? If not, are there design tweaks to improve efficiency in colder climates?
This pasteurization system can work in northern US states, but its performance may decline during winter or on cloudy days due to reduced sunlight and lower ambient temperatures. To improve efficiency in colder climates, consider using additional insulation around the water container, incorporating a tracking mechanism for the solar collector to follow the sun, or using evacuated tube collectors, which are better at retaining heat. You might also preheat the water indoors or use a backup heating source for days with minimal sunlight.