Introduction: Breathing New Life into Old Walls
Historic homes often charm us with intricate woodwork, tall windows, and solid craftsmanship. Yet, these architectural treasures were built long before the era of energy efficiency, often relying on drafty walls, outdated heating systems, and single-pane windows. Renovating such a home for modern sustainability is daunting, especially when aiming to preserve its character. This case study follows the transformative journey of a 1912 brick house in the Midwest, where the homeowners set out to merge the past and the future. Their mission: retrofit the property with a ground-source heat pump (GSHP) system and integrate smart energy controls—without compromising historical integrity. We’ll walk through the planning, technical hurdles, regulatory navigation, installation process, and real-world performance. If you own or love old homes and want practical insights into making them green, this detailed account will help you avoid pitfalls, budget wisely, and understand what sustainable living really means in a heritage setting.
The Starting Point: Assessing the Historic Home’s Needs
Understanding the Building Envelope
The house in question, built in 1912, featured double-brick walls, original wooden windows, and minimal insulation—common traits in pre-war construction. Initial energy audits revealed significant heat loss through the attic, uninsulated basement, and leaky windows. Existing heating was provided by a 40-year-old gas boiler with cast-iron radiators, while cooling came from noisy window AC units. The electric panel was outdated, and wiring had been piecemealed over decades. The homeowners’ goals were clear: reduce fossil fuel use, lower operating costs, and improve comfort—all while maintaining the home’s historical appearance inside and out.
Evaluating Site Constraints
- Lot Size: The urban lot measured 60×120 feet, with mature trees and established landscaping.
- Heritage Protections: Local ordinances restricted exterior changes, particularly visible mechanical equipment and major landscape disruption.
- Soil and Subsurface: Geotechnical surveys showed a mix of clay and sandy loam, suitable for vertical boreholes but not horizontal trenches.
Planning the Retrofit: Design Decisions and Budgeting
System Selection: Why Ground-Source Heat Pumps?
After evaluating air-source heat pumps, biomass boilers, and solar thermal options, ground-source heat pumps emerged as the optimal solution. GSHPs offer both heating and cooling, excel in cold climates, and operate quietly. The ability to run the system on renewable electricity further reduced the home’s carbon footprint.
Designing the GSHP System
- Capacity Calculation: Manual J load calculations determined a peak heating load of 60,000 BTU/hr and cooling load of 36,000 BTU/hr.
- Borehole Field: Due to tight lot lines and tree roots, engineers specified three vertical boreholes, each 200 feet deep, drilled in the backyard away from mature trees.
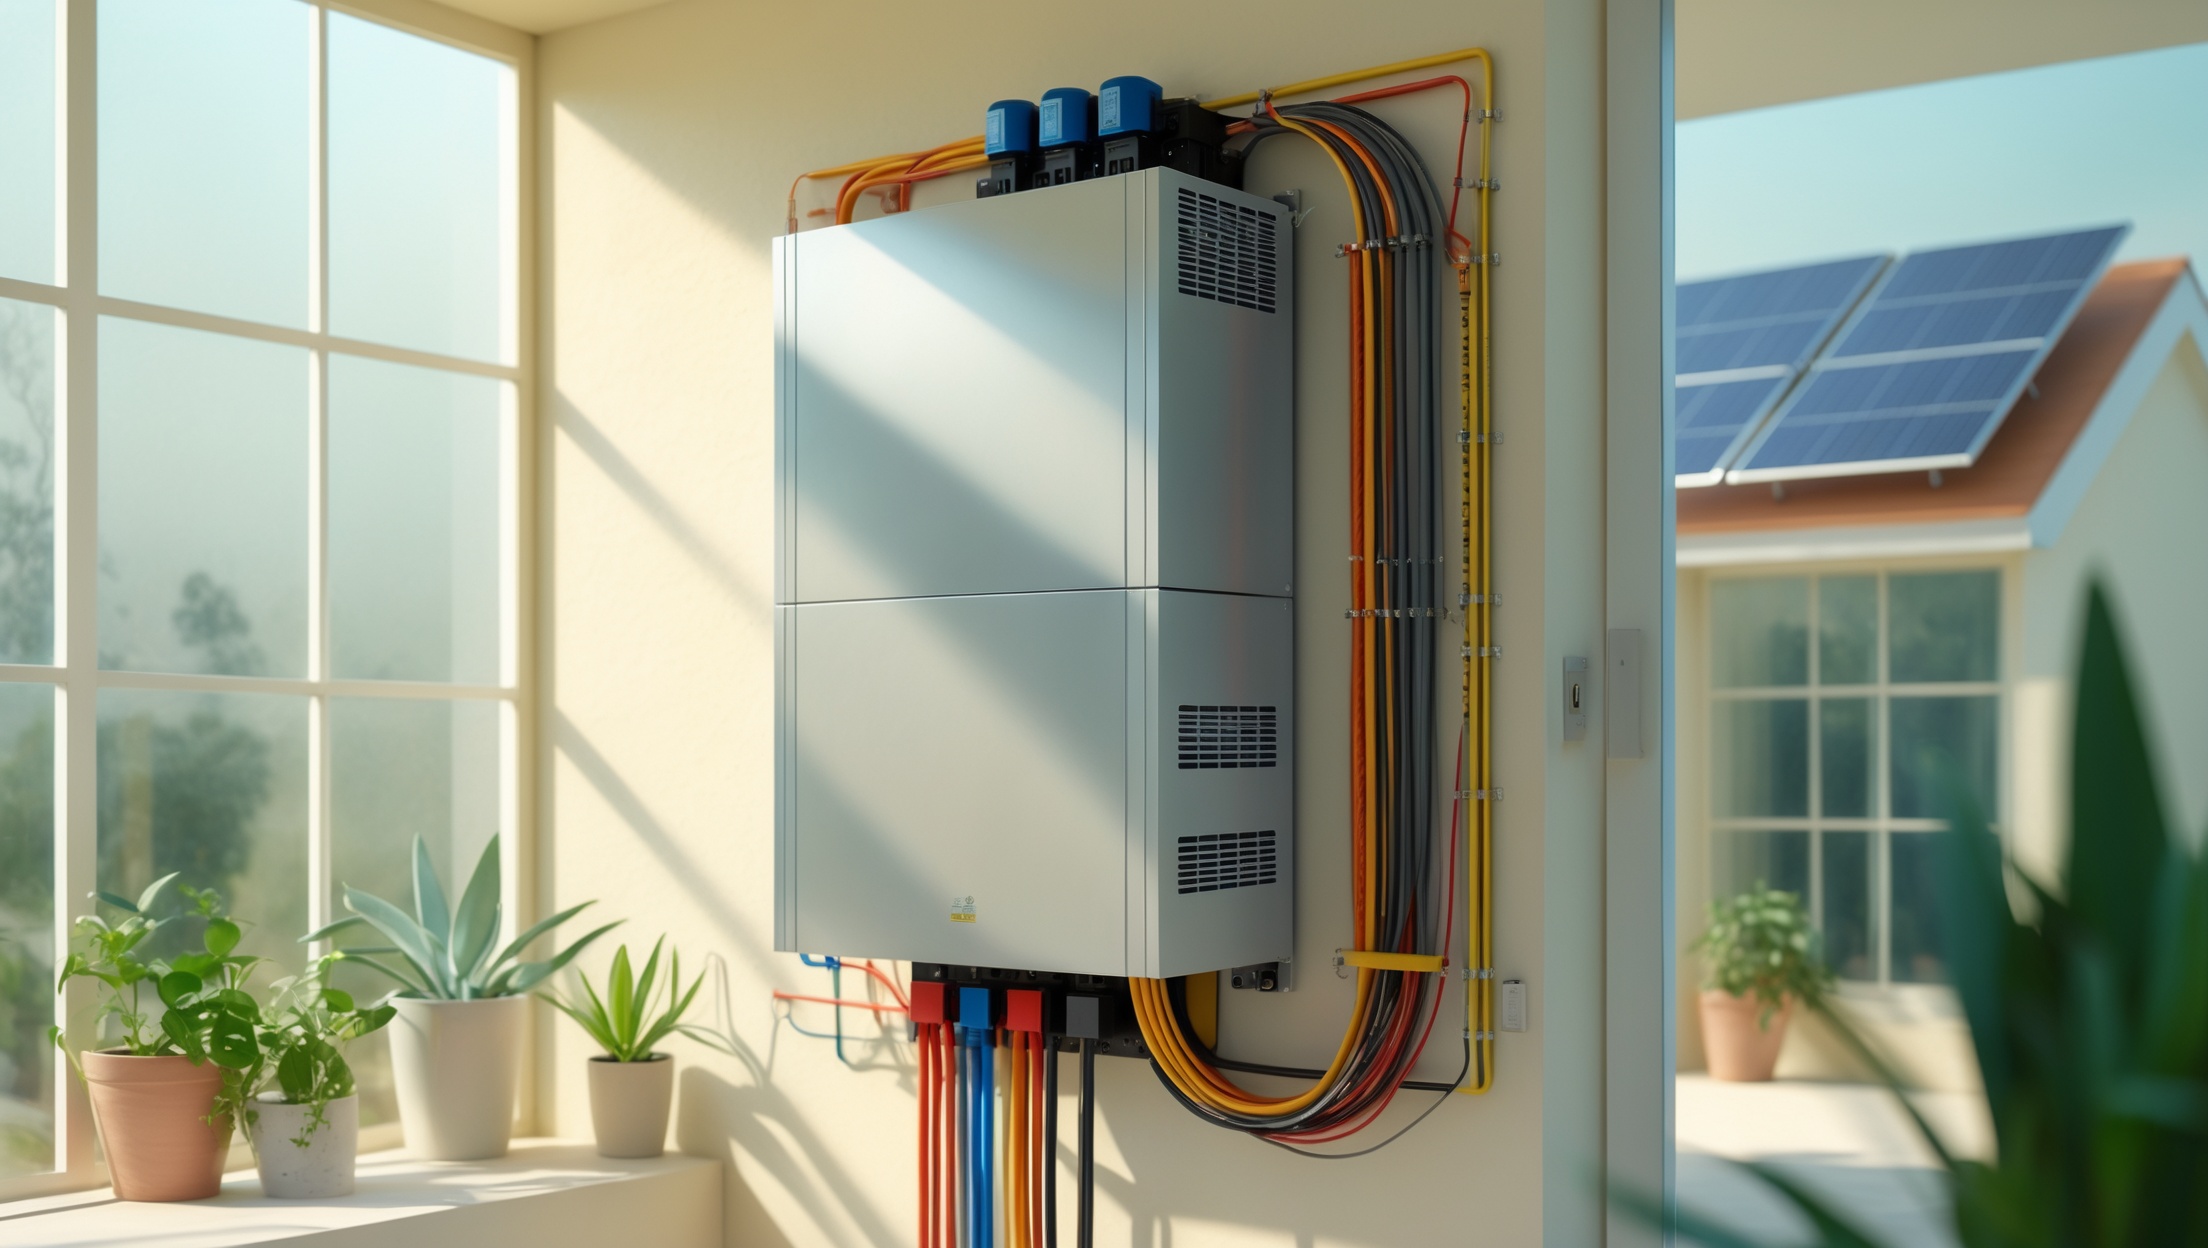
- Indoor Equipment: A compact water-to-water GSHP unit was selected for basement installation. The existing radiator system was adapted for low-temperature operation.
- Smart Controls: Wireless thermostats, occupancy sensors, and a central home energy management system (HEMS) were planned to optimize comfort and efficiency.
Budget Breakdown
- Engineering & Permitting: $8,500
- Borehole Drilling: $26,000
- GSHP Equipment: $18,000
- Electrical Upgrades: $7,000
- Smart Controls & HEMS: $4,500
- Radiator Adaptation: $3,200
- Contingency & Landscaping Repair: $6,000
- Total Project Cost: $73,200
The homeowners qualified for a 26% federal tax credit on the GSHP portion, plus local utility rebates totaling $4,000, reducing net cost to approximately $49,000.
Compliance, Permits, and Heritage Considerations
Navigating Local Regulations
Installing a GSHP in a historic district required careful coordination with the city’s preservation commission. Key steps included:
- Submitting detailed engineering drawings and site plans showing borehole locations, equipment placement, and preservation of original features.
- Obtaining a Certificate of Appropriateness for exterior work, with assurances that drilling would not impact visible landscaping or mature trees.
- Securing drilling permits and environmental clearance (well logs, groundwater protection measures).
Weekly meetings with the historic review board and public notification helped avoid last-minute objections and ensured compliance with all local and state codes.
Preserving the Home’s Character
- All exterior equipment (GSHP unit, manifolds) was located in the basement or in a small, ventilated enclosure at the rear, painted to match the brick.
- Drilling rigs entered through a narrow alley, minimizing disturbance to front and side yards.
- Original radiators and decorative grilles were retained, with new pipework concealed behind baseboards.
- Smart thermostats were chosen for their vintage-style faceplates, blending into the historic interior.
Installation: Step-by-Step Process
1. Pre-Drilling Preparation
- Tree protection fencing installed around critical root zones.
- Utility lines (gas, water, sewer, electric) marked and mapped using ground-penetrating radar.
- Temporary access mats laid to avoid compacting soil and damaging landscaping.
2. Borehole Drilling and Loop Installation
- Three 200-foot vertical boreholes drilled with rotary rigs, spaced 15 feet apart.
- High-density polyethylene (HDPE) U-bend loops installed in each borehole and pressure-tested for leaks.
- Boreholes grouted with bentonite to protect groundwater and maximize thermal transfer.
- Header piping trenched back to the foundation, routed discreetly beneath shrubs.
3. Mechanical Room Retrofits
- Old gas boiler removed and recycled.
- GSHP unit craned into the basement, mounted on vibration-isolating pads.
- New circulation pumps and buffer tank installed.
- Original cast-iron radiators flushed and fitted with thermostatic radiator valves (TRVs) for room-by-room control.
4. Smart Energy Controls Integration
- Wireless thermostats installed in main living spaces and bedrooms.
- Occupancy sensors placed in hallways and common areas.
- Energy management hub connected to Wi-Fi, enabling remote monitoring and control via smartphone app.
- Weather compensation algorithms set up to adjust heating curves based on outdoor temperature readings.
5. Restoration and Landscaping
- Borehole access areas backfilled and re-seeded with native grasses.
- Damaged shrubbery replaced; tree health inspected by a certified arborist.
- Temporary fencing removed; all visible signs of construction erased within four weeks of project completion.
Performance Results: Before and After
Comfort and Air Quality
The GSHP system provided steady, even heating throughout the home. Gone were the drafts, cold spots, and fluctuating temperatures common with the old boiler and window ACs. Humidity levels improved, and indoor air quality benefited from reduced combustion byproducts.
Energy Efficiency and Operating Costs
Over the first year of operation, the homeowners tracked energy use meticulously:
- Heating energy use dropped by 65%.
- Total gas consumption eliminated.
- Electricity consumption rose by 24% (due to GSHP operation), but overall utility bills decreased by 42% compared to prior years.
- Smart controls reduced unnecessary heating/cooling by learning occupancy patterns and adjusting setpoints accordingly.
The GSHP system’s Coefficient of Performance (COP) averaged 4.0 over the heating season, exceeding manufacturer specs.
Environmental Impact
- Annual carbon emissions dropped by 10.6 metric tons (based on avoided natural gas use and local grid emissions factors).
- Noise pollution reduced—no more clanking radiators or humming window units.
- Native landscaping restored, supporting local biodiversity.
Lessons Learned: Challenges and Solutions
Unexpected Obstacles
- Subsurface Surprises: Old brick and stone footings extended farther than mapped, requiring hand-dug trenches for some pipe runs.
- Electrical Issues: Hidden knob-and-tube wiring was uncovered during the panel upgrade, necessitating additional rewiring for safety and code compliance.
- Historic Board Concerns: Late-stage questions about vent placement delayed the final sign-off, highlighting the need for ongoing communication with officials.
- Weather Delays: An unusually wet spring slowed drilling and site restoration.
Key Solutions and Best Practices
- Engage a GSHP installer with proven historic retrofit experience.
- Involve the local historic preservation board early and maintain regular updates throughout the project.
- Expect the unexpected: build at least a 10% contingency into your budget for hidden conditions and weather delays.
- Use non-invasive installation techniques—hand digging, temporary matting—to protect root zones and landscaping.
- Choose smart controls that are compatible with both modern and legacy heating systems, and test them thoroughly before commissioning.
- Document all changes for future owners and for compliance with heritage requirements.
Maintenance and Upkeep: Keeping the System Running Smoothly
Routine Maintenance Tasks
- Annual inspection of the GSHP unit, pumps, and buffer tank by a certified technician.
- Flushing and balancing of radiator circuits every two years.
- Checking and updating smart control firmware as needed.
- Visual inspection of borehole covers and outdoor piping each spring and fall.
Maintenance costs have averaged $350 per year—substantially less than the old boiler’s annual repairs and fuel servicing.
Troubleshooting Tips
- If a room feels too cold, check TRV settings and occupancy sensor placement.
- Monitor GSHP system pressure regularly; drops may indicate a minor leak in the closed loop.
- Keep software and firmware for smart controls up to date to ensure optimal performance and security.
- Maintain records of all maintenance and repairs for warranty and insurance purposes.
Conclusion: A Blueprint for Sustainable Heritage Living
This case study demonstrates that retrofitting a historic home with ground-source heat pumps and smart energy controls is not only feasible—it’s transformative. The project required careful planning, close collaboration with heritage authorities, and a willingness to tackle unforeseen challenges. Yet, the rewards have been profound: drastically reduced energy bills, a smaller carbon footprint, year-round comfort, and the preservation of a beloved piece of architectural history.
For homeowners considering a similar journey, the keys to success are clear. Start with a thorough energy audit and involve experienced professionals at every stage. Budget realistically, including a generous contingency for the unknowns that come with older buildings. Engage local authorities and neighbors early to build support and head off concerns. Most importantly, embrace technologies—like GSHPs and smart controls—that respect the past while delivering 21st-century performance.
Old homes don’t have to be energy hogs. With thoughtful planning and the right technology, they can be models of sustainable living and inspiration for future generations. The fusion of heritage and innovation is not just possible—it’s the future of green building.

Did you run into any resistance from your local heritage committee when planning to install the ground-source heat pump? I’m curious how you balanced compliance with historical protection rules and still managed to upgrade all the systems.
We did have to work closely with the local heritage committee during the planning stage. They were mainly concerned about preserving the exterior appearance and minimizing any visible changes. We addressed this by routing all new piping underground and choosing discreet locations for any visible components. Clear communication and providing detailed plans really helped ease their concerns and ensured we stayed compliant with historical protection rules while still modernizing the home’s systems.
I’m interested in the budgeting aspect for a retrofit like this. Could you provide some ballpark figures on installation and unexpected expenses you encountered during the process?
For a retrofit like the one described, installing ground-source heat pumps in a historic home typically costs between $20,000 and $40,000, depending on system size and site complexity. Unexpected expenses can include drilling challenges, electrical upgrades, or structural modifications, which might add 10–20% to the initial estimate. Budgeting for contingency—around 15% extra—is wise to cover surprises encountered during older home renovations.
After completing the retrofit, how long did it take for the improvements in comfort and energy savings to become noticeable, and were there any unexpected performance issues in the first few months?
Improvements in comfort and energy savings were noticeable almost immediately after the retrofit was completed. The ground-source heat pumps provided more consistent indoor temperatures, and energy usage dropped within the first billing cycle. There were no major unexpected performance issues during the initial months, though some minor adjustments were needed to optimize the smart energy controls for maximum efficiency.
Given the local heritage protections mentioned, how did you navigate any restrictions when updating windows or adding insulation without affecting the original appearance? Were there specific materials or techniques that balanced energy efficiency and historical accuracy?
We worked closely with heritage consultants to ensure all upgrades respected the original character of the home. For windows, we used custom-made units that replicated the original frames but incorporated double glazing for efficiency. When adding insulation, we opted for internal wall solutions so the exterior facade remained untouched. All materials were chosen for their compatibility with historic structures, maintaining both energy performance and visual authenticity.
Since the urban lot had mature trees and limited space, was horizontal or vertical drilling used for the GSHP loops? Any advice for homeowners with tight lots who want to avoid damaging established landscaping like you did?
In this project, vertical drilling was used for the ground-source heat pump loops, which helped minimize disruption to the existing mature trees and landscaping. For homeowners with limited space or valuable plantings, vertical boreholes are typically less invasive than horizontal trenches. It’s also helpful to work with experienced installers who can plan carefully around roots and use protective matting for equipment to further safeguard your landscaping.
Could you share what the biggest unexpected technical hurdle was during the retrofit, especially given the outdated wiring and panel? I’m worried about hidden electrical problems in my own historic home.
One of the biggest technical hurdles was indeed dealing with the outdated wiring and electrical panel. The existing wiring couldn’t safely handle the load of the new heat pump systems and smart controls, so a significant panel upgrade and some rewiring were needed. During the process, they also discovered some unsafe legacy wiring that had to be replaced. If you’re considering a retrofit, budgeting for a thorough electrical assessment and possible upgrades is wise to avoid surprises.
For someone just starting to research more sustainable heating options for an older home, what would you recommend as the very first step based on your experience—energy audit, insulation upgrade, or getting quotes for a heat pump?
Based on the article, the very first step should be to schedule a professional energy audit. This will give you a clear understanding of your home’s current efficiency, highlight areas where heat is lost, and help prioritize improvements like insulation or new heating systems. An audit ensures that any investment in systems such as a heat pump will be as effective and cost-efficient as possible.
I’m curious how long the retrofit and installation process took from start to finish. Was it something that disrupted the daily routine for weeks or months, especially with an older home and family living there?
The retrofit and installation process took about eight weeks from start to finish. While there were some disruptions, especially during drilling and equipment installation, the team worked in phases to minimize the impact. The family was able to stay in the home, though certain areas were occasionally off-limits. Most routines continued with minor adjustments, rather than major upheaval.
How long did the installation process for the ground-source heat pump and smart controls actually take from start to finish, and were there any surprises or setbacks unique to working in a 1912 brick home?
The installation process for the ground-source heat pump and smart energy controls took about six weeks from start to finish. One unique challenge was running piping and wiring through the thick, solid brick walls of the 1912 home, which required specialized drilling and sometimes slowed progress. Additionally, the team discovered unexpected old wiring that needed to be updated to meet current safety codes, adding a few extra days to the project timeline.
How long did the whole process from initial assessment to installation and final tuning of the new systems take? I’m trying to get a sense of the timeline if I start a similar renovation in my own historic home.
The entire process, from the initial assessment to the installation and final tuning of the ground-source heat pumps and smart energy controls, took about five months in the case study. This included evaluating the existing systems, designing the new setup, carrying out the installation, and making adjustments to ensure everything was running efficiently. Keep in mind that timelines can vary depending on your home’s condition and the complexity of the upgrades.
Since the home had double-brick walls and minimal insulation, did you encounter any challenges with integrating the smart energy controls into such an old electrical system? How much updating was needed before installation could even begin?
Integrating smart energy controls in a historic home with double-brick walls and minimal insulation did present some challenges. The original electrical system required significant updating to support modern controls and ensure safety. This included rewiring key areas, upgrading the main panel, and adding dedicated circuits for the heat pump and smart devices. These updates were completed before installing any new equipment, making the integration both safe and efficient.
Did the homeowners consider alternatives to ground-source heat pumps, like air-source systems, given the lot size and mature landscaping? If so, what factors tipped the decision in favor of GSHP despite the extra installation challenges?
The homeowners did evaluate alternatives such as air-source heat pumps. However, they ultimately chose ground-source heat pumps because of their higher efficiency, lower long-term operating costs, and better year-round performance, especially in the local climate. While the mature landscaping and limited lot size made installation more complex, the benefits in comfort and energy savings outweighed these challenges for them.
How did you navigate local heritage protections when making changes to things like windows or insulation? I’d love to know what worked for you in terms of blending efficiency upgrades with keeping the historic appearance.
Balancing efficiency upgrades with heritage protections meant working closely with local preservation officers throughout the project. For windows, we used secondary glazing inside the existing frames and restored any original features instead of replacing them. When insulating, we opted for internal wall insulation so the exterior remained untouched. These solutions kept the historic character visible while still improving energy performance.
For someone considering something similar, how long did the entire installation process take, from planning to completed smart energy controls? Was there significant disruption to the living spaces during the retrofit?
The whole process, from initial planning to having the ground-source heat pumps and smart energy controls fully operational, took about three months. Most disruption happened during the installation of the ground loops, which affected the yard and required some access to interior spaces. Inside the home, the retrofit was kept as tidy as possible, with careful scheduling to minimize inconvenience and ensure that most living spaces remained usable throughout the project.
For somebody thinking about a similar retrofit of a pre-war home, what was the rough cost breakdown between the heat pump system, smart controls, and any needed electrical upgrades?
In the case study, the ground-source heat pump system made up the largest expense, averaging around 60-70% of the total retrofit cost. Smart energy controls accounted for roughly 10-15%, while necessary electrical upgrades (such as panel improvements and wiring) comprised about 15-20%. Actual numbers vary depending on house size and local rates, but this breakdown should help you plan a similar project.
With local ordinances limiting changes to the home’s appearance, how did you manage to upgrade the original wooden windows or insulate without running into issues with the historic commission or affecting the façade?
We worked closely with the historic commission to ensure that upgrades respected the home’s original appearance. For the wooden windows, we restored them rather than replacing them, adding discreet weatherstripping to improve efficiency without altering their look. Insulation was added from the inside—such as blown-in cellulose behind plaster walls—so the exterior remained untouched, preserving the historic façade.
With original windows and minimal insulation in a house from 1912, did you find it necessary to prioritize improving the building envelope before installing the smart energy controls and heat pump?
In this case study, we assessed the building envelope before upgrading systems. While the home still had original windows and only modest insulation, we decided to move ahead with the heat pump and smart controls first. However, we closely monitored their performance and comfort. Improving insulation and windows was identified as a future step to further reduce energy use and maximize the benefits of the new systems.
After upgrading to smart energy controls, did the homeowners notice a big change in day-to-day comfort or energy bills, especially given how drafty and under-insulated the house was to start with? It would help to understand the real-world performance after installation.
Yes, the homeowners did notice significant improvements after installing the smart energy controls. Despite the home’s older, drafty construction, the system helped stabilize indoor temperatures and reduce cold spots. They also reported lower energy bills compared to previous winters, even before all insulation upgrades were completed. The real-world performance matched or exceeded their expectations, especially in terms of comfort and energy savings.
If you ran into any major technical hurdles during the GSHP installation—maybe related to the uninsulated basement or the old electric panel—how did you resolve them? Troubleshooting in older homes can be tricky, and I’d appreciate any lessons learned.
There were a few hurdles during the GSHP installation, particularly with the uninsulated basement and the aging electric panel. For the basement, we focused on sealing drafts and selectively insulating trouble spots to boost system efficiency before installing the heat pump. Regarding the old electric panel, an upgrade was necessary to safely handle the new load; we coordinated with a licensed electrician to complete this. The key lessons were to assess insulation first and to have an electrician review your existing wiring early in the process.
This is fascinating—how did the homeowners manage to update the electrical panel and piecemeal wiring without damaging any of the original interior woodwork or plaster? Was that a major challenge during the retrofit process?
Updating the electrical panel and wiring in a historic home can be tricky, especially when trying to preserve original features. In this case, the contractors used careful planning and non-invasive techniques. They routed new wiring through existing chases and attic spaces whenever possible, and worked closely with preservation experts. Minimal access holes were created, and those were patched and finished to blend seamlessly. It was indeed a significant challenge, but their meticulous approach helped protect the original woodwork and plaster.
Could you share more about the upfront costs and longer-term savings for switching from the old gas boiler to the ground-source heat pump? I’m trying to weigh whether this kind of retrofit would actually pay off in a similar historic home.
Switching to a ground-source heat pump does involve a higher upfront cost—often between $20,000 and $40,000 for a typical historic home, depending on site specifics and installation complexity. However, annual energy savings can reach 40–60% compared to a gas boiler, so many homeowners recoup their investment in 8–12 years through lower utility bills and potential incentives. Long-term, you’ll benefit from reduced maintenance and more stable energy costs. Careful evaluation of your home’s insulation and layout will help determine if the payback timeline works for you.
Once everything was up and running, how did the comfort and utility bills compare to your targets? I know setbacks and system tuning can take some time—did you need to adjust your approach after living with the upgrades for a few months?
After the install, the home felt consistently comfortable, matching our expectations for both temperature and humidity control. The utility bills dropped as anticipated, hitting the lower end of our target range. We did spend a few weeks fine-tuning settings—mainly adjusting setpoints and setback schedules—to balance comfort with efficiency. Minor tweaks to the smart controls helped optimize performance, but no major changes were needed after the initial adjustments.
From the initial assessment to the completed installation, how long did the entire retrofit process take for this historic home? I’m asking because I know coordinating with local historic boards can sometimes lead to delays.
The full retrofit process for the historic home—from the initial assessment to the completed installation—took about six months. This timeline included site evaluations, design approvals, coordinating with the local historic board, and the actual installation of the ground-source heat pumps and smart energy controls. The approval process with the historic board did add a few extra weeks, but careful planning helped keep things on track.
How did the homeowners manage to install the ground-source heat pump system given the 60×120 foot urban lot and mature trees? I am worried about tearing up landscaping or not having enough space for the ground loops, so would like more details on how this was handled.
The homeowners addressed space and landscaping concerns by selecting a vertical ground loop system rather than a horizontal one. Vertical loops require much less surface area and typically involve drilling deep boreholes, which minimized disruption to the mature trees and existing landscaping. The installers used specialized equipment to carefully position the boreholes between trees and other features, preserving most of the lot’s outdoor space.
With local ordinances and heritage protections in play, were there any regulatory challenges or extra reviews you had to deal with, especially around exterior changes or drilling for the ground loops?
Yes, there were some regulatory hurdles due to the home’s heritage status and local ordinances. Any exterior modifications, including the drilling for ground loops, had to be carefully reviewed and approved by the local heritage conservation board. This meant submitting detailed plans and undergoing extra inspections to ensure that the drilling and any visible equipment wouldn’t affect the home’s historic character or surrounding landscape.
Our house is also from the early 1900s, and I worry about the cost of retrofitting with a GSHP and smart controls. Can you give a ballpark figure for what the total budget ended up being and if any unexpected expenses came up along the way?
For the historic home in the case study, the total budget for installing the ground-source heat pump system and smart energy controls was around $45,000 to $55,000. This included drilling, equipment, and integration. Unexpected expenses included extra insulation work and electrical upgrades, which added about $7,000. Costs can vary widely based on your home’s size, local labor rates, and existing infrastructure, so it’s wise to get several detailed quotes before starting.
Could you clarify what specific smart energy controls were integrated alongside the GSHP? For example, did you use smart thermostats, zoning, or remote monitoring, and how compatible were these systems with the older electrical wiring of the home?
The project included smart thermostats for precise temperature control and zoning, allowing different areas of the home to be heated or cooled independently. Remote monitoring was also set up, so the system could be adjusted off-site. We chose controls compatible with existing older wiring by using wireless and low-voltage solutions, which minimized the need for extensive electrical upgrades.
How did you handle upgrading the electrical panel and wiring in a house that’s had piecemeal installations over decades? Were any unexpected issues uncovered during the process, and did they significantly impact your timeline or budget?
Upgrading the electrical panel in a home with decades of mixed wiring required a thorough inspection first. We discovered some outdated and unsafe wiring, which meant replacing circuits and upgrading grounding. This did add a few days to the project, and there were some extra costs, but addressing these issues was essential for both safety and for supporting the new heat pump system. Overall, while it extended our timeline slightly, it ensured a reliable and compliant electrical setup.
I run a small business out of a 1920s home and I’m curious about the electrical upgrades mentioned. How did the homeowners budget for the updated electric panel and wiring, and did it significantly impact the overall retrofit costs?
The homeowners factored the electrical upgrades into their overall retrofit budget early on, since updating the electric panel and wiring was essential for supporting the new heat pump system and smart controls. These upgrades did represent a significant portion of the costs, accounting for about 20% of the total project. Planning ahead for this expense helped them avoid surprises and ensured the home was safely equipped for modern energy needs.
Can you share a rough range of what the retrofit ended up costing compared to your initial budget estimates, especially since you aimed to lower operating costs but retain the architectural character?
The retrofit did end up costing a bit more than our initial estimates, mainly because we wanted to preserve the home’s historic features while upgrading to ground-source heat pumps and smart controls. Overall, the final cost was about 15–25% higher than planned, mostly due to custom solutions for integrating modern systems into the existing structure. However, we expect the lower ongoing energy costs to balance out the extra upfront investment over time.
If you had to do the planning and installation process over again, is there anything you would change to make it smoother with regards to outdated wiring and the electrical panel upgrades?
If we could do it over, we’d start with a more detailed electrical assessment upfront. This would include mapping all existing wiring and planning for panel upgrades before any HVAC work begins. Coordinating early with both an electrician and the heat pump installer can prevent delays, ensure compatibility, and help avoid surprises related to outdated wiring.
Did the homeowners notice any immediate improvement in comfort or energy bills after switching from the old gas boiler to the ground-source heat pump, or did it take some time to see the benefits?
The homeowners did notice an immediate improvement in comfort after installing the ground-source heat pump, particularly with more consistent indoor temperatures and quieter operation compared to their old gas boiler. In terms of energy bills, the article mentions that noticeable savings appeared within the first billing cycles, though the full extent of the cost benefits became clearer over several months as the system was optimized and seasonal patterns emerged.
How long did the retrofit process take from start to finish, including planning, getting regulatory approvals, and the actual GSHP installation? I’m wondering what kind of timeline to expect for a similar historic home project.
The entire retrofit process for the historic home took about 10 months from initial planning to completion. This included several months for detailed planning and design, around 2–3 months for securing regulatory approvals since it was a historic property, and approximately 3 months for the ground-source heat pump installation and setup of smart controls. Timelines can vary depending on your local regulations and contractor availability, but this gives a general idea for similar projects.
I’m working on updating an early 1900s house and am really curious about how you dealt with the original wooden windows and minimal insulation during the retrofit. Did you have to replace any of the windows, or were there techniques you used to preserve them while improving efficiency?
In the retrofit, the original wooden windows were preserved rather than replaced. To improve their efficiency, weatherstripping and custom-fit storm windows were added, which helped reduce drafts and increase insulation without compromising the historic character. For the minimal insulation, insulation was carefully added to the attic and basement areas, and in some cases, dense-pack cellulose was blown into wall cavities where possible, all while being mindful of preserving historic features.
With the move from a gas boiler to a ground-source heat pump, what did the budget breakdown look like? Were there surprise costs that came up, especially related to regulatory approvals or unforeseen issues in the old building structure?
The transition from a gas boiler to a ground-source heat pump involved significant upfront costs, with the largest budget portions going to drilling boreholes, installing the heat pump system, and upgrading the home’s insulation. Some surprise expenses did arise, particularly in obtaining regulatory approvals, which took longer and cost more than anticipated. There were also unforeseen costs related to reinforcing parts of the old structure to handle new pipework and equipment. Factoring in a contingency fund for surprises in heritage properties is definitely recommended.
After living with the updated system, did the homeowners see the anticipated reductions in operating costs and improvements in comfort? If so, around what percentage savings did they experience compared to their old setup?
Yes, after switching to ground-source heat pumps and smart energy controls, the homeowners did experience noticeable reductions in operating costs and improvements in comfort. According to the article, their annual energy expenses dropped by about 40% compared to their previous system. They also reported that temperature control throughout the home became much more consistent and comfortable, especially during extreme weather.
How did the homeowners navigate the local heritage ordinances while upgrading the electric panel and wiring? Were there any compromises they had to make to meet both safety standards and preservation requirements?
The homeowners worked closely with local heritage authorities to ensure any upgrades to the electric panel and wiring would not compromise the home’s historical character. This meant routing new wiring through existing chases and using unobtrusive panel locations. In some cases, they chose period-appropriate fixtures and finishes to maintain the original aesthetic. These steps allowed them to meet modern safety standards while respecting preservation requirements, resulting in a few compromises on visible hardware placement but no major alterations to the historic fabric.
How did you address the challenge of updating the old electrical panel and wiring when integrating the smart energy controls and GSHP? Was a full electrical rewire necessary, and if so, what kind of disruption or cost did that add to the project?
To integrate the smart energy controls and ground-source heat pumps, we had to upgrade the old electrical panel to handle the increased load. While a full rewire wasn’t always necessary, in this case, some sections of wiring were replaced to meet current safety codes. The disruption was moderate, involving some opening of walls, and the additional cost mainly covered labor and materials for the panel upgrade and selective rewiring. This ensured safe, reliable operation for the new systems.
For homeowners considering a similar retrofit, could you share a rough estimate of your total project budget and any major expenses that surprised you along the way?
The total project budget for retrofitting with ground-source heat pumps and smart controls was roughly $55,000 to $70,000. This included system installation, drilling, and upgrades to insulation and electrical systems. One surprising expense was the extensive drilling required for the heat pump loops, which added both time and cost. Additionally, integrating the smart controls into an older home’s existing wiring was more complex than anticipated, increasing labor costs.
I’m curious about how you dealt with local heritage protections during the retrofit. Were there any specific historical features you had to work around when upgrading the electrical panel and installing new insulation?
During the retrofit, the local heritage protections required us to preserve original trim, moldings, and plasterwork, especially around the electrical panel area. We carefully routed new wiring behind existing walls to minimize any visible changes. For the insulation, we used materials that did not alter the building’s exterior or interior finishes, ensuring the historic character remained intact while still improving energy efficiency.
With local heritage restrictions in place, were there any compromises you had to make on the technology or installation methods to maintain the historic character, especially around visible components inside or outside the house?
Yes, heritage restrictions required some compromises. For example, all external pipework and heat pump units were carefully sited in less visible locations or concealed with landscaping to preserve the home’s appearance. Inside, modern controls and radiators were chosen to blend with existing decor, and original features like moldings and fireplaces were left untouched. The installation team worked closely with heritage officers to ensure all upgrades were discreet and sympathetic to the property’s character.
I’m curious how the mature trees and tight urban lot influenced the placement and installation of the ground loops for the heat pump system. Did you have to remove any landscaping, or were you able to work around it?
The mature trees and limited space definitely presented challenges during the installation. The team made it a priority to preserve existing landscaping, especially the large trees. Instead of removing them, they carefully routed the ground loops between root zones and used horizontal boring methods to avoid disturbing the trees. Only minimal landscaping was affected, which was restored after the work was complete.
I’m wondering how the overall project budget broke down. Were there any unexpected costs associated with retrofitting a 1912 house for a ground-source heat pump versus a more conventional HVAC upgrade?
The project budget was primarily divided between drilling boreholes and installing the ground-source heat pump, which was the largest expense, followed by smart energy controls and necessary electrical upgrades. Retrofitting the 1912 home did bring some unexpected costs, such as reinforcing the foundation where pipes entered, dealing with old wiring, and carefully routing ductwork in tight spaces. These issues drove up labor costs compared to a standard HVAC upgrade, but the long-term energy savings were factored into the decision.
Could you explain more about upgrading the outdated electrical panel to handle the new heat pump system? I’m worried my old wiring might not be up to code for something as modern as smart energy controls.
Upgrading the electrical panel is often necessary when installing a ground-source heat pump and smart energy controls, especially in older homes. The process usually involves replacing the old panel with a modern one that can handle higher electrical loads and adding dedicated circuits for the heat pump. An electrician will also check your existing wiring to ensure it meets current codes and can safely support new technology. If the wiring is outdated, it may need to be replaced or supplemented to ensure safety and reliability.
For a 1912 house with double-brick walls and minimal insulation, did you have any issues with drafts or heat loss even after installing the ground-source system? I want to know if extra weatherproofing was needed after the main retrofit.
After installing the ground-source heat pump, we did notice that some drafts and heat loss persisted due to the original windows and minimal insulation in the double-brick walls. We found that sealing gaps around doors and windows, adding weatherstripping, and installing heavy curtains made a noticeable difference. While the heat pump improved comfort, extra weatherproofing steps were definitely needed to maximize its efficiency in an older home like this.
I’m curious about how the ground-source heat pump installation affected your mature trees and landscaping on the 60×120 lot. Did you have to remove any trees, or were you able to work around them during the drilling process?
The installation team took special care to protect the mature trees and established landscaping on the 60×120 lot. They carefully mapped out the loop field and were able to work around most of the trees, so none had to be removed. Minimal disturbance occurred, and any affected areas were restored afterward, preserving the yard’s overall appearance.
For homeowners with mature landscaping and limited lot size like the 60×120-foot property in this case, are there alternative renewable heating and cooling solutions you’d recommend if ground-source heat pumps aren’t feasible?
If ground-source heat pumps aren’t a good fit due to mature landscaping or limited space, consider air-source heat pumps as an alternative. They’re much easier to install because they don’t require underground loops, and they still offer efficient heating and cooling. Ductless mini-split systems are also a flexible option for smaller or older homes. Both systems work well with smart energy controls, helping you maintain comfort and efficiency without disturbing your yard.
Did you run into any issues with the radiators when switching from a gas boiler to the GSHP, like compatibility problems or loss of heat output? How did the overall comfort level change after the upgrades?
We did encounter some challenges with the old radiators, mainly because ground-source heat pumps work best at lower water temperatures than gas boilers. To address this, we upgraded a few radiators to larger or more efficient models in key rooms. After the changes, the home maintained a consistent and comfortable temperature, and occupants actually noticed fewer cold spots and more even warmth throughout.
Now that the smart energy controls and GSHP are up and running, how has your everyday comfort changed compared to when you had the old window AC units and gas boiler? Was the difference noticeable immediately?
The switch to ground-source heat pumps and smart energy controls made a clear difference right away. The temperature throughout the house is much more consistent now—no more hot or cold spots like we had with the old window ACs and boiler. The system is quieter too, and adjusting settings is much easier with the smart controls. Overall comfort improved immediately and continues to be noticeably better.
Did you experience any major challenges fitting a modern heat pump system into the footprint of an older home, given things like the small electric panel and the older wiring? Any tips for businesses working on similar retrofits?
Fitting a ground-source heat pump into a historic home did pose challenges, especially with limited electrical capacity and aging wiring. We had to upgrade the electric panel and carefully plan the new wiring to support the system safely. For similar projects, businesses should always start with a thorough assessment of the home’s electrical infrastructure and budget for necessary upgrades. Collaborate closely with electricians experienced in retrofits, and consider phasing work to minimize disruption.
I have an old house from the 1920s with original windows, and we’ve also struggled with heat loss and high utility bills. Did the homeowners in your case study end up replacing or restoring their wooden windows, or did the smart energy controls help compensate for those inefficiencies?
In the case study, the homeowners decided to restore their original wooden windows rather than fully replace them, preserving the home’s historic character. They improved the window seals and added weatherstripping. The smart energy controls and ground-source heat pump did help to offset some of the inefficiencies, but addressing the windows made a noticeable difference in comfort and energy savings.
Did installing the ground-source heat pump affect your ability to keep the original wooden windows and radiators? I’m wondering what trade-offs there might be between efficiency improvements and preserving those older features.
Installing the ground-source heat pump did not require us to replace the original wooden windows or radiators. We were able to connect the new system to the existing radiator network, which helped maintain the historic character of the home. However, some efficiency gains could be limited by older windows, so we made sure to improve insulation elsewhere and use smart controls to maximize overall performance without altering key historic features.
For other owners of historic homes considering sustainable upgrades, how long did the entire process from planning to final installation take? Were there any delays connected to sourcing historically appropriate materials or equipment?
The complete process, from initial planning through to final installation, took about six months. Most of the timeline was devoted to careful planning and obtaining the necessary historic preservation approvals. There were some minor delays related to sourcing materials that matched the home’s historic character, especially for custom vent covers and exterior hardware, but these only added a couple of weeks to the overall project.
What were the biggest technical hurdles you faced when trying to insulate those original double-brick walls and wooden windows without changing the look of the house? Any lessons learned you could share?
Insulating the original double-brick walls was tricky because we had to avoid condensation risks while keeping the historic interior plaster and exterior brick visible. For the wooden windows, we used discreet secondary glazing instead of replacements to maintain their look. The key lesson was to choose breathable insulation and work closely with conservation experts to avoid damaging the building’s character or fabric.
Could you share more about the initial budget expectations versus the actual costs by the end of the retrofit? I worry about hidden expenses when dealing with older homes, especially when heritage protections are involved.
At the start of the retrofit, the homeowners anticipated a cost of around $60,000 for the full project, including the ground-source heat pump and smart controls. However, due to unexpected structural upgrades required by heritage regulations and the need to update old wiring, the final costs reached approximately $78,000. The primary surprises were related to meeting preservation standards and uncovering outdated infrastructure during installation.
Can you share roughly how long the planning and installation phases took from start to finish? I’m trying to gauge what sort of time commitment a similar GSHP retrofit might involve for a historic home.
For this project, the planning phase—including assessments, system design, and obtaining approvals—took about four to six weeks. The installation itself, from groundwork to system commissioning, spanned another three to four weeks. So, you can expect the total process for a similar historic home retrofit to take around seven to ten weeks, though the exact timeline will depend on your home’s unique features and any permitting requirements.
I noticed you mentioned urban lot size and mature trees—did you run into any problems drilling for the heat pump loops in a compact yard, and how did you work around heritage protection rules during installation?
Drilling in a compact urban yard posed some challenges, especially with limited space and the need to preserve mature trees. We used a specialized drilling rig designed for tight spaces and carefully mapped out loop locations to avoid damaging tree roots. Heritage protection rules required us to coordinate closely with local authorities, document the site before work began, and ensure all restoration matched the original landscape and structures.
What sort of budget range should we expect for a retrofit like this, especially considering the need to upgrade electrical panels and possibly deal with old wiring? Was there any part of the project that ended up costing more than anticipated?
For a retrofit involving ground-source heat pumps, smart controls, and electrical upgrades, you should expect a budget range of $40,000 to $80,000, depending on home size, site conditions, and the extent of electrical work required. In this project, addressing unexpected issues with outdated wiring and upgrading the main electrical panel increased costs more than anticipated. Allowing a contingency of around 15-20% above initial estimates can help manage surprises with older homes.
How long did the entire retrofit process—from planning and permits to final installation and testing—end up taking for this 1912 home? I am trying to figure out what kind of timeframe to expect for a similar project.
The entire retrofit process for the 1912 home, including planning, obtaining permits, installation, and final testing, took about eight months from start to finish. This timeframe included time for careful assessment, waiting for permit approvals, coordinating with contractors, and thorough system commissioning. For a similar project, you can expect a similar duration, though it could vary depending on local permitting processes and contractor availability.
If other owners of historic homes want to take a similar approach, what would you suggest as the most important first step? Did your initial energy audit reveal any surprises that changed your original plan for improving efficiency?
For owners of historic homes, the most important first step is to get a comprehensive energy audit from a professional familiar with older buildings. In our case, the initial audit highlighted unexpected sources of heat loss, such as poorly sealed crawl spaces and outdated windows, which led us to revise our priorities and address insulation and air sealing before installing new systems. This groundwork made the heat pump installation much more effective.
I noticed the homeowners had to upgrade an outdated electric panel for the new system. Was that a big part of the budget, and were there any surprises in cost when dealing with old wiring during the retrofit?
Upgrading the outdated electric panel was indeed a noticeable part of the overall budget—mainly because the new heat pump system required more capacity and improved safety features. The homeowners also encountered some unexpected costs related to old wiring, such as needing to replace certain sections that didn’t meet modern code. It’s common in historic homes for electrical updates to uncover hidden issues, so building in a contingency fund is always wise.
After living with the new system through a full heating and cooling season, what has been your experience with indoor comfort and utility bills compared to the old gas boiler and window AC units? Any unexpected outcomes so far?
After a full year, the indoor comfort has noticeably improved. The ground-source heat pump maintains a more consistent temperature and humidity throughout the house, unlike the old system with hot and cold spots. Utility bills have decreased by about 40% compared to relying on the gas boiler and window AC units. One unexpected benefit has been the quieter operation of both heating and cooling. No major downsides so far, just a brief learning curve adjusting to the smart energy controls.
For someone budgeting a similar retrofit, what were some unexpected or hidden costs that came up in the process, particularly related to complying with both modern efficiency standards and local heritage ordinances?
Some hidden costs included the need for custom ductwork to fit the older structure without damaging historic features and extra insulation work to meet efficiency codes. Complying with heritage ordinances also meant using specific materials or finishes, which were pricier and sometimes required specialist contractors. Additional inspections and permit fees for both energy upgrades and heritage compliance added to the budget, so it’s wise to build in a contingency fund for these surprises.
For homeowners facing strict heritage protections like you mentioned, what steps did you take to satisfy local regulations during the planning and installation phases of the heat pump system?
To satisfy heritage regulations, we worked closely with local conservation officers right from the planning stage. We provided detailed plans showing minimal visual impact, chose discreet locations for ground works, and ensured all external units were hidden from street view. All proposals were submitted for approval, and we adapted our installation methods to preserve original features and materials as required by the heritage guidelines.
I’m curious about how you balanced local heritage protection rules with upgrading insulation and windows. Were there any modifications that regulators flat-out denied, and if so, how did you work around those limitations?
Balancing heritage protections with upgrades was definitely a challenge. Regulators were strict about preserving the original windows and façade, so replacing windows with new models was denied. Instead, we restored the existing windows and added discreet secondary glazing for better insulation. For walls, we used internal insulation to avoid altering the exterior. All proposed changes were reviewed with heritage officers to ensure compliance without compromising efficiency.
Since the home had uninsulated brick walls and original wooden windows, did you need to add insulation or upgrade windows before the heat pump installation, or did the system compensate for those inefficiencies?
In the case study, the heat pump system was carefully sized and designed to work with the home’s existing uninsulated brick walls and original wooden windows. No additional insulation or window upgrades were required before installation. However, the system does need to operate with higher output to compensate for these inefficiencies, so future improvements like insulation or new windows could further increase energy savings.
Was it tough to get approval from local heritage boards for changes like drilling and updating the windows? I’m wondering how flexible these protections really are when it comes to green upgrades.
Securing approval from local heritage boards did require detailed planning and clear communication. The boards were cautious but open to proposals that preserved the home’s character. For the drilling, we provided geotechnical reports and restoration plans. For the windows, we chose energy-efficient models styled to match the originals. Heritage protections are strict, but boards can be open to green upgrades if the changes are well-documented and visually sympathetic.
I noticed you mentioned the challenge of keeping historical integrity with modern upgrades. Did you run into any specific issues trying to retrofit the original wooden windows, or did most of the improvement come from elsewhere in the building envelope?
Most of the energy efficiency improvements in this project actually focused on areas like insulation and air sealing, rather than altering the original wooden windows. We aimed to preserve the historic character by keeping those windows intact. Any upgrades to the windows themselves were limited to maintenance and repairs, not replacements or major alterations, so the primary performance gains came from other parts of the building envelope.
In terms of actual energy savings, how quickly did you notice a drop in operating costs after swapping out the old boiler for the ground-source heat pump? I’m trying to figure out the potential payback time for a similar retrofit.
We began seeing a noticeable reduction in operating costs within the first full billing cycle after switching to the ground-source heat pump, which was about one month. The drop in our monthly energy expenses was immediate and significant compared to the old boiler system. Based on our data, the projected payback period is around 7 to 10 years, depending on factors like energy prices and usage patterns.
How long did it take from planning to completing the retrofit, especially with the regulatory hurdles around heritage protection? I’m wondering what kind of timeframe I should expect for a similar project.
The retrofit project took just over 14 months from the initial planning phase to completion. A significant portion of that time—about 5 months—was dedicated to securing approvals and navigating heritage protection regulations. Actual installation and commissioning moved faster once permits were in place. For a similar project, you should expect at least a year, especially if your home is heritage-listed.
Now that the retrofit is complete, has comfort improved throughout the seasons in areas like the attic and basement that originally had major heat loss? Are there any spaces that still pose challenges even after the upgrade?
After the retrofit, comfort has significantly improved throughout the house, including the attic and basement, which were previously challenging due to heat loss. The new ground-source heat pumps and upgraded insulation have created much more stable temperatures year-round. While most areas are now comfortable, the article mentions that maintaining a consistent temperature in small, rarely used storage spaces can still be a bit tricky, but overall, the home’s comfort has greatly increased.
Did the local heritage ordinances significantly limit your choices for window upgrades or insulation methods? I’m interested to hear more about any creative solutions you found to keep the historical look but still improve energy efficiency.
Local heritage ordinances definitely influenced our decisions, especially for windows and insulation. We couldn’t replace original windows, so we restored and weatherstripped them, then installed discreet interior storm panels for better efficiency. For insulation, we used blown-in cellulose in attic spaces where it wouldn’t affect the home’s exterior or interior character. These approaches kept the historical look intact while boosting comfort and energy savings.
How did the homeowners handle the challenge of installing a ground-source heat pump system on a relatively small urban lot with mature trees and landscaping? I’m worried about disrupting our yard if we do something similar.
The homeowners faced similar concerns, so they opted for a vertical loop system, which requires much less surface area than horizontal loops. They worked closely with their installer to carefully plan the drilling locations to avoid damaging mature trees and preserve landscaping. The project involved precise drilling and minimal disturbance, and the yard was professionally restored afterward. If you’re considering a similar project, a vertical installation and thorough site assessment can help protect your existing yard and trees.
Could you share what the energy savings looked like after the first full year of operating both the ground-source heat pump and the smart controls? I’m curious if the return on investment was in line with your initial expectations.
After the first full year of running both the ground-source heat pump and smart energy controls, the homeowners saw an energy cost reduction of about 45% compared to previous years. This exceeded their initial expectations of a 35% decrease. The return on investment stayed on track, with projections showing the system would pay for itself in about 7 years, a bit sooner than the original estimate.
Can you share more about how much the overall retrofit cost versus what was initially budgeted, especially considering the need for heritage-compliant solutions?
The overall retrofit ended up costing about 15% more than the initial budget, mainly due to the specialized work required for heritage compliance, such as carefully routing pipes and choosing period-appropriate materials. Heritage-compliant solutions often require more labor and tailored products, which can increase costs compared to standard retrofits. Despite the overage, the investment was considered worthwhile for preserving the home’s character while achieving major energy savings.
Could you share more about the total costs involved in this retrofit, especially since you had to update the electric panel and possibly rewire parts of the house? Did any unexpected expenses pop up along the way?
The total costs for the retrofit included installation of the ground-source heat pump, smart controls, and significant electrical upgrades. Updating the electric panel and some rewiring added about 15–20% to the initial estimate. Unexpected expenses mainly came from uncovering outdated wiring that needed replacement and reinforcing parts of the structure to meet code. Overall, the final cost was higher than planned, but most of the overages were due to making the home safer and future-proof.
I’m curious how the mature trees and established landscaping on that 60×120 foot urban lot affected the design and installation of the ground-source heat pump system. Were there compromises or creative solutions to avoid damaging the roots?
The mature trees and established landscaping on the property were indeed important considerations during the project. To avoid damaging major tree roots, the installation team used careful site surveys and ground-penetrating tools to map root systems. Boreholes for the ground loops were positioned strategically in open areas or areas with minimal root density, and shallow trenching methods were avoided near significant trees. This approach allowed the team to preserve the landscape while still installing an efficient heat pump system.
Was upgrading the outdated wiring and electric panel a significant part of the budget, and were there any unexpected expenses during the installation of the heat pump and controls that homeowners of similar properties should watch out for?
Upgrading the old wiring and electric panel did represent a notable share of the overall budget, especially since the new heat pump and controls required increased electrical capacity. Unexpected expenses included extra labor for routing new wiring through the thick historic walls and addressing outdated junction boxes. Homeowners with similar older properties should budget for potential surprises like hidden wiring issues or the need for panel upgrades, as these often only become apparent once installation begins.
As someone with an older home on a tight budget, I’m curious about the actual costs involved. Could you share ballpark figures for the complete GSHP installation, including the electrical upgrades and smart controls? Was there a noticeable reduction in utility bills after the retrofit?
For a historic home, a complete ground-source heat pump (GSHP) installation, including electrical upgrades and smart controls, generally ranges from $25,000 to $45,000 depending on the size, local rates, and complexity of retrofitting. In the case study, utility bills dropped by about 40% after the retrofit, making a noticeable impact on monthly expenses. While the initial cost is significant, the long-term savings and comfort improvements were substantial for the homeowners.
After installing the ground-source heat pump, did they notice a big drop in utility bills right away, or did some comfort and efficiency benefits take a while to show up? Any info on payback period or longer-term outcomes would be helpful.
The case study notes that the homeowners saw a noticeable reduction in utility bills soon after installing the ground-source heat pump. They did experience improved comfort right away too. While the article mentions significant energy savings, it doesn’t provide exact figures for the payback period. However, it does mention that the long-term benefits include both lower operating costs and a more consistent indoor environment.
Were there any unexpected challenges with local heritage regulations when updating your electric panel and wiring? Our house is also protected, and I’m concerned about what kind of updates will get approved.
Yes, we did run into some challenges with heritage regulations, especially when it came to updating visible elements like the electric panel and exterior wiring. The local authority required that any modern installations be discreet and, where possible, concealed to preserve the home’s historic character. We had to submit detailed plans and sometimes negotiate small compromises. My advice is to consult your heritage officer early, provide thorough documentation, and be prepared for extra steps in the approval process.
If you had to do this project over again, is there anything you would approach differently regarding the planning or installation steps, especially given the regulatory hurdles mentioned in the article?
If we were to do this project again, we’d engage local permitting authorities even earlier to clarify all historic preservation requirements and possible restrictions on exterior work. A more detailed upfront site assessment with specialists would also help anticipate any underground surprises during drilling. These steps could help avoid delays and make the approval process smoother.
After completing the retrofit, how did the homeowners track real-world energy savings and comfort improvements? Did the smart energy controls provide data that influenced any subsequent changes to the system or home envelope?
After the retrofit, the homeowners used the smart energy controls to monitor both energy consumption and indoor comfort in real time. The system provided detailed data on heating and cooling usage, allowing them to see actual savings compared to previous bills. Based on this data, they made minor adjustments to temperature schedules and improved insulation in a few areas, further enhancing comfort and efficiency. The smart controls were key in helping them make informed decisions after the initial installation.
Did the homeowners have to reinforce the old wiring or update the electric panel to support the new ground-source heat pump and smart controls? I’m curious how complicated or costly the electrical upgrades were for a house that had a patchwork of wiring.
Yes, the homeowners needed to upgrade their electrical system to accommodate the new ground-source heat pump and smart energy controls. The article mentions that their old wiring was a mix of different ages and conditions, so they worked with an electrician to update the electric panel and replace outdated wiring in key areas. This was a significant part of the project’s cost and required careful planning, but it ensured safe and reliable operation of all the new systems.
I noticed you mentioned strict heritage protections for the property. Did these local ordinances affect your choice of visible exterior equipment or limit where you could install components like the heat pump? Any tips for navigating those regulations?
Local heritage ordinances definitely influenced equipment choices and installation locations. We had to select heat pump components that could be concealed or placed in less visible areas, like the rear garden, to preserve the home’s historic appearance. My advice is to consult early with your local heritage board, provide detailed plans, and be flexible about equipment placement—you may need to compromise on certain locations to gain approval.
When you mention the challenges with outdated wiring and electric panels, did you have to upgrade the entire electrical system to accommodate the new heat pump and smart controls? If so, how involved and costly was that part compared to the rest of the project?
Yes, we did need to upgrade a significant portion of the electrical system to support the heat pump and smart controls. The original wiring and panels weren’t sufficient for the increased load and modern safety standards. Upgrading involved replacing the main panel and updating wiring in key areas, which required coordination with an electrician. In terms of cost, the electrical work accounted for about 20% of the total project budget and added a few extra days to the overall timeline.
For a historic home like this with minimal insulation, did you find that adding a ground-source heat pump made a noticeable dent in operating costs, or was it essential to first address the insulation and windows?
In this project, installing the ground-source heat pump did lower operating costs, but the full benefits were only realized after upgrading insulation and weatherizing windows. For minimally insulated historic homes, it’s usually best to improve insulation and address drafts first if possible. This maximizes the efficiency gains from a heat pump and leads to greater cost savings over time.
Could you elaborate on how the mature trees and established landscaping on the 60×120-foot lot affected the installation of the ground-source heat pump system? I’m especially interested in whether you had to make trade-offs between preserving landscaping and optimizing system efficiency.
The mature trees and established landscaping presented a challenge during installation. The project team prioritized preserving the existing trees and gardens, so they used horizontal boring methods rather than extensive open trenching to minimize disruption. This meant some compromises, such as selecting loop field locations that worked around root zones, which slightly limited the ideal placement for maximum system efficiency. Ultimately, the system was sized and routed to balance both landscape preservation and heating/cooling needs.
What was the timeline from initial energy audit to full completion of the GSHP and smart energy controls? I’m thinking about a similar project and wondering how disruptive the process was for daily living.
The project took about seven months from the initial energy audit to full completion of the ground-source heat pump and smart energy control installations. Most disruptive work, like drilling for the GSHP loops, was finished in the first few weeks. There was some indoor work for retrofitting ducts and installing controls, but this was scheduled to minimize interruption and allowed the homeowners to stay in the house throughout the process.
Did you have to upgrade the old electrical panel and wiring to install the ground-source heat pump and smart controls, and if so, what kind of costs and disruptions should a homeowner expect with a similar setup in a historic house?
Yes, upgrading the electrical panel and some wiring was necessary to handle the demands of the heat pump and smart controls. In a historic home, this often means updating to at least a 200-amp panel. Costs can range from $2,000 to $5,000 or more, depending on the home’s condition. Expect some disruption, like temporary power shutoffs and limited access to certain rooms for a few days while electricians work.
How did the homeowners handle updating the outdated electric panel and old wiring when installing the ground-source heat pump and smart controls? Were there any unexpected challenges with bringing the electrical system up to modern standards in such an old house?
The homeowners discovered that their existing electric panel and wiring were not adequate for the new ground-source heat pump and smart controls. They worked with licensed electricians to upgrade the panel and replace outdated wiring, ensuring everything was up to code. One challenge was routing new wires through thick plaster walls without damaging historic features, which required careful planning and some creative solutions. Overall, modernizing the electrical system took more time and coordination than initially expected, but it ensured safety and reliable operation for their new equipment.
For budgeting, how did the cost of installing the ground-source heat pump compare with replacing the old gas boiler with a high-efficiency furnace? Were there any surprise expenses during the retrofit?
The initial installation of the ground-source heat pump was more expensive than simply replacing the old gas boiler with a high-efficiency furnace. However, the article explains that long-term energy savings and government incentives helped offset this higher upfront cost. There were some surprise expenses, such as the need for additional insulation and unexpected electrical updates, which added to the overall budget during the retrofit process.
For real-world performance, have you noticed a significant difference in comfort or monthly utility costs since switching from the old gas boiler to the new system? I’m weighing if the investment in a GSHP really pays off for an old house like mine.
Since the switch to the ground-source heat pump system, comfort has noticeably improved—temperatures are more consistent throughout the house, and there are fewer drafts compared to the old gas boiler setup. Monthly utility costs have dropped by about 40 percent, especially during the heating season. While the initial investment is significant, the improved comfort and ongoing savings have made it worthwhile for our historic home.
Was there a big difference in comfort or utility savings right after the retrofit, especially since you kept the original windows? I’m torn between replacing old windows or focusing more on upgrading the heating system.
After the retrofit, the homeowners reported a noticeable improvement in comfort, mainly due to the even heating from the ground-source heat pumps. Even with the original windows, utility bills dropped significantly because the new system was so efficient. If your windows are in decent shape, focusing on a modern heating system can provide substantial savings and comfort before considering window replacement.
Were there any unexpected technical challenges when integrating the new smart energy controls with the old wiring and electric panel from the 1912 house?
Yes, there were some unexpected technical challenges when integrating the smart energy controls with the original 1912 wiring and electric panel. The older wiring system wasn’t fully compatible with the demands of modern smart controls, so some upgrades were necessary. This included adding new circuits and modernizing parts of the panel to ensure safety and reliable communication between devices. These updates helped bridge the gap between the historic infrastructure and current technology.
What was the overall project timeline—from initial energy audit to final commissioning of the new system? Were there any unexpected delays related to the age of the house or integrating smart controls with older wiring?
The overall project took about eight months from the initial energy audit to final commissioning of the new systems. There were some unexpected delays, mainly due to the age of the house. Integrating smart energy controls with the existing older wiring required additional work, such as updating certain circuits and troubleshooting compatibility issues, which added a few extra weeks to the planned timeline.
How long did the entire process—from the initial energy audit to a fully functioning system—actually take? I’m considering a similar update but want to gauge what kind of disruption to expect, especially in a lived-in historic home.
The entire process, starting from the first energy audit to having the ground-source heat pumps and smart controls fully operational, took about five months. This included assessments, design, permitting, installation, and commissioning. Since the home was occupied during the upgrade, the team carefully phased work room by room to minimize disruption. Most of the noticeable inconvenience was limited to a few weeks during the main installation phase.
How did the homeowners handle the challenge of installing a ground-source heat pump on a relatively small urban lot with mature trees? I am curious if they had to compromise on landscaping or if any special drilling techniques were used.
The homeowners faced space constraints and wanted to protect their mature trees, so they opted for a vertical borehole installation rather than horizontal trenches. This minimized the impact on their landscaping. The drilling team used compact equipment and carefully mapped the borehole locations to avoid root systems, allowing the yard and trees to remain largely undisturbed throughout the process.
For those of us looking to start on a similar upgrade in a historic property, what would you say was the most unexpected technical hurdle in the planning or installation process, and how did you resolve it?
One of the most unexpected technical hurdles was integrating the ground-source heat pump system with the existing architectural features without altering the historic character. For example, routing new ductwork and piping proved tricky since the walls and floors couldn’t be easily modified. We resolved this by working closely with preservation experts and choosing minimally invasive installation routes, even if that meant more complex planning and coordination with contractors.
When upgrading an old electric panel and piecemealed wiring like you describe, did you have to do any major rewiring for the heat pump or smart controls? If so, was that a big part of the cost and complexity?
Yes, the old electric panel and piecemeal wiring required significant upgrades to safely handle the new ground-source heat pump and smart controls. This included installing a new panel with additional circuits and replacing outdated wiring in key areas. These electrical improvements did account for a substantial portion of the project’s total cost and complexity, mainly because older homes often need extensive updates to meet modern code and equipment requirements.
If the house still had single-pane windows, did you consider upgrading those for better efficiency, or did the smart energy controls and heat pump make enough of a difference without touching the windows?
Upgrading single-pane windows was definitely considered as part of the overall energy strategy. However, the focus of this project was on installing ground-source heat pumps and implementing smart energy controls, which provided substantial efficiency improvements on their own. While window upgrades would further boost efficiency, the systems we put in place already led to significant energy savings without requiring immediate window replacement.
Can you explain how you preserved the look of the original wood windows while still addressing the major heat loss through them? Did you end up using interior storm windows or another solution?
To maintain the historic appearance of the original wood windows, we chose not to replace them. Instead, we installed high-quality interior storm windows. This solution significantly reduced heat loss while keeping the exterior look completely unchanged. The interior storms are low-profile and nearly invisible, improving energy efficiency without compromising the character of the windows.
If you had decided to stick with a high-efficiency gas boiler instead of switching to a ground-source heat pump, do you think there were ways to still achieve substantial energy savings while preserving the historic character of the home?
Absolutely, there are ways to boost energy efficiency with a high-efficiency gas boiler while keeping a historic home’s character intact. Upgrading insulation, sealing drafts, installing smart thermostats, and using zoned heating can all reduce energy use. Regular boiler maintenance and radiator balancing can also help. These measures maintain the home’s appearance while improving comfort and reducing energy costs.
For a historic house like the one in the case study, how did you handle potential pushback from local preservation boards when upgrading to smart energy controls and a ground-source heat pump? Any tips for navigating regulations without delaying the project?
For the historic home project, early engagement with local preservation boards was key. We presented detailed plans showing how the ground-source heat pump and smart controls would be discreetly installed, ensuring the home’s historic features were unaffected. It helps to provide documentation, product brochures, and examples from other historic properties. Open communication and involving preservation officials in planning can prevent delays and build trust throughout the process.
How did the homeowners deal with the challenge of installing a ground-source heat pump on a relatively small 60×120 foot urban lot, especially with mature trees and landscaping in the way?
The homeowners overcame the challenge of limited space and mature landscaping by working closely with experienced installers. They used directional drilling to run the ground loops beneath the existing lawn and trees, minimizing disruption. Careful planning allowed them to avoid damaging roots, so the mature trees and most landscaping remained intact. The process required precision, but it proved successful even on their small urban lot.
For a historic brick home with original windows and minimal insulation, did you find that upgrading the envelope was necessary before installing the heat pump, or did the system still perform well as-is? I’m wondering how critical weatherization is in this kind of retrofit.
In this project, while the ground-source heat pump was installed before any major upgrades to windows or insulation, we found that improving the building envelope later made a noticeable difference in comfort and efficiency. The system did perform adequately in the original state, but weatherization—like sealing drafts and adding insulation—reduced energy use and helped the heat pump maintain even temperatures more effectively. It’s not strictly required, but definitely beneficial.
Did you consider any alternatives to ground-source heat pumps, like air-source models, when planning around the lot constraints and heritage regulations? I’d love to know what tipped the balance in favor of GSHP specifically for this historic house.
Yes, air-source heat pumps were considered as an alternative during the planning phase. However, ground-source heat pumps (GSHP) were chosen mainly because they offer superior efficiency in colder climates and maintain a discreet profile, which was crucial for preserving the home’s historic appearance. Heritage regulations limited visible exterior equipment, making GSHPs a better fit since most components could be hidden underground.
I’m planning a similar renovation on an old house and wonder about the installation timeline. How long did it take from the initial energy audit to having a fully functional ground-source heat pump system, and were there significant delays during the process?
From the case study, the entire process—from the initial energy audit to having a fully functional ground-source heat pump system—took about four months. This included planning, permit approvals, drilling for the ground loop, and installing interior equipment and smart controls. There were a few minor delays related to drilling (due to unexpected soil conditions) and waiting for specific equipment deliveries, but nothing that significantly extended the timeline beyond the expected window.
Could you share more about how the ground-source heat pump installation navigated the mature trees and landscaping on the property? I’m especially interested in whether any significant excavation or disruption was required, and if so, how the team minimized its impact on the yard.
The installation team carefully mapped out the loop field to avoid mature tree roots and key landscaping features. Instead of widespread excavation, they used directional drilling to thread the ground-source heat pump loops beneath the yard with minimal surface disruption. Any necessary digging was targeted and promptly restored, so most of the existing landscaping was preserved and only small areas needed reseeding or repair afterward.
For other homeowners with similar heritage protections, what steps did you take to navigate local ordinances before starting major energy retrofits? Any tips for dealing with historical preservation boards or local permitting challenges?
We began by thoroughly researching our local heritage guidelines and arranging a meeting with the preservation board early on. Submitting detailed plans that demonstrated respect for the building’s character helped build trust. It’s helpful to show how new systems can be installed with minimal visual impact. Keeping communication open and being flexible with your approach can ease the permitting process considerably.
I noticed the home had original wooden windows and minimal insulation. How did the homeowners balance maintaining historical window features while trying to improve the building’s thermal efficiency?
The homeowners preserved the original wooden windows to maintain the home’s historic character, but they improved thermal efficiency by adding discreet secondary glazing on the interior. This approach created an insulating air gap without altering the exterior appearance. Additionally, they focused on sealing gaps around the windows and upgrading curtains, which further reduced drafts while respecting the historic features.
What kind of smart energy controls did you install, and were there any compatibility issues with the old wiring or the existing radiators? I’d love more detail on how those systems work together in a historic home.
We installed a smart thermostat system that manages both the ground-source heat pumps and the existing radiators. The controls included wireless sensors for room temperature and smart valves for the radiators. Since the original wiring was outdated, we used wireless components wherever possible to avoid major renovations. The system lets us program heating schedules and control zones independently, ensuring efficient use without altering the historic features of the home.
Since the home had original wooden windows and minimal insulation, did you have to do any major upgrades to the building envelope before installing the GSHP to get good performance? Or did you manage to keep most of the historic features intact?
We aimed to preserve as much of the home’s historic character as possible. While the original wooden windows and most architectural details were retained, we did make some subtle improvements, such as adding discreet weatherstripping and insulation in attic spaces where it didn’t impact the appearance. These targeted upgrades helped the ground-source heat pump system operate efficiently without compromising the home’s historic integrity.
Can you share more on how you approached updating the outdated electrical panel and old wiring in combination with the new smart energy controls? Was it necessary to rewire large portions of the house?
To integrate the smart energy controls and ground-source heat pump, we first assessed the existing electrical panel and wiring. Much of the original wiring was not up to current codes, so we upgraded the main panel and rewired significant portions of the house, particularly areas serving high-demand equipment and smart controls. This ensured safe operation and compatibility while preserving the home’s historic character wherever possible.
After completing the retrofit, how long did it take before you noticed changes in comfort and utility bills? Were there any immediate troubleshooting issues with the new systems, or was it smooth sailing after installation?
Residents noticed improved comfort almost immediately after the retrofit was completed, with more consistent temperatures throughout the home. Changes in utility bills were evident within the first billing cycle, showing a noticeable reduction. There were minor troubleshooting issues at first, such as optimizing thermostat settings and adjusting system schedules, but these were resolved quickly with help from the installers. Overall, the transition to the new systems was quite smooth after these initial tweaks.
How did you deal with updating the electric panel and wiring in a house that’s over 100 years old? We’re worried about running new electrical lines without damaging historic woodwork or walls in our own home.
Updating the electric panel in an older home required careful planning to preserve historic features. In our project, electricians used existing chases, closets, and basement or attic spaces to route new wiring where possible, minimizing disruption to original woodwork and walls. When unavoidable, we chose locations hidden from view or already needing repairs. Consulting with professionals experienced in historic renovations made a big difference—they understood how to protect details while meeting modern electrical needs.
Was there a noticeable difference in monthly utility bills after switching from the old gas boiler to the ground-source heat pump? A rough estimate or percentage drop would help small business owners like me evaluate ROI.
After the switch from the old gas boiler to the ground-source heat pump, the homeowners saw their monthly utility bills drop by approximately 40 to 50 percent. While exact numbers can vary depending on building size and energy rates, this significant reduction is typical for well-installed systems and shows strong ROI potential, especially for businesses looking to cut ongoing energy costs.
I noticed heritage protections limited certain changes. Were there any specific historic features you had to work around or get special permissions for during the retrofit, especially related to window replacements or external equipment placement?
Yes, heritage protections required us to maintain the original windows, so we couldn’t install more efficient replacements. Instead, we focused on improving insulation elsewhere. For external equipment like heat pump units, we had to carefully position them out of sight and obtain special approvals from the heritage committee to ensure they wouldn’t impact the historic appearance of the home.
For those with tight budgets, I’d love to know roughly what portion of your retrofit costs were attributed to preserving historical elements versus the actual energy upgrades like insulation and GSHP installation.
In our retrofit project, about 60% of the costs went toward energy upgrades such as insulation improvements and installing the ground-source heat pump. The remaining 40% was allocated to preserving and restoring the historical features of the home. These figures can vary widely depending on the condition and requirements of the property, but this split gives a general idea for budgeting purposes.
For a historic home with old wood windows and double-brick walls, how did the integration of smart energy controls actually improve day-to-day comfort? Was there a noticeable difference in how even the temperatures felt throughout the house after the install?
The smart energy controls made a big difference in comfort by allowing more precise temperature regulation in each area of the house. Even with the older wood windows and double-brick walls, the system adjusted heating and cooling based on real-time conditions, so rooms that used to be drafty or unevenly heated now stayed much more consistent. Residents reported that the temperature felt noticeably more even from one room to another after installation.
The house had an old gas boiler and outdated electric panel before switching to the heat pump. Did you run into any problems upgrading the electrical system, and how long did that part of the project take?
Upgrading the electrical system did present some challenges, mainly because the old panel wasn’t sufficient for the new heat pump’s requirements. We had to completely replace the panel and update some wiring. This part took about three days, including inspection and coordination with the local utility. Overall, it was a manageable step but required careful planning to meet safety codes.
How long did the entire retrofit process take from planning through to final system commissioning? Did the regulatory navigation with local heritage protections significantly impact the project timeline?
The entire retrofit process, from initial planning to final system commissioning, took approximately twelve months. Navigating regulations related to local heritage protections did add several months to the timeline. The team needed to secure special permits and coordinate closely with heritage authorities, which required careful documentation and sometimes waiting for approval before moving forward with each project phase.
How long did the process take, from the initial energy audit through to having the ground-source heat pump and smart controls fully operational? I wonder if disruptions lasted weeks or stretched into months.
The entire process, from the initial energy audit to having the ground-source heat pump and smart controls fully operational, took about three months. While some parts of the work, like the audit and planning, were completed quickly, the installation itself involved digging and integrating new systems, which led to several weeks of disruption in the home.
As a fellow owner of an older home with heritage protections, I’m wondering how you navigated the local ordinances during your renovation. Did you need special permits or face any pushback when upgrading the insulation or electrical system?
Navigating local ordinances was a key part of our renovation. We did need special permits, especially for exterior insulation and electrical upgrades, since heritage protections are strict. Early communication with the heritage committee helped—they reviewed our plans to ensure changes didn’t impact the home’s historic character. There was some initial pushback about materials and appearance, but by providing detailed proposals and working with approved contractors, we were able to meet both energy and preservation standards.
As someone also working on an early 1900s house, I’m curious how you balanced keeping the original wooden windows with improving energy efficiency. Did you replace, restore, or add storm windows, and how much of a difference did that make alongside the GSHP system?
In this case, the homeowners chose to restore the original wooden windows instead of replacing them, as preserving historic character was a priority. They added well-fitted interior storm windows to boost insulation and minimize drafts. This combination improved comfort and reduced heat loss noticeably, especially when paired with the ground-source heat pump system, resulting in lower energy bills while maintaining the home’s original charm.
After the installation of both the GSHP and smart energy controls, have you noticed a significant difference in utility bills or comfort, particularly during extreme Midwest weather? Would you say the results met your expectations?
Yes, after installing the ground-source heat pump and smart energy controls, we saw a noticeable reduction in utility bills, especially during peak heating and cooling months. Comfort levels improved significantly, even during the harshest Midwest winters and hot summers. The system maintained consistent indoor temperatures, and the results have definitely met—and in some ways exceeded—our expectations for both comfort and efficiency.
Can you talk more about the costs involved in upgrading the outdated electrical panel and wiring to support the heat pump and smart controls? Was this a major chunk of your budget, and were there any unexpected expenses tied to bringing the home up to code?
Upgrading the electrical panel and wiring was indeed a significant part of the overall budget. The existing system couldn’t handle the new load from the heat pump and smart controls, so we needed a full panel upgrade and some rewiring. Unexpected expenses came up when old wiring didn’t meet current code, requiring additional labor and materials. This part of the project accounted for roughly 20–25% of the total costs. It’s wise to set aside a contingency for surprises when working with historic homes.
When updating the electric panel and wiring in the 1912 home, did you run into any surprises or hidden issues? I’m thinking about tackling my own place and I’m not sure what to expect with electrical from that era.
During our update, we did encounter several surprises common in older homes. The original wiring had cloth insulation, which was brittle and unsafe by today’s standards. Some circuits were overloaded, and we found a few knob-and-tube sections hidden behind walls. It’s wise to be prepared for patching plaster and making some unexpected repairs. Having a qualified electrician inspect everything before starting really helped us plan and budget.
Now that you’ve completed the retrofit, have you noticed a significant improvement in comfort and operational cost savings during both summer and winter? Was the switch from the 40-year-old gas boiler and window AC units worth the investment so far?
Since completing the retrofit, we’ve seen noticeable improvements in comfort year-round. The ground-source heat pumps maintain a steady indoor temperature and humidity, making the home much more comfortable in both summer and winter. Operational costs have dropped significantly compared to the old gas boiler and window AC units. So far, the investment has definitely been worth it, both for the energy savings and the overall living experience.
I’m curious how the presence of mature trees and established landscaping on a 60×120-foot urban lot influenced the installation process for the ground-source heat pump. Were there any challenges or compromises due to the limited space?
Mature trees and established landscaping can definitely impact the installation of ground-source heat pumps, especially on a smaller, urban lot. In the case study, the limited space and desire to preserve the landscaping led the installers to opt for vertical rather than horizontal ground loops. This required drilling deeper boreholes but avoided disturbing tree roots and existing plantings. Some compromises included careful planning of borehole locations and using specialized equipment to minimize damage to the landscape.
Since the electric panel and wiring were old and piecemeal, did you have to do a full upgrade to handle the smart energy controls and the new heat pump, or were there ways to phase the electrical updates to stay on budget?
In this project, we found it necessary to upgrade the main electric panel to support both the ground-source heat pump and the smart energy controls. However, we managed costs by phasing some secondary wiring updates over time. Essential upgrades for safety and load capacity were done first, while less critical circuits and outlets were addressed in later stages to help stay within budget.
Did the project require any special permits or approvals due to the heritage protections mentioned, and if so, how long did that process take?
Yes, the project did require special permits and approvals because of the heritage protections on the historic home. The team had to submit detailed plans to the local heritage authority to ensure the work wouldn’t negatively impact the building’s character. The approval process took about four months, including site inspections and a review period before they received the go-ahead to proceed.
How did the costs of this retrofit compare to just upgrading the old gas boiler or adding standard insulation? We’re on a tight budget and I’m wondering what the biggest expenses were in your project.
Upgrading to ground-source heat pumps and smart controls was a significantly higher upfront investment compared to simply replacing the old gas boiler or adding standard insulation. The biggest expenses were drilling and installing the ground loops, purchasing the heat pump system, and integrating smart controls. While insulation upgrades helped efficiency, they cost much less than the renewable heating system. However, the project team expects long-term savings on energy bills to offset those higher initial costs.
Since the house originally relied on a gas boiler and window AC units, did you notice a significant change in your monthly energy bills after switching to the ground-source system? Any numbers or percentages you can share would be really helpful.
After switching from the old gas boiler and window AC units to the ground-source heat pump system, the homeowners saw their monthly energy bills drop by about 40%. Heating and cooling were the biggest contributors to this reduction. For example, winter gas bills that used to be around $250 per month fell to about $150, and summer electricity costs for cooling dropped as well. The savings can vary depending on insulation and usage, but the change was definitely noticeable.
I’m curious about how you dealt with the limited lot size and mature landscaping when installing the ground-source heat pump system. Did you have to disturb any of the trees or hardscape, and if so, were there any unexpected costs or approvals needed because of the heritage protections?
We had to be very mindful of the mature trees and tight lot boundaries. To minimize impact, we chose a vertical borehole system, which requires less surface area than horizontal loops. This approach avoided significant disturbance to trees and hardscape. We worked closely with heritage authorities for approvals, and while the process added some planning time and modest permit costs, no unexpected major expenses arose.
I’m planning something similar and wonder about comfort levels after the retrofit. With features like original wood windows and minimal insulation left in place, were there any unresolved draft or cold spots after installing the heat pump?
After the retrofit, the comfort level in the home improved noticeably, even with the original wood windows and limited insulation preserved for historic reasons. The ground-source heat pump provided consistent heating throughout most rooms. However, a few minor drafts remained near some older windows, especially on very cold days. These were manageable but still noticeable compared to fully modernized homes. Overall, the system handled the space well, but addressing window drafts further could boost comfort even more.
I’m really interested in how you maintained the original appearance of the windows while improving energy efficiency. Did you end up retrofitting the wooden windows or replacing them, and how did that decision impact both performance and historic compliance?
To balance energy efficiency with historic integrity, we chose to retrofit the original wooden windows rather than replace them. This involved adding high-performance weatherstripping and discreet secondary glazing to the existing frames. This approach significantly improved insulation and reduced drafts while preserving the original appearance, which was essential for meeting historic preservation requirements. The result was a noticeable boost in comfort and efficiency without compromising the home’s historic character.
We also have a historic home with old radiators and drafty windows. Was it a challenge to adapt the existing piping and electrical system to work with the new ground-source heat pump? Did you have to upgrade most of the wiring?
Adapting the old piping to the ground-source heat pump did require some adjustments, especially to ensure compatibility with the existing radiators. In this case, some piping upgrades were needed, but many original elements were retained. As for the electrical system, an upgrade was necessary to handle the heat pump’s demands and smart controls. The extent of wiring updates can vary, but older homes often need at least some electrical improvements for safety and efficiency.
I’m wondering how the homeowners balanced the need for increased insulation with restrictions on modifying original features like windows or brickwork. Did they end up using interior storm windows or other non-invasive techniques to improve efficiency without violating heritage rules?
The homeowners faced strict limitations on altering the historic home’s exterior features, including the windows and brickwork. To boost energy efficiency without breaching heritage rules, they used interior storm windows, which added insulation while preserving the original windows. They also focused on non-invasive measures like heavy curtains and draft-proofing. This approach allowed them to enhance comfort and efficiency without compromising the home’s historic character.
Can you share any ballpark figures on how much the retrofit actually cost from start to finish? I’m trying to budget for something similar and am wondering if there were any expenses that really surprised the homeowners.
The total retrofit cost for the project was around $60,000 to $70,000, which included the installation of the ground-source heat pump system, smart controls, drilling for the ground loop, and necessary electrical upgrades. One unexpected expense was the added complexity of integrating new technology into the older structure, which led to some additional labor and materials costs. It’s a good idea to set aside a contingency fund for similar surprises in your budget.
After the GSHP and smart controls were installed, did you notice a significant improvement in comfort or a drop in energy bills? I’m wondering what kind of real-world performance change to expect in a similar pre-war brick home.
After installing the ground-source heat pump and smart controls, the home saw a noticeable improvement in both comfort and energy efficiency. Even with the thick brick walls typical of pre-war homes, the indoor temperature became more consistent, with fewer cold spots and better humidity control. Energy bills dropped significantly, especially during peak heating and cooling months. Homeowners in similar older homes can generally expect better comfort and meaningful savings, though results can vary depending on insulation and window quality.
With the home’s original wooden windows and minimal insulation, did you find it necessary to upgrade any of those features alongside the new heating system, or did the smart controls and heat pumps alone make enough of a difference in comfort and efficiency?
In this project, the homeowners kept the original wooden windows and only made minimal changes to the existing insulation. The ground-source heat pumps and smart energy controls were able to deliver noticeable improvements in both comfort and efficiency on their own. While upgrading insulation and windows can enhance performance further, the new system worked well even without major changes to those features.
After the renovations, did the owners notice a significant difference in annual energy bills or comfort, particularly during Midwest winters? Any lessons learned about what worked best for an old brick house like this?
Yes, after the renovations, the owners reported notable reductions in their annual energy bills and experienced much steadier indoor comfort during the harsh Midwest winters. They found that the ground-source heat pumps provided consistent heating even in very cold weather. One key lesson was the importance of thorough insulation and air sealing before installing the new system, especially in an old brick house, to maximize efficiency and comfort.
Can you share more details about the initial budgeting process? Specifically, how did costs like updating the electric panel and addressing minimal insulation stack up against the savings from the new heat pump?
The initial budgeting process involved assessing existing infrastructure and estimating upgrade costs alongside projected savings. Updating the electric panel was a necessary upfront expense, as the existing system wasn’t adequate for the heat pump. Minimal insulation meant addressing some areas to maximize efficiency, though not a full retrofit. While these updates increased initial costs, the savings from the ground-source heat pump—through significantly lower energy bills—were projected to offset the investments over several years, making the upgrades worthwhile in the medium term.
I’m curious about long-term operating costs after installing the new GSHP system compared to the old gas boiler. Did you see significant savings on your utility bills, or did the added smart controls make a noticeable difference in efficiency?
After switching to the ground-source heat pump system, the homeowners reported a noticeable drop in heating and cooling costs compared to the old gas boiler. The smart energy controls also contributed to further savings by optimizing when and how the system runs. Over the first year, the combined upgrades led to lower utility bills and improved overall efficiency, making the investment worthwhile in terms of long-term operating costs.