Introduction: Clean Energy for Your Commute
As electric vehicles (EVs) become increasingly mainstream, more homeowners are seeking ways to make their commutes truly sustainable. Charging your EV from the grid is already cleaner than using gasoline, but it’s even better when your car runs on sunshine. Installing a solar-powered EV charging station at home is an accessible way to cut carbon emissions, reduce your fuel costs, and gain true energy independence. However, while the idea is simple, the process requires careful planning, the right equipment, and a clear understanding of how solar and EV charging technologies intersect. In this comprehensive guide, we’ll break down the specific tools and equipment you’ll need, walk through each stage of the DIY installation process, highlight compatibility and safety factors, and provide practical tips to maximize efficiency and reliability. Whether you’re a seasoned DIYer or simply want to understand what’s involved before hiring a pro, this guide will help you make informed, confident steps toward a greener driveway and a more sustainable future.
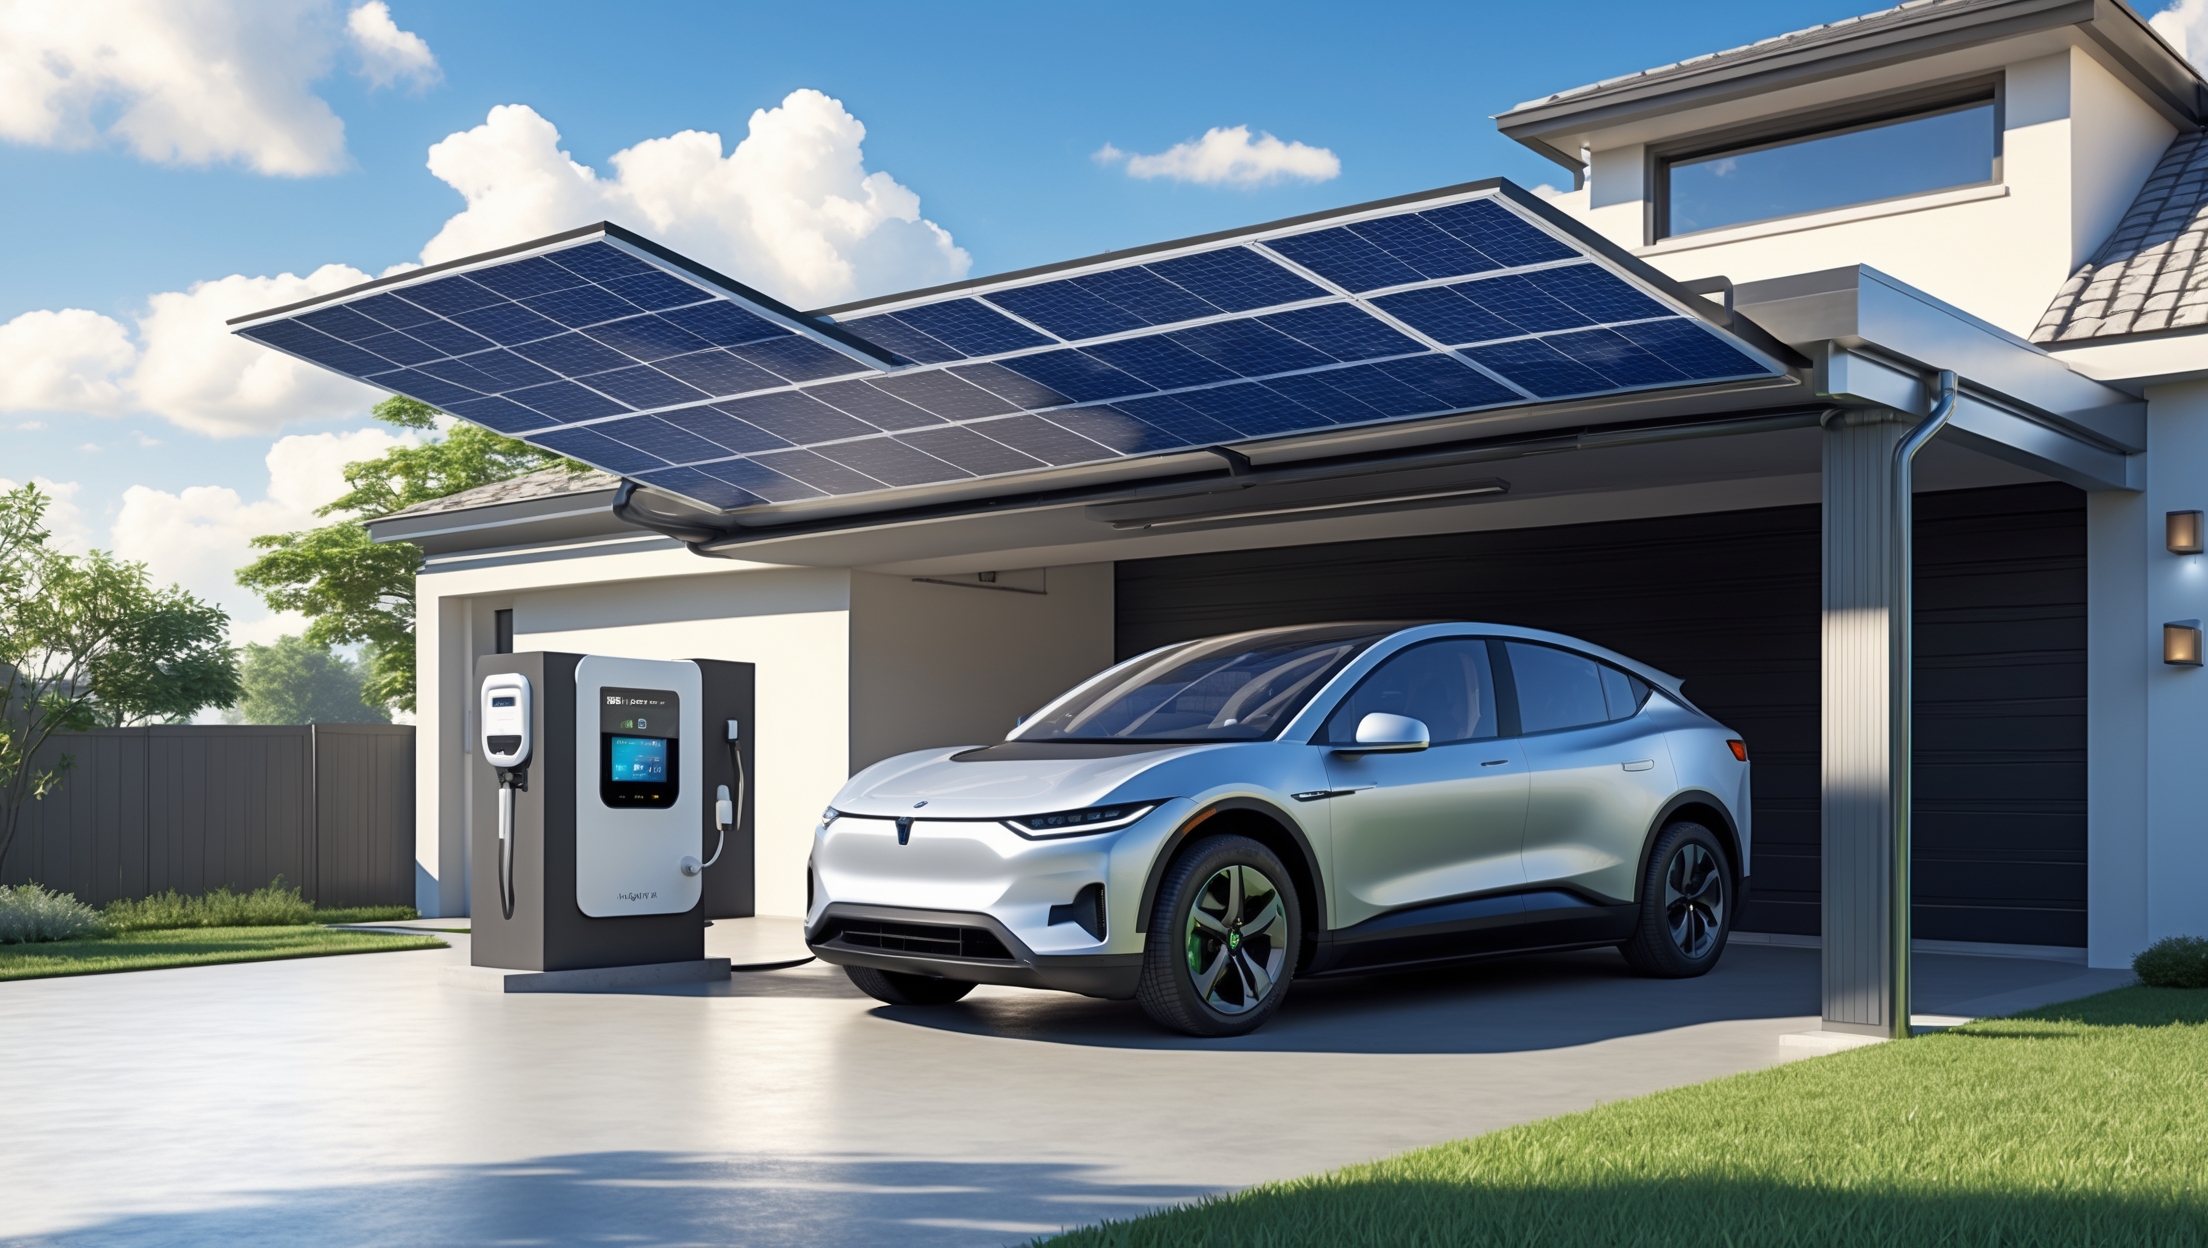
How Solar-Powered EV Charging Works
The Basic Components
A solar-powered EV charging system connects a photovoltaic (PV) solar array to an electric vehicle supply equipment (EVSE), often via a home’s electrical panel. The solar panels generate DC electricity, which is converted to AC by an inverter. This AC power can be used directly by the EV charger, offsetting or even eliminating the need for grid electricity during daylight hours. Excess solar can also be stored in batteries or exported to the grid, depending on your setup.
- Solar Panels: Generate electricity from sunlight.
- Inverter: Converts DC from solar panels to AC for home and EV charger use.
- EV Charger (EVSE): Delivers power safely to your vehicle.
- Electrical Panel: Distributes electricity throughout your home.
- (Optional) Battery Storage: Stores solar energy for use when the sun isn’t shining.
Essential Tools and Equipment Checklist
Solar Power Equipment
- Photovoltaic (PV) Solar Panels: Monocrystalline or polycrystalline panels, typically 350W–450W each. Quantity depends on your EV’s charging needs (see below).
- Solar Mounting Hardware: Rails, brackets, and fasteners for roof, carport, or ground-installed arrays. Choose hardware rated for your climate and roof type.
- String Inverter or Microinverters: For converting DC to AC. Microinverters allow panel-level monitoring and flexibility, while string inverters are usually more cost-effective for larger arrays.
- PV Wire & Connectors: UV-resistant wire, MC4 connectors, and junction boxes for safe, weatherproof connections.
EV Charging Equipment
- Level 2 EV Charger (EVSE): 240V charger, ideally smart-enabled for scheduling and monitoring. Check compatibility with your vehicle’s charging port and amperage requirements.
- EV Charging Cable: Often included with the EVSE, but ensure it’s long enough to reach your preferred parking spot.
- Weatherproof Charger Enclosure: Required for outdoor installations to protect the EVSE from rain, snow, and dust.
Electrical and Safety Hardware
- Dedicated Circuit Breaker: Sized for your charger (usually 40–60A, 2-pole, 240V). Must be installed in your main panel or subpanel.
- Conduit and Junction Boxes: For routing wires safely indoors or outdoors.
- Disconnect Switch: Required by code for many installations; allows safe isolation of the charger or solar array.
- Grounding Equipment: Ground rods, clamps, and bonding jumpers as needed for safe operation.
Installation Tools
- Drill/Driver Set: For mounting hardware and electrical enclosures.
- Impact Driver: Speeds up lag bolt installation for rooftop or carport mounts.
- Wire Strippers & Crimpers: For electrical connections.
- Multimeter & Voltage Tester: For verifying live circuits and troubleshooting.
- Torque Wrench: Ensures tight (but not over-tightened) connections as per manufacturer specifications.
- Ladder & Fall Protection: For rooftop or elevated installations.
- Label Maker: For marking circuits and disconnects as required by electrical code.
Sizing Your Solar Array for EV Charging
Estimating Your EV’s Energy Needs
The number of solar panels you’ll need depends on how much you drive and your EV’s efficiency. Here’s how to calculate:
- Miles Driven Per Day: Example: 30 miles/day.
- EV Efficiency: Most EVs consume about 0.25–0.35 kWh per mile. Check your model’s rating.
- Daily kWh Needed: 30 miles × 0.3 kWh/mile = 9 kWh/day.
- Solar Production Factor: Divide daily kWh by your average sun hours. Example: 9 kWh ÷ 5 sun hours = 1.8 kW array needed (about 5–6 panels at 350W each).
Consider sizing up if you want to offset home energy use, too, or if your driving needs are higher on some days.
System Expansion and Future-Proofing
If you may get a second EV, drive more in the future, or want to add battery storage, consider installing extra conduit and leaving space in your electrical panel. Smart inverters and modular systems make it easier to expand later.
Key Steps for Your DIY Solar EV Charging Station
1. Site Assessment and Planning
- Sun Exposure: Evaluate south-facing roofs, carports, or ground areas for optimal solar access.
- Structural Check: If roof or carport-mounted, ensure structures can handle the weight of panels and mounting hardware.
- Charger Location: Plan the shortest, safest wire run between the charging point, electrical panel, and solar inverter.
2. Gathering Permits and Compliance Checks
Most jurisdictions require permits for both solar and EV charger installations. Check with local building and electrical authorities for:
- Solar PV permits and inspections
- Electrical permits for the charger circuit
- Utility interconnection (if grid-tied)
- HOA or zoning restrictions (if applicable)
Some areas require a licensed electrician to perform high-voltage wiring—know your limits and local laws.
3. Installing the Solar Array
- Mounting Rails: Secure rails to roof rafters, carport beams, or ground posts using lag bolts and flashing. Ensure all penetrations are weatherproofed.
- Panel Placement: Attach panels to rails with clamps, spacing them for airflow and optimal tilt angle.
- Electrical Connections: Connect panel outputs in series (for string inverter) or to microinverters, then run PV wire to the inverter location, using conduit as required.
4. Setting Up the Inverter
- Inverter Mounting: Install on a shaded wall near your main panel, following clearance and ventilation guidelines.
- AC Wiring: Run AC output from inverter to a breaker in your main or subpanel. Label all circuits as required.
5. Installing the EV Charger
- Mounting the EVSE: Secure the charger to a wall or pedestal near your parking space, within reach of the charging cable.
- Electrical Wiring: Run a dedicated 240V circuit (with correct gauge wire and breaker size) from your panel to the EVSE. Use conduit for outdoor or exposed runs.
- Weatherproofing: Use a NEMA-rated enclosure if the charger is outdoors. Ensure all connections are sealed from the elements.
6. Final Connections and Testing
- Grounding: Double-check all system grounds for safety and code compliance.
- Labeling: Clearly label all disconnect switches, breakers, and junction boxes.
- System Test: After inspection, power up the system. Use your EV charger’s app or onboard display to confirm charging rates and solar contribution.
Smart Features and Energy Management
Smart Chargers and Solar Monitoring
Modern EV chargers often include WiFi connectivity and smartphone apps. Choose a charger with the ability to schedule charging times (to match peak solar production), monitor energy use, and get notifications. Many inverters also offer app-based monitoring to track solar generation and consumption.
Load Sharing and Dynamic Control
Some systems can limit EV charging speed if your home is using a lot of electricity—preventing tripped breakers and reducing demand charges. Look for chargers and inverters that support load management if you have a smaller electrical service or want to avoid panel upgrades.
Battery Storage Integration
Adding a home battery (like a Tesla Powerwall or LG Chem RESU) allows you to store excess solar energy for nighttime EV charging. While not required, it increases your solar self-consumption and can provide backup power during outages.
Common Compatibility and Safety Pitfalls
Charger and Vehicle Compatibility
Most home EV chargers use the universal J1772 connector, but Tesla vehicles require an adapter (usually included with the car). Check your vehicle’s maximum charging rate—installing a 48A charger won’t benefit a car limited to 32A.
Electrical Panel Capacity
Ensure your main panel has enough capacity for the added load. If your panel is already near its limit, consider a service upgrade or load management system.
Ground Fault and Arc Fault Protection
National Electrical Code (NEC) often requires ground-fault circuit interrupters (GFCIs) and arc-fault protection for new circuits. Use listed equipment and follow manufacturer instructions closely.
Permitting and Inspection
Skipping permits or inspections can lead to failed insurance claims, fines, or even fire hazards. Always follow local codes and get all required approvals before energizing your system.
Maximizing Efficiency and Reliability
Panel Cleaning and Maintenance
Keep your solar panels free of dust, leaves, and snow for maximum output. Inspect mounting hardware and wiring annually for signs of wear, corrosion, or animal damage.
Energy Usage Habits
Charge your EV during peak sunlight hours when possible to maximize direct solar use. Set smart charger schedules to avoid unnecessary grid draw during evenings or cloudy days.
Software and Firmware Updates
Regularly update your charger and inverter firmware to ensure compatibility, security, and access to the latest energy management features.
Troubleshooting Common Issues
- Charger Won’t Start: Check breaker, GFCI reset, and WiFi connection. Consult charger diagnostics via its app.
- Low Solar Output: Inspect panels for shading or soiling. Check inverter status for fault codes.
- Tripped Breaker: Ensure correct wire gauge and breaker size were used. Avoid charging other high-draw appliances simultaneously.
- App Not Reporting: Reboot WiFi router and reconnect device. Ensure firmware is up to date.
Cost Breakdown: What to Expect
- Solar Panels & Hardware: $2,000–$5,000 for a 2–4 kW system (before incentives).
- Inverter: $1,000–$2,000.
- EV Charger (EVSE): $400–$1,200.
- Electrical Materials: $300–$700 (wire, conduit, breakers).
- Permitting & Inspection Fees: $200–$500 (varies by locality).
- Optional Battery Storage: $7,000–$12,000 (if desired).
Federal and local incentives can reduce the net cost by 26% or more. DIY installation saves on labor, but always budget for professional help where needed.
Conclusion: Powering Your Drive with Sunshine
Installing a solar-powered EV charging station at home is a rewarding step toward energy independence and true sustainability. By carefully selecting quality tools and equipment—and taking the time to understand your household’s energy needs—you can create a system that reliably fuels your electric vehicle with clean, renewable power for years to come. Remember, safety and code compliance are non-negotiable: when in doubt, consult a licensed electrician or solar installer, especially for high-voltage or code-critical steps. Take advantage of smart chargers, robust mounting hardware, and modern monitoring apps to keep your system running smoothly with minimal fuss. With the right planning and a bit of DIY spirit, you’ll be able to charge your car from the sun, shrink your carbon footprint, and enjoy the peace of mind that comes from driving on truly clean energy. The future of transportation is electric—and with a solar-powered EV charger at home, you’re driving it forward, one sunny mile at a time.


When setting up a solar-powered EV charging station at home, how do you size the solar array to ensure it covers your vehicle’s daily charging needs, especially if your driving habits or solar production vary seasonally?
To size your solar array, first calculate your EV’s average daily energy use by multiplying the miles you drive each day by your car’s energy consumption rate (kWh per mile). Then, factor in local solar production data—look up average daily sunlight hours for your area, noting seasonal changes. Divide your daily charging needs by the lowest expected daily solar output to determine the minimum array size. Oversizing the system by about 10–20% is wise to account for inefficiencies and cloudy days.