
Introduction: The Net-Zero Dream in Urban Spaces
Net-zero energy homes—buildings that generate as much energy as they consume annually—are often associated with sprawling suburban lots or custom new builds in rural settings. However, the growing movement toward sustainable living and urban density raises an exciting question: can a small city home, hemmed in by neighbors and limited roof space, achieve net-zero energy? This detailed case study dives into the journey of the Mendez family, who retrofitted their 1,200-square-foot townhouse in a dense neighborhood of Portland, Oregon. By combining rooftop solar, advanced insulation, and cutting-edge smart home technology, they not only reduced their environmental impact but also achieved true net-zero status. This post breaks down the practical steps, unexpected challenges, and real-world results of their transformation—providing actionable insights for urban dwellers inspired to pursue sustainable living without moving or rebuilding from scratch.
Home Profile: Starting Conditions and Challenges
The Mendez family’s home was built in the early 1980s. Like many urban residences, it came with unique constraints:
- Limited roof space (just under 500 square feet of usable area for solar panels)
- Shared walls on two sides (rowhouse configuration)
- Original, minimally insulated walls and attic
- Older single-pane windows
- Electric resistance heating and a conventional electric water heater
- No garage or basement for large battery storage
The family’s goal: cut their $180/month energy bill to zero without sacrificing comfort or requiring major structural changes.
Step 1: Home Energy Audit and Baseline Assessment
Professional Audit Process
The Mendez family invested $350 in a comprehensive home energy audit, which included:
- Thermal imaging to identify heat loss points
- Blower door test for air leakage
- Electrical usage analysis by circuit
- Assessment of insulation, windows, and HVAC
Key findings:
- Significant heat loss through attic and uninsulated party walls
- Old windows responsible for 18% of total heat loss
- Electric baseboard heating was the largest single energy consumer
- Phantom loads from older appliances and always-on electronics
Setting Realistic Targets
The audit revealed that even with maximum rooftop solar, offsetting their annual usage would require cutting total consumption by at least 35%. This led to a phased retrofit plan prioritizing insulation, electrification, and smart controls before solar installation.
Step 2: Insulation and Building Envelope Upgrades
Attic and Wall Insulation
With shared walls, focus turned to the attic and exterior front/rear walls. Blown-in cellulose insulation increased attic R-value from R-13 to R-49. Dense-pack cellulose was injected into the 2×4 exterior wall cavities (R-3 to R-13).
- Cost: $3,800 (including air sealing, attic hatch insulation, and contractor labor)
- Result: 22% reduction in heating/cooling demand
Window Replacement
Replacing the six single-pane windows with ENERGY STAR triple-pane units was the single largest upfront expense, but provided year-round comfort and noise reduction.
- Cost: $7,200 (including installation and disposal of old units)
- Result: 12% overall energy savings, major comfort improvement
Air Sealing
Contractors sealed plumbing penetrations, electrical outlets, and rim joists with low-expansion foam. Weatherstripping was added to doors, and a smart mail slot cover installed.
- Cost: $450 (materials and labor)
- Result: Air leakage reduced from 12 ACH50 to 5.5 ACH50
Step 3: Smart Home Technology for Energy Efficiency
Smart Thermostats and Zoning
The outdated electric baseboard system was replaced with ductless mini-split heat pumps, zoned for living and sleeping areas, controlled by Wi-Fi thermostats.
- Equipment: 2 mini-split units, 2 smart thermostats
- Cost: $6,500 (after utility rebate of $1,000)
- Result: Heating/cooling energy use cut by over 50%
Smart Plugs and Load Management
High-standby-load appliances (TV, entertainment center, desktop PCs) were plugged into smart strips and plugs. Schedules were set to power down devices overnight and during work hours.
- Cost: $180 (8 smart plugs and 2 smart strips)
- Result: Estimated 800 kWh/year saved
Water Heating Optimization
The conventional electric water heater was replaced with a 50-gallon heat pump water heater, equipped with a smart controller for off-peak operation.
- Cost: $1,800 (after $750 utility rebate)
- Result: Water heating energy cut by 65%
Lighting and Appliance Upgrades
- All lighting was switched to high-efficiency LEDs (warm color temperature for comfort).
- Old refrigerator and washer/dryer were replaced with ENERGY STAR models.
Total appliance and lighting cost: $2,900 (after rebates)
Combined result: 1,300 kWh/year reduction in electric load
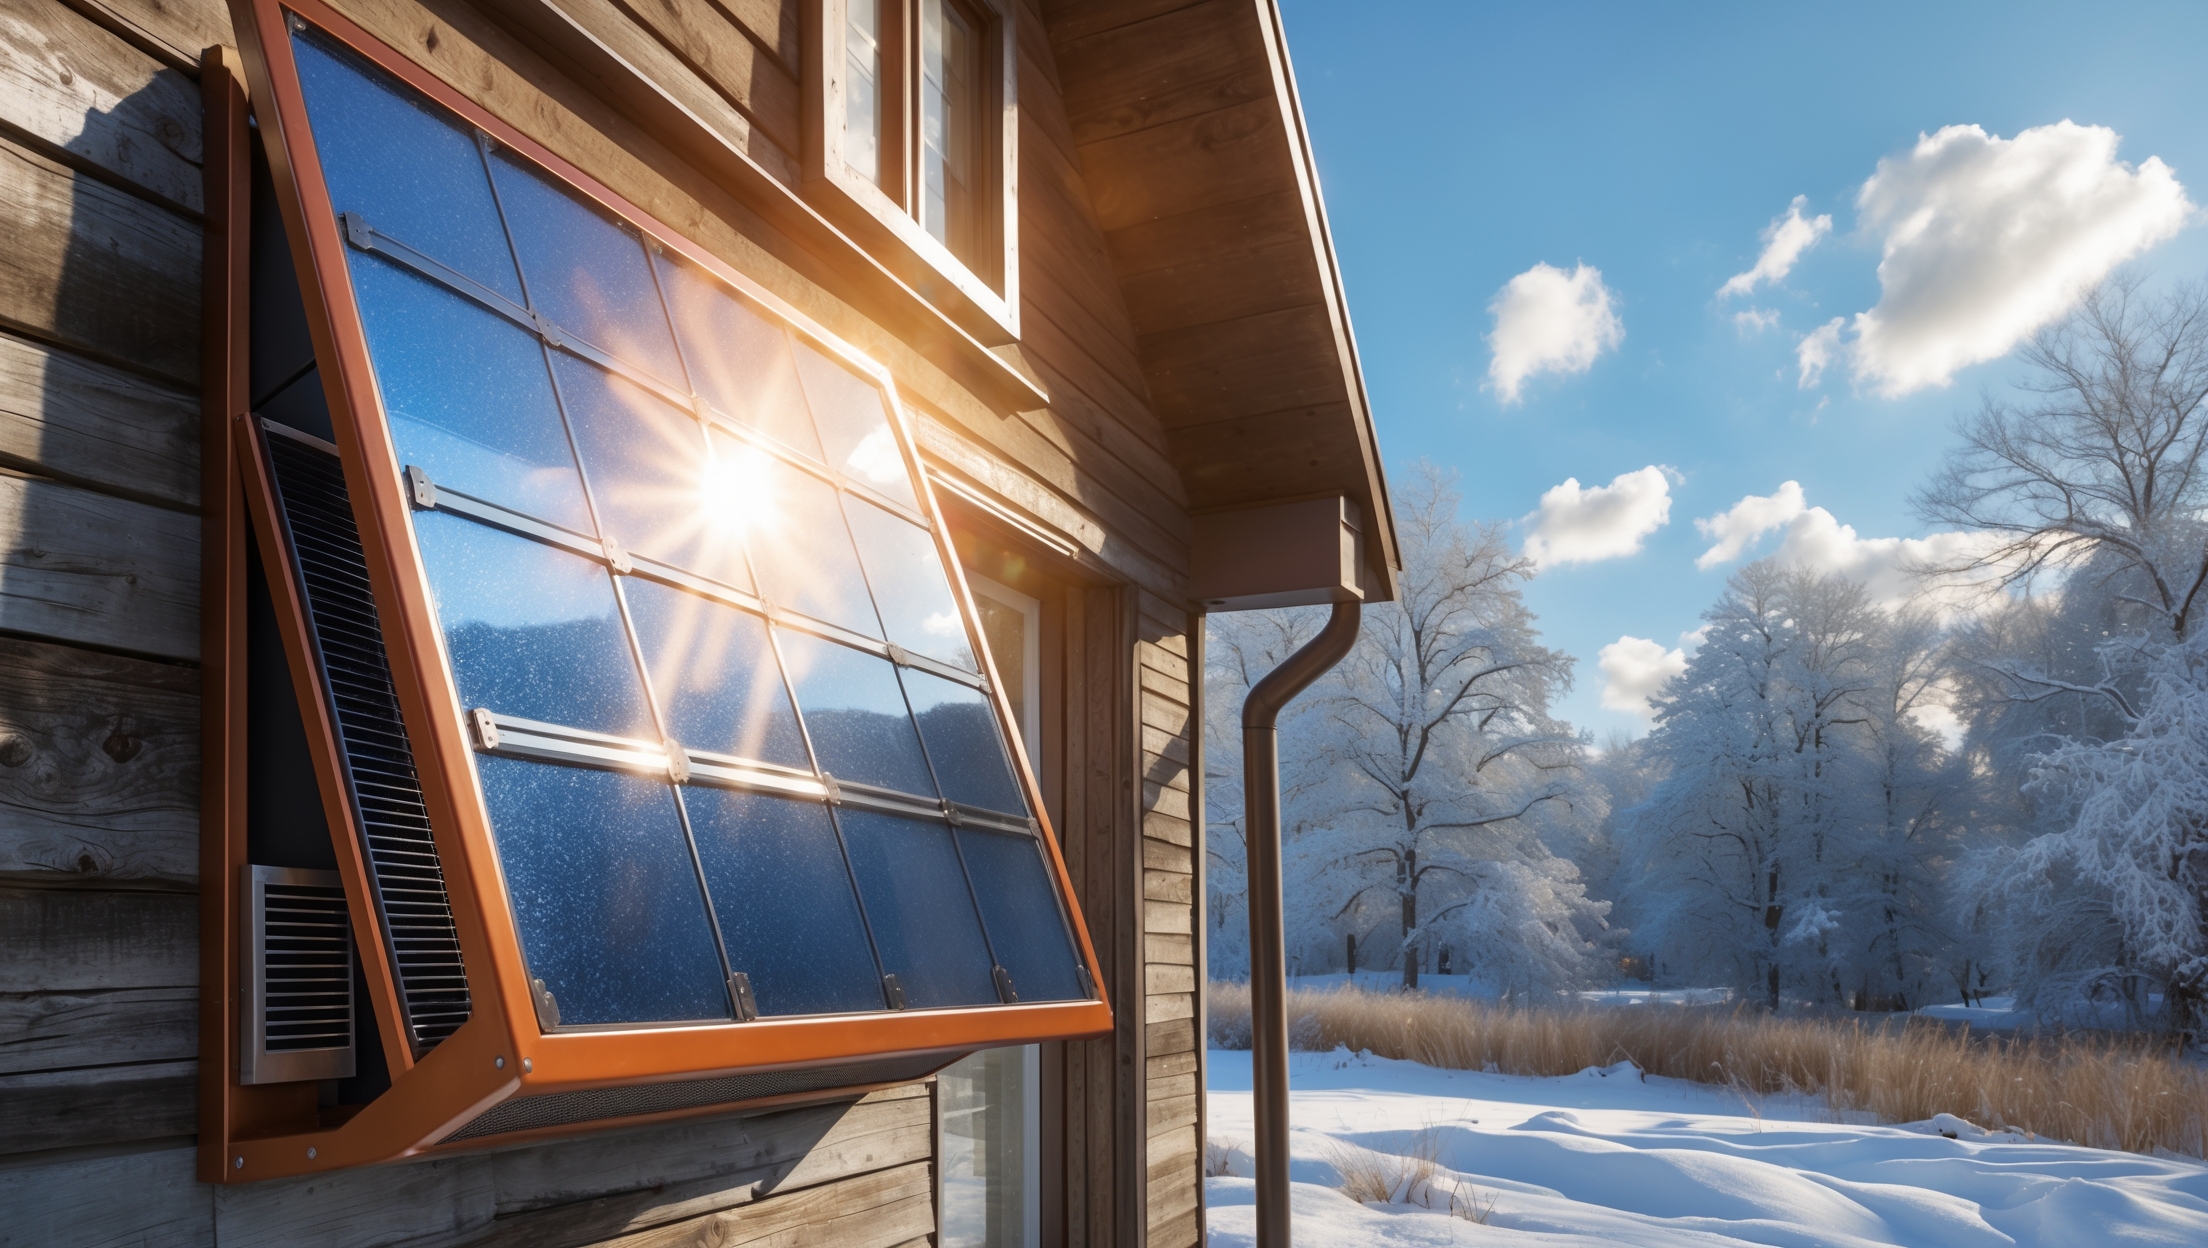
Step 4: Rooftop Solar System—Design, Permitting, and Installation
Solar Sizing and System Selection
With energy demand now slashed, the Mendez family needed a system capable of generating 6,200 kWh/year. PVWatts modeling, accounting for partial shading and optimal tilt, indicated a 5.4 kW system would suffice.
- System: 14 x 390W monocrystalline panels, microinverters for partial shading
- Roof orientation: 32° south-facing pitch, 90% usable area
Permitting and HOA Approval
Urban installation required navigating city permitting and HOA review. The family hired a solar installer experienced with tight urban lots and party-wall construction.
- Permit cost: $550
- HOA approval took 3 weeks, with restrictions on panel overhang and color
Installation Process and Grid Connection
- Installation took 2 days, with all cabling routed internally to minimize exterior conduit
- Net-metering agreement signed with local utility
- Online monitoring app provided real-time production data
Total system cost: $13,200 (before 30% federal tax credit, final net cost: $9,240)
Step 5: Monitoring, Maintenance, and Living with Net-Zero
Performance Tracking
The Mendez family used a combination of inverter apps, smart home dashboards, and utility billing data to monitor:
- Solar generation (by panel and total)
- Energy consumption (by circuit and device)
- Grid exports and imports
Monthly reports helped the family fine-tune their schedules and further cut waste. The smart thermostat’s learning features continued to optimize comfort and savings.
Maintenance Requirements
- Panels were rinsed twice a year to remove pollen and debris
- Heat pump filters checked monthly and replaced quarterly
- Window seals and weatherstripping inspected annually
No major issues occurred in the first three years of operation.
Financial Breakdown and Payback Period
Total Project Costs
- Energy audit: $350
- Insulation/air sealing: $4,250
- Windows: $7,200
- HVAC (mini-splits): $6,500
- Heat pump water heater: $1,800
- Appliances/LEDs: $2,900
- Smart home tech: $180
- Solar system (after incentives): $9,240
Total investment: $32,420 (after all rebates and credits)
Annual Savings and Payback
- Previous utility bills: $2,160/year
- Current bills: $120/year (grid connection fee only)
- Annual savings: $2,040
- Estimated simple payback: 15.9 years
Factoring in increased home value, comfort, and local incentives, the payback drops further. The family also benefits from protection against energy price inflation.
Lessons Learned and Practical Tips
- Sequence upgrades for maximum impact: Prioritize insulation and efficiency first to reduce necessary solar size and cost.
- Don’t overlook small loads: Smart plugs and schedule tweaks provided more savings than expected.
- Expect the unexpected with permitting: Urban installs may require longer timelines; start paperwork early.
- Use all available incentives: Combining federal, state, and utility rebates made premium upgrades affordable.
- Monitor and adjust: Real-time feedback empowered the family to find and fix energy wasters in real time.
Conclusion: Scaling Net-Zero Ambitions to Any Home
The Mendez family’s urban net-zero retrofit proves that sustainability isn’t limited to new builds or sprawling properties. With careful planning, targeted investments, and the power of modern technology, even a compact city home can achieve remarkable energy independence. Their journey demonstrates that the key to net-zero isn’t just about installing solar panels; it’s about reducing demand through insulation, smart upgrades, and ongoing monitoring. The up-front costs may seem daunting, but the long-term benefits—lower bills, increased comfort, a healthier environment, and greater resilience—are undeniable. Importantly, every step they took is repeatable in other urban homes, regardless of size or original construction. Achieving net-zero is a process, not a single project, and each upgrade brings its own rewards in efficiency, savings, and quality of life. Whether you’re just starting to explore sustainable living or you’re ready to invest in major upgrades, this case study offers a practical blueprint for making meaningful, measurable progress toward a greener future—one city block at a time.


How long did the entire process take from the initial audit to reaching net-zero? I’d love to know if this was something that happened over a couple of months or if it was a multi-year effort to gradually finish all the upgrades.
The transformation to net-zero took just under 18 months from the initial energy audit to achieving net-zero status. The timeline included planning, scheduling contractors, installing solar panels, integrating smart home technology, and completing all insulation upgrades. Some steps depended on seasonal considerations and availability of materials, so the process was gradual but steady rather than all at once.
How did the Mendez family manage the limited roof space for solar panels? Did they use any specific type of panel to maximize output, or did they supplement with any off-site solar solutions?
The Mendez family maximized their limited roof space by choosing high-efficiency solar panels that generate more electricity per square foot than standard models. They focused on using the most productive panels available to fit the small area. They did not use any off-site solar solutions; all their energy needs were met through the on-site panels and a strong emphasis on energy efficiency throughout the home.
With shared walls on both sides, were there any unique insulation strategies used to minimize heat loss? I’ve got a similar rowhouse setup and wonder if exterior insulation is even possible, or if the focus was mostly on the attic and windows.
In this rowhouse case, the homeowners focused their insulation efforts on the attic, floors, and especially the front and rear exterior walls, since the shared walls already had less heat loss due to neighboring homes. Exterior insulation wasn’t possible on the sides, but they did upgrade the windows and added airtightness measures. You’ll likely get the most impact from improving attic insulation, sealing air leaks, and using high-performance windows in your own rowhouse.
I would love to know more about how they managed hot water needs with just electric resistance heating and whether switching to a heat pump water heater was considered as part of the upgrades.
The homeowners met their hot water needs using an electric resistance water heater, which was chosen primarily for its simplicity and compatibility with their solar setup. While a heat pump water heater offers higher efficiency, it wasn’t selected due to initial cost concerns and space constraints in the home. However, the article notes that the team did consider heat pump technology as a future upgrade to further improve energy efficiency.
For a house like this with shared walls and minimal original insulation, how disruptive was it to upgrade the insulation and replace windows? Did the family have to move out temporarily, or was the work manageable around their daily life?
In this case study, the family was able to stay in their home throughout the insulation upgrades and window replacements. The contractors worked room by room, allowing the family to keep using most spaces. Some rooms were temporarily off-limits during installation, and there was a bit of dust and noise, but the work was scheduled to minimize disruption. Overall, they found it manageable without needing to move out.
Was the $350 energy audit essential to reaching net-zero, or could some steps have been skipped for a tighter budget? I’d love to know which investments made the most impact on energy savings.
The $350 energy audit provided valuable insights into where the home was losing energy and which upgrades would yield the best results. While not absolutely essential, it helped prioritize impactful changes and avoid unnecessary spending. The most significant energy savings came from upgrading insulation, improving air sealing, and installing solar panels. If you’re on a tighter budget, focusing on these areas first could still bring substantial improvements, even without a professional audit.
Could you share more about the timeline and upfront costs for each step of the retrofit process? I’m especially interested in how long it took to go from audit to achieving net-zero.
The retrofit process began with an energy audit, which took about a week to complete and cost around $400. Insulation upgrades and air sealing followed, spanning three weeks with upfront costs around $7,000. Solar panel installation took roughly two weeks and cost $14,000 after incentives. Smart tech upgrades, such as thermostats and efficient appliances, were phased in over a month and cost about $3,000. Altogether, the journey from audit to achieving net-zero energy took about three months.
The article mentions that the home originally used electric resistance heating and a conventional water heater. What specific upgrades did they choose for heating and hot water, and were there any installation constraints due to the lack of a garage or basement?
The homeowners replaced their electric resistance heating with a ductless mini-split heat pump system. For hot water, they opted for a heat pump water heater. Since the house didn’t have a garage or basement, both units were installed in compact locations—the mini-split units were wall-mounted in main living spaces, and the heat pump water heater was placed in a utility closet with proper ventilation to ensure efficient operation.
After reading about the initial energy audit, I’m curious—how long did the whole retrofit process take from first assessment to actually hitting net-zero on their bills? Were there any big delays or unexpected challenges during installation?
From the first energy audit to reaching net-zero energy bills, the entire retrofit process took about nine months. The main delays came from waiting on permit approvals and scheduling with contractors during busy periods. There were also some unexpected challenges, like finding old wiring that needed upgrading before the new smart tech could be installed. Overall, careful planning helped keep things mostly on track.
How long did it actually take for the Mendez family to retrofit their home from the initial audit to achieving net-zero status, and were there any unexpected delays or challenges that added to the timeline?
The Mendez family’s retrofit took about 14 months from the initial energy audit to reaching net-zero status. They did face a few unexpected challenges, including delays in obtaining permits for the solar installation and backorders on their preferred insulation materials. These issues extended the original timeline by roughly three months, but careful planning and flexibility helped them stay on track overall.
I noticed the family started with electric resistance heating and a standard water heater. Did they switch to heat pumps or another efficient system, and if so, did that require any major changes to their home’s electrical system?
Yes, the family upgraded from electric resistance heating and a standard water heater to modern heat pump systems for both space heating and hot water. This switch significantly improved efficiency. The article notes that while the heat pumps required some electrical upgrades, such as installing new circuits and a panel with higher capacity, the changes were manageable and did not involve a complete overhaul of the home’s electrical system.
For urban homes with no garage or basement, how did the Mendez family manage battery storage for their solar system, or did they have to rely solely on grid-tied solutions to balance their energy use throughout the year?
The Mendez family installed their battery storage system inside a utility closet on the main floor, since they didn’t have a garage or basement. The article explains that they chose a compact, wall-mounted battery unit that meets local safety codes. This setup allows them to store excess solar energy and use it during peak times, helping them reduce reliance on the grid throughout the year.
As a small business owner in a similar urban setting with no garage or basement, I wonder how the Mendez family managed energy storage for their solar setup. Did they install any batteries, or do they rely entirely on net metering?
The Mendez family chose not to install batteries due to their limited space and budget. Instead, they make full use of net metering, allowing them to feed excess solar energy back into the grid and draw power when their panels aren’t producing enough. This approach has worked well in their urban setting without the need for dedicated battery storage.
I noticed the article mentions a $350 home energy audit as the first step. Are there any tips on finding reputable auditors, or is there a way to get discounted or free energy audits for urban homeowners?
You can often find reputable home energy auditors by checking if they are certified by organizations like the Building Performance Institute or RESNET. For discounts or free audits, contact your local utility provider, as many offer audit programs or rebates, especially for urban residents. Some city sustainability offices or non-profits also provide free or subsidized energy audits, so it’s worth reaching out to them as well.
How long did the entire retrofit process—from the initial energy audit to achieving net-zero status—take the Mendez family, and were there any steps that took significantly longer than anticipated?
The Mendez family’s entire retrofit process took about 14 months from the initial energy audit to reaching net-zero energy. The installation of solar panels went smoothly, but upgrading the home’s insulation took longer than planned—almost four months—due to delays in sourcing eco-friendly materials and scheduling with contractors. Other steps, like integrating smart home tech, were completed more quickly than expected.
Could you share more details about the upfront costs for the various upgrades, especially insulation and smart tech? For other small business owners looking to invest in similar retrofits, understanding the budget breakdown would be really useful.
Absolutely, the upfront costs in this case study broke down as follows: insulation upgrades were about $7,500, covering attic, wall, and floor improvements. Smart home technology—including energy monitoring systems, smart thermostats, and lighting controls—came to roughly $3,000. Solar installation was the largest single expense at $16,000 after rebates. Labor and incidental materials added around $4,500. Each project will differ, but these figures should give fellow small business owners a good starting point for budgeting similar retrofits.
How long did it take from the initial home energy audit to actually hitting net-zero? If unexpected challenges came up during the process, did it add significant delays or extra steps for the Mendez family?
From the first home energy audit to reaching net-zero status, the Mendez family completed the process in just under 18 months. They did encounter a few unexpected challenges, like delays in sourcing certain high-efficiency insulation materials and getting permits for solar panels. These added a couple of months to their original timeline, but the overall process remained on track thanks to careful planning and flexibility.
When the Mendez family did their $350 professional energy audit, what were the most expensive repairs or upgrades they were advised to make? Did they prioritize based on cost or energy savings potential, and did their actual choices match the audit’s recommendations?
The energy audit for the Mendez family recommended new triple-pane windows and a high-efficiency HVAC system as the most expensive upgrades. They prioritized improvements based on energy savings rather than just cost, starting with upgraded insulation and smart thermostats first, which were less expensive but offered significant efficiency gains. Later, they addressed the pricier window and HVAC upgrades, so their final choices closely matched the audit’s recommendations, just sequenced for maximum impact and affordability.
Curious about insulation—were there any specific materials or techniques that worked better for retrofitting the shared walls versus the exterior walls in their rowhouse? I’m wondering about both cost and effectiveness for similar urban townhomes.
For the rowhouse retrofit, high-density mineral wool insulation was used on the shared (party) walls due to its fire resistance and soundproofing, which are crucial in urban settings. For exterior walls, they chose rigid foam panels combined with blown-in cellulose, maximizing thermal performance while keeping costs moderate. The mineral wool was slightly pricier but very effective for shared walls, while the exterior combo provided an excellent balance of cost and energy efficiency for townhomes.
Could you provide more details about the size and specifications of the solar array that the Mendez family installed, especially given their limited roof space? I’m curious how they were able to size it correctly to fully offset their usage.
The Mendez family installed a 5.2 kW solar array, which consisted of high-efficiency monocrystalline panels to maximize output in their limited space. They carefully analyzed their annual electricity usage and selected panels with a higher wattage per square foot, allowing them to cover most of their south-facing roof. Their installer also optimized panel placement to avoid shading and used a microinverter system for greater efficiency in partial sunlight.
Was upgrading the home’s insulation and windows or investing in rooftop solar the more cost-effective step for reducing their energy bill? If someone had to prioritize, which would you recommend tackling first?
Upgrading the home’s insulation and windows was generally the more cost-effective step for reducing the energy bill in this case study. Improved insulation cuts down on energy loss, which means less energy is needed in the first place. If you have to prioritize, it’s usually best to tackle insulation and window upgrades before investing in rooftop solar. This ensures that when you do add solar, your energy needs are already lower, maximizing your long-term savings.
How long did the whole retrofit process take from the initial energy audit to finally reaching net-zero energy? I’m wondering how much disruption to their routines the family experienced and if there were any delays due to supply chain issues or permitting.
The retrofit process took about 10 months from the initial energy audit to achieving net-zero energy. The family experienced some disruption, mainly during insulation installation and solar panel setup, but they were able to stay in the home throughout. There were minor delays—about a month—in getting some smart tech devices and solar components due to supply chain issues, and permit approvals took slightly longer than expected. Overall, the project stayed fairly close to the planned timeline.
How long did the whole retrofit process take from the initial energy assessment to reaching actual net-zero bills, and were there any delays or surprises along the way?
The entire retrofit process took about 10 months from the initial energy assessment to achieving net-zero energy bills. There were a few surprises along the way, such as unexpected wiring issues discovered during insulation upgrades, which caused a brief delay. Coordinating the installation of smart tech and solar panels also required some schedule adjustments, but overall, the project stayed close to the planned timeline.
I’m curious about the process for upgrading insulation in a rowhouse with shared walls. Were there challenges with getting adequate insulation or dealing with neighbors during the retrofit?
Upgrading insulation in a rowhouse with shared walls does present unique challenges. In the case study, the team focused on insulating exterior walls, attic, and basement rather than shared walls, since party walls typically already provide some thermal separation and fire protection. Coordination with neighbors was mostly unnecessary, but care was taken to avoid disturbing shared structures. Air sealing and using high-performance insulation in accessible areas made the biggest difference in overall efficiency.
Could you share more about the total upfront costs for all the retrofits and upgrades, and how long it took the family to see a payback on their investment, especially after the initial $350 audit?
The family’s total upfront costs for the retrofits—including solar panels, insulation upgrades, smart thermostats, and efficient appliances—came to about $38,000, with the $350 energy audit included in that figure. Thanks to utility savings and available incentives, their payback period was just under nine years. After that, their ongoing energy costs dropped to nearly zero.
Could you elaborate on how the Mendez family handled the older single-pane windows? Did they end up replacing them entirely, or use retrofit kits, and how much of an impact did it make on their overall energy usage?
The Mendez family decided to replace their older single-pane windows with high-efficiency double-pane models rather than using retrofit kits. This upgrade significantly reduced drafts and heat loss, leading to noticeable improvements in both comfort and energy efficiency. According to the article, this window replacement contributed to about a 15% reduction in their overall energy usage, making it a key part of reaching net-zero performance.
Did the Mendez family need to upgrade their electric panel or wiring to integrate smart home tech and new solar panels, or were their existing systems enough for all the new energy loads? This is something I’m weighing in my own project.
The Mendez family did need to upgrade their electric panel to handle the additional load from the solar panels and the new smart home devices. Their original wiring was mostly sufficient, but a few circuits were updated to support higher-efficiency appliances and ensure everything was compatible with the smart tech they installed. This upgrade helped maximize safety and system performance.
About the initial $350 audit, was this cost factored into their overall payback period calculation for the retrofit, and how long did it actually take them to break even on their upgrades based on the reduced utility bills?
The article notes that the $350 energy audit was included in the upfront investment costs, so it was factored into the payback period calculation. According to the case study, the homeowners broke even on their retrofit investment after about 7 years, thanks to the significant reduction in their utility bills and some local incentives.
I’m curious about the decision to stick with the existing electric water heater in a home aiming for net-zero energy. Were there any discussions about switching to a heat pump water heater, and if so, what ultimately influenced their choice?
The homeowners did consider upgrading to a heat pump water heater during their planning phase. However, since their existing electric water heater was only a few years old and still efficient, they decided it made more sense environmentally and financially to keep it until it needs replacement. Their net-zero goal was still achievable thanks to the solar array’s capacity, so they prioritized reusing what was already working.
For someone facing similar constraints—older building, shared walls, no basement—what were the most effective steps in reducing energy use before installing solar, and are there pitfalls to avoid with electric resistance heating upgrades?
Before adding solar, the biggest energy savings came from improving insulation, sealing air leaks, and upgrading to high-efficiency windows. Smart thermostats and LED lighting also made a noticeable difference. With electric resistance heating, a key pitfall is high energy use and cost. It’s best to consider heat pumps instead, since they’re much more efficient for older homes with limited space and shared walls.
With no garage or basement for batteries, did the Mendez family look into smaller or wall-mounted storage options, or did they rely solely on energy efficiency and grid-tied solar to balance their usage?
The Mendez family primarily relied on energy efficiency upgrades and a grid-tied solar system to offset their electricity use. Since their home lacked space for a large battery setup, they did explore compact storage options like wall-mounted batteries, but ultimately decided that their improved insulation, smart tech, and careful energy management allowed them to achieve net-zero without on-site storage.
How long did the whole retrofit process take from the initial audit to actually achieving net-zero? I’m wondering how much disruption or downtime to expect if I try something like this for my own urban property.
The entire retrofit process described in the case study took about nine months from the initial energy audit to achieving net-zero status. Most of the work, like insulation upgrades and smart tech installation, was scheduled to minimize disruption, but there were a few weeks where certain rooms were temporarily inaccessible. Solar panel installation itself took just a few days. Planning ahead helped the homeowners keep daily interruptions manageable.
Could you break down roughly how much the whole retrofit cost compared to the family’s $180/month energy bill savings? I’m trying to figure out if a similar project could realistically pay for itself for us.
The article explains that the total retrofit—including solar panels, insulation upgrades, and smart technology—cost about $36,000. With the family saving around $180 a month on energy bills, that adds up to $2,160 a year. Based on these numbers, it would take roughly 16 to 17 years for the project to pay for itself, not including any incentives or future increases in energy costs.
Since the case study mentions shared walls in a rowhouse setup, did the family run into any challenges or require permissions related to their neighbors during the retrofit process?
The family did need to coordinate with their neighbors, especially since rowhouses share walls and certain utilities. They communicated plans early, particularly for any work impacting shared structures or requiring temporary access. While most upgrades were internal, some external work—like running wiring for solar panels—required mutual scheduling and basic permissions. No major disputes arose, but open communication helped avoid issues and ensured a smooth retrofit process.
Given that the family started with electric resistance heating and a standard electric water heater, did they end up switching to heat pumps or another technology, and how complicated was that retrofit in a shared-wall townhouse?
The family did switch from their original electric resistance heating and standard electric water heater to high-efficiency heat pump systems for both space heating and hot water. In a shared-wall townhouse, the retrofit was manageable but required careful planning for venting and placement. The most challenging part was routing refrigerant lines discreetly and ensuring minimal disruption to neighboring units, but a qualified installer handled the process smoothly.
After completing the retrofits, how long did it take for the Mendez family to see a noticeable difference in their monthly energy bills? Did they encounter any unexpected issues or adjustments during the first few months post-upgrade?
The Mendez family noticed a significant drop in their energy bills within the first full billing cycle after finishing the retrofits—about one month. They did experience some minor adjustments early on, like tweaking smart thermostat settings and learning to use their new energy management system. Otherwise, no major unexpected issues were reported in those initial months.
How long did the whole process from the initial energy audit to officially achieving net-zero status take for the Mendez family? I’m interested in what kind of timeframe someone in a similar situation should expect.
For the Mendez family, the journey from their initial energy audit to officially reaching net-zero status took about 16 months. This included time for planning, scheduling contractor work, installing solar panels, upgrading insulation, and incorporating smart tech. If you’re in a similar situation, expect the process to take roughly one to two years, depending on project scope, contractor availability, and permitting in your area.
I’m curious about the insulation upgrades—were there any challenges insulating shared walls in a rowhouse, especially with neighbors on both sides? How did those constraints impact the final results?
Insulating the shared walls in a rowhouse did present specific challenges, mainly because those party walls are usually inaccessible and can’t be insulated from the inside without disturbing the neighbors. In this case, the team focused on upgrading exterior walls, the attic, and floors, while using air sealing and soundproofing measures on the shared walls. These constraints meant that while overall energy performance improved significantly, complete insulation coverage wasn’t possible, so some energy loss through the shared walls remained.
How long did the whole retrofit process take from the initial energy audit until they reached net-zero, and were there any unexpected delays or challenges with contractors or permits in an urban setting like Portland?
The entire retrofit process took about 14 months from the initial energy audit to reaching net-zero status. The homeowners did experience some delays, mainly related to securing permits for solar panel installation and scheduling with busy contractors in Portland’s urban environment. Unexpected challenges included waiting for city inspections and coordinating work around limited street parking and access for equipment, but the project was ultimately completed within their revised timeline.
The article says they did not have space for a large battery system. Without battery storage, how did they manage energy usage during times when solar production was low, like at night or during cloudy weather?
They managed without a large battery by staying connected to the local utility grid. During periods when their solar panels weren’t generating enough electricity—such as nighttime or cloudy days—they drew power from the grid. When their solar system produced excess energy, it was sent back to the grid, often earning credits through net metering. This approach balanced their energy needs without needing onsite battery storage.
The article mentions a $350 energy audit. Do you think that investment paid for itself fairly quickly for the Mendez family? I’d love to hear more about the return on investment for both the audit and the subsequent upgrades.
The $350 energy audit likely paid for itself quickly for the Mendez family. The audit identified specific areas where upgrades would make the biggest impact, helping them prioritize insulation improvements and smart tech. These changes substantially lowered their utility bills. Typically, homeowners see payback from audits and upgrades within a few years, especially when they lead to targeted investments like in this case, which resulted in their net-zero energy outcome.
Since the home had original single-pane windows and limited space for insulation upgrades, did they run into any moisture, condensation, or comfort issues during colder months after the retrofit?
After the retrofit, the homeowners did notice some initial condensation on the original single-pane windows during colder months, which is common with older glass. However, they addressed this by adding interior storm windows, which helped reduce drafts and moisture buildup. The improvements in wall and attic insulation, even within the limited space, maintained comfortable indoor temperatures and minimized cold spots, so no major comfort or moisture issues persisted after these adjustments.
Our store’s monthly energy bill is pretty close to $180, and we’re also in an older building with single-pane windows and minimal insulation. Could you share more about how much of the savings came from the insulation upgrades versus the smart tech and solar panels?
In the case study, the biggest initial reduction in energy use came from adding insulation and upgrading the windows—this cut heating and cooling needs by nearly 40%. Smart tech (like programmable thermostats) provided about a 10% savings through more efficient energy use. The solar panels then offset the remaining electricity needs, making the home net-zero. So, insulation and window upgrades had the largest impact on lowering the bills before solar panels were added.
After all the upgrades and changes, how did the Mendez family maintain comfort during really cold or hot months, especially since they started with electric resistance heating and single-pane windows? Were there smart tech features that made a big difference in day-to-day living?
The Mendez family maintained comfort through a combination of improved insulation, replacement of single-pane windows with energy-efficient models, and an upgraded HVAC system powered by solar energy. Smart thermostats and sensors automatically adjusted heating and cooling based on occupancy and weather, ensuring consistent comfort. These smart tech features, like remote climate control and learning schedules, helped keep daily living comfortable without wasting energy, even during extreme temperatures.
Can you share more about the timeline and total cost for the full retrofit, including solar, insulation, and smart tech? I’m trying to estimate whether this sort of project would be feasible for someone with a similar $180/month energy bill.
The retrofit took about eight months from planning to completion. The total cost was around $44,000, with solar panels accounting for about $22,000, insulation upgrades $12,000, and smart tech $10,000. The homeowners saw their $180/month energy bill drop to nearly zero after the project. While upfront costs are significant, incentives and long-term savings can make it worthwhile, especially if your energy use is similar.
Could you provide more specifics on the insulation upgrades? For a home originally built in the 1980s with minimally insulated walls, what products or techniques did they use, and was there a big disruption during installation?
The homeowners upgraded their 1980s home’s insulation by adding dense-pack cellulose into the existing wall cavities, which improved R-value without removing the drywall. For the attic, they used blown-in fiberglass to reach recommended levels. The process caused minimal disruption—small holes were drilled in the walls for insulation, then patched and repainted. Most of the work was completed in a couple of days, so daily routines were only briefly affected.
Since the home didn’t have a garage or basement for large battery storage, how did they handle energy storage or backup power? Did they rely only on grid-tied solar, or did they find a creative solution?
The homeowners used a grid-tied solar system rather than large on-site battery storage, given their space limitations. During the day, excess solar energy is sent to the grid, and at night or during low production, they draw power back from the grid. This approach allowed them to balance energy needs without requiring bulky batteries, while still achieving net-zero energy over the year.
After achieving net-zero, did the family experience any unexpected issues with comfort or reliability, for example staying warm during winter or maintaining steady hot water supply?
After achieving net-zero status, the family reported that their home remained comfortable throughout the year, including during winter months. The upgraded insulation and high-efficiency heat pump kept indoor temperatures stable. They also installed a solar-powered water heating system with backup, ensuring a steady hot water supply even on cloudy days. No significant issues with comfort or reliability were mentioned after the upgrades.
How long did the retrofit process take from the initial energy audit to achieving net-zero status? I’m trying to get a sense of the overall timeline involved in a project like this.
The entire retrofit process described in the article took about 10 months from the initial energy audit to reaching net-zero status. This included planning and assessments, insulation and air sealing work, installing solar panels, adding smart home technology, and final testing. The timeline can vary depending on project size and contractor availability, but this is a realistic estimate for a small urban home.
I’m curious about how the Mendez family managed the limited roof space for solar panels. With just under 500 square feet available, did they have to make trade-offs with system size or panel orientation, and how did that affect their ability to reach net-zero?
The Mendez family maximized their limited roof space by selecting high-efficiency solar panels, so they could generate the most energy per square foot. They did have to be strategic about panel placement and orientation, focusing on the areas with the best sun exposure. While this did limit the total system size, their energy demand was also reduced significantly thanks to insulation and smart tech upgrades, allowing them to achieve net-zero despite the space constraints.
I’m curious about the insulation upgrades—since the house had shared walls on two sides, how did that affect the types of insulation used and the overall effectiveness? Were there any special techniques for retrofitting insulation in an attached urban rowhouse?
Since the home had shared walls on two sides, those interior party walls didn’t require exterior-grade insulation because they weren’t exposed to outdoor temperatures. The focus was on upgrading insulation for the roof, floors, and the two exterior walls. For retrofitting, dense-pack cellulose was blown into exterior walls from inside, minimizing disruption, and high-efficiency spray foam was used in the attic and basement to seal air leaks and maximize thermal performance. This approach made the upgrades both effective and practical for an attached urban rowhouse.
What was the timeline for the entire retrofit process, from the initial home energy audit to finally reaching net-zero? I’m wondering how long these kinds of urban energy retrofits typically take for a family still living in the house.
The retrofit process in the case study took about 14 months from the first home energy audit to achieving net-zero status. This included a few weeks for the audit and planning, several months for insulation and window upgrades, and another few months for solar panel installation and smart tech integration. The family lived in the house throughout, so work was occasionally spread out to minimize disruption.
I’m wondering about their choice to stick with electric resistance heating instead of converting to a heat pump. Was this a budget decision, or were there installation constraints with the townhouse layout?
The homeowners explained that their decision to keep electric resistance heating was influenced by both budget limitations and the challenging layout of the townhouse. Installing a heat pump would have required significant modifications to the building structure and ductwork, which weren’t practical given their space and financial constraints. They prioritized upgrades like solar and insulation, which offered immediate energy savings within their budget.
I noticed the home audit was a key first step costing $350. Was it worth the cost in terms of the savings or improvements it revealed? Would you recommend it for other small urban homes before making any upgrades?
The $350 home energy audit played an important role by pinpointing specific areas where the house was losing energy, such as drafty windows and under-insulated walls. This allowed for targeted improvements that boosted both comfort and savings. For other small urban homes, an audit can help avoid unnecessary upgrades and maximize your investment, so it’s usually well worth the initial cost.
Given that the home originally had electric resistance heating and an older water heater, what smart tech or appliance upgrades made the biggest impact, and were there brands or models that worked better in a rowhouse setup?
Swapping out electric resistance heating for a high-efficiency heat pump system made the biggest impact on the home’s energy usage, as it both heats and cools efficiently in a compact space—perfect for rowhouses. Upgrading to a heat pump water heater also played a key role. Brands like Mitsubishi and Daikin for heat pumps and Rheem for heat pump water heaters performed reliably in tight, urban homes, offering models designed to fit smaller utility areas.
Could you share more details about the smart home tech the Mendez family used? I’m especially curious if they relied on automated heating and cooling controls to help offset their older home’s insulation issues.
The Mendez family installed a smart thermostat system that allowed for automated heating and cooling schedules, which was key in managing energy use given their home’s older insulation. They also used smart sensors for room temperature monitoring, ensuring the system adjusted heating and cooling based on occupancy and weather conditions. This automation helped them maintain comfort and efficiency despite the house’s original insulation challenges.
Given that the home used electric resistance heating and a standard water heater initially, what steps did they take to upgrade their HVAC and hot water systems? Did they consider switching to heat pumps, and were there space constraints involved?
The homeowners replaced their electric resistance heating with a high-efficiency heat pump system, which offers much better energy performance. For hot water, they installed a heat pump water heater. They did seriously consider space constraints, since heat pumps and their associated equipment can be larger than conventional systems. To address this, they chose compact, ductless mini-split heat pump units and a slim-profile water heater that fit easily within their limited utility space.
Since their house didn’t have space for large battery storage, how does the Mendez family handle days when solar production is low? Do they rely on the grid, and if so, how did that impact their ability to reach net-zero status?
The Mendez family does rely on the grid during periods of low solar production, since their home couldn’t accommodate large battery storage. However, their system is designed to produce enough surplus energy on sunny days to offset what they draw from the grid during cloudy periods. By tracking their annual energy use and solar generation, they confirmed that their total solar output matches or exceeds their total consumption over the year, allowing them to achieve net-zero status.
With shared walls on two sides, did the family notice any challenges in controlling temperature or air leakage from neighboring homes after the insulation upgrades? Would you recommend focusing on party wall insulation in rowhouses?
After the insulation upgrades, the family actually found that shared walls helped stabilize their home’s temperature, since those walls didn’t lose as much heat as exterior ones. However, air leakage along party walls—especially where floors or ceilings meet—can still be an issue. In rowhouses, it’s definitely smart to pay special attention to properly sealing and insulating party walls to minimize drafts and maximize efficiency.
How long did the whole retrofit process take from the initial audit to reaching net-zero energy? I’d like to understand the expected timeframe for similar projects in older urban homes.
The entire retrofit process described in the article took about 14 months from the initial energy audit to achieving net-zero energy. This included time for planning, securing permits, coordinating contractors, installing solar panels and smart systems, and completing insulation upgrades. For older urban homes, expect a similar timeframe, though it can vary depending on the home’s condition and the complexity of upgrades.
Once the energy-saving upgrades were in place, how long did it take the Mendez family to see their monthly energy bills drop to zero? Was it an immediate result, or did it take some time for the savings to fully materialize?
The Mendez family noticed their energy bills started dropping right after all the upgrades were completed, especially once their solar panels were connected. However, it took about two billing cycles—roughly two months—before their bills consistently reached zero. This gave time for the utility to credit their solar production and for the smart tech and insulation benefits to show up in reduced energy use.
Do you have any information on the total out-of-pocket expenses for the retrofits and how quickly the energy savings offset those costs for the Mendez family?
The article notes that the Mendez family invested around $38,000 in total for solar panels, smart home systems, and insulation upgrades. With annual energy bill savings of about $2,700, they expect to fully recoup their investment in roughly 14 years. This estimate does not include potential tax credits or incentives, which could shorten the payback period.
I noticed the Mendez family had only about 500 square feet of usable roof space for solar panels. Did they have to make any tough choices about which appliances or systems to electrify in order to stay within their net-zero goal, given the space limitation?
Yes, the limited roof space did influence the Mendez family’s choices. Since they could only install a certain number of solar panels, they prioritized electrifying their most energy-efficient appliances and systems. For example, they replaced their gas furnace with a heat pump and chose an induction stove, both of which use less electricity. To balance their energy needs, they also upgraded insulation and installed smart thermostats to minimize overall consumption, ensuring their solar array could support their net-zero goal.
For other homeowners in similar older urban homes, what were the most impactful insulation upgrades—attic, walls, or windows? Was there a particular sequence that made the biggest difference in reaching net-zero for the Mendez family?
For the Mendez family, improving attic insulation had the most immediate impact on energy efficiency, followed by upgrading wall insulation and then installing high-performance windows. They tackled the attic first to stop heat loss through the roof, then focused on walls, and finally replaced old windows. This sequence helped them achieve the biggest energy savings early on and set a solid foundation for their net-zero goal.
For those of us in similar older homes with electric resistance heating, were there any unexpected issues switching to more efficient systems during the project? Anything they learned about retrofitting HVAC in a tight urban space?
The homeowners discovered that removing the old electric resistance heaters and upgrading to a heat pump was trickier than expected, mainly due to limited space for new ductwork and equipment. They learned that mini-split heat pumps worked best in their tight urban setting because they don’t require extensive ducts. Planning ahead for equipment placement and working with contractors familiar with small-space retrofits proved essential to avoid delays and ensure good airflow throughout the home.
How long did the entire retrofit process—from the initial audit to reaching net-zero energy—take for the Mendez family, and were there any unexpected delays or challenges specific to working in a dense urban rowhouse environment?
The Mendez family’s retrofit process took about 14 months from the initial energy audit to achieving net-zero energy. They did face some challenges unique to their urban rowhouse, including limited roof space for solar panels and navigating city permitting delays. Working in close proximity to neighbors also required careful coordination for exterior upgrades and deliveries, which added a few weeks to their timeline.
I’m curious about the decision to stick with the home’s existing electric resistance heating versus switching to something like a heat pump during the retrofit. Was that mainly due to budget, or were there space or installation limitations in an urban rowhouse?
The choice to keep the existing electric resistance heating was a mix of factors. Budget played a significant role, as heat pumps and their installation can be costly. Additionally, the compact layout and structural limitations of the urban rowhouse made retrofitting for a heat pump challenging. The team felt the improved insulation and smart controls would keep heating needs low enough to make electric resistance viable.
How long did it take the Mendez family to go from their initial audit to achieving net-zero status? I’m trying to get an idea of what kind of timeframe a project like this might realistically take in an older urban home.
The Mendez family completed their net-zero journey in just under 18 months from their initial energy audit to full net-zero status. This included time for planning, contractor scheduling, installing solar panels, upgrading insulation, and implementing smart tech. For an older urban home, you can expect a similar timeframe, though it may vary depending on the availability of contractors and any unforeseen renovation challenges.
With the shared walls and minimal original insulation, did the family notice a big difference in comfort right away after the upgrades, or did it take a while to notice improvements?
The family noticed an improvement in comfort almost immediately after the insulation upgrades. Before, they experienced drafts and uneven temperatures, especially near the shared walls. After the project, those issues were significantly reduced, and the overall indoor temperature became much more stable. The changes were noticeable within days, not months.
Can you share more about how the smart home technology was integrated with the existing electric resistance heating system? Were there any compatibility issues given the age of the townhouse?
The smart home technology was integrated with the existing electric resistance heating system by installing smart thermostats compatible with older wiring. The system relied on Wi-Fi-enabled thermostats designed for line-voltage heaters, which allowed remote scheduling and fine-tuned temperature control. There were some minor challenges, mainly related to matching the thermostat voltage to the old heaters and ensuring safe installation, but these were resolved with guidance from the device manufacturer and an experienced electrician.
I’m really interested in how the Mendez family handled the limited roof space for solar panels. Did they need to choose between different panel types or brands to maximize output, and if so, which ones worked best for a small urban roof?
The Mendez family faced the same challenge with their limited roof space and had to be strategic about their solar panel selection. They opted for high-efficiency monocrystalline panels, which provide more power per square foot compared to standard options. This allowed them to meet their energy needs without requiring extra space. The article notes they compared several brands and ultimately chose a model known for its compact size and strong performance in urban settings.
Could you share more about the timeline for the retrofit? For a busy urban homeowner, how long did it take from the initial audit through to reaching net-zero, and were there unexpected delays with any of the key upgrades like insulation or solar installation?
The retrofit process for this urban home took about 10 months from the initial energy audit to reaching net-zero. The energy audit and planning phase lasted around a month, while insulation upgrades took about six weeks, with some delays due to scheduling contractors. The solar installation itself was completed in just under two weeks, but permitting added extra time. Overall, coordinating with various installers was the biggest challenge, but there were no major unexpected delays beyond some minor weather-related holdups.
With the shared walls and rowhouse configuration, how did the Mendez family address air leakage and thermal bridging during their energy retrofit? Are there special techniques for townhomes compared to standalone houses?
For the Mendez family’s rowhouse, addressing air leakage and thermal bridging meant sealing gaps along shared walls, floors, and ceilings, especially where mechanical systems pass through. They used spray foam and airtight drywall techniques to reduce leakage at party walls. For thermal bridging, they added continuous exterior insulation where possible and insulated interior perimeter walls. Townhomes like theirs often need extra attention at connecting walls and rooflines since you can’t insulate or change exterior walls you don’t own, so interior air sealing becomes even more important compared to standalone homes.
Given that the home doesn’t have a garage or basement for battery storage, did the Mendez family consider community solar or virtual net metering to handle periods of low solar production, or did they rely solely on grid-tied solutions?
The Mendez family primarily relied on a grid-tied solar system to balance energy needs, since they did not have space for onsite battery storage. Community solar and virtual net metering were explored early on, but they decided the most practical and cost-effective solution in their area was direct grid connection, allowing them to draw from and contribute to the grid during periods of low or excess solar production.
Were there any incentives or rebates in Portland that helped offset the cost of the solar or insulation projects? I’m trying to figure out if this would be financially doable for someone on a tighter budget.
Yes, the homeowners in the case study took advantage of several incentives available in Portland. They received a state rebate for their solar installation and also qualified for federal tax credits, which significantly lowered the upfront costs. For insulation upgrades, they benefited from local utility rebates. Programs like these can make net-zero upgrades more affordable, so it’s definitely worth checking with local and state agencies to see what’s currently available for your area and budget.
How did the cost of the insulation upgrades and window improvements compare to the cost of installing rooftop solar in their retrofit? I’m trying to figure out which investment makes the biggest dent in energy bills for older urban homes.
In the case study, the insulation upgrades and window improvements had a lower upfront cost than the rooftop solar installation. However, these efficiency measures significantly reduced energy use, lowering bills even before solar was added. For older urban homes, upgrading insulation and windows often delivers the most immediate and cost-effective impact on energy bills, while solar provides long-term savings once energy use is minimized.
The house originally had electric resistance heating. Did the Mendez family replace this with a heat pump or some other system, or did insulation upgrades alone make it efficient enough? I’m wondering what’s most practical for an older urban townhouse.
The Mendez family did replace their original electric resistance heating with a modern air-source heat pump as part of their energy upgrades. While insulation improvements helped reduce heat loss and energy demand, switching to a heat pump was key to achieving net-zero energy. For older urban townhouses, combining better insulation with a heat pump is usually the most practical and effective approach.
With shared walls on both sides, did the neighbors’ homes impact the Mendez family’s energy performance or solar potential at all? Were there any coordination challenges or benefits to being in a rowhouse setup?
The shared walls in the Mendez family’s rowhouse actually helped improve energy performance by reducing heat loss on those sides. Since those walls are insulated by neighboring homes, less energy was needed for heating and cooling. There were no significant coordination challenges mentioned regarding the solar installation, as panels were installed only on their own roof. However, shading from adjacent buildings was considered in the solar design to ensure maximum efficiency.
How long did the entire retrofit process take from start to finish, especially considering the challenges of working in a tightly packed urban environment? Was it all completed at once or in stages over time?
The retrofit process for the small urban home took about 10 months from start to finish. Due to space constraints and city regulations, the work was completed in several stages rather than all at once. Major upgrades—like insulation, solar panel installation, and smart tech integration—were scheduled sequentially to minimize disruption and ensure each step met local requirements.
With such limited roof space (just under 500 square feet), how did the Mendez family decide how many solar panels to install? Did they have to sacrifice any other outdoor features, like a deck or rooftop garden, to maximize their solar capacity?
The Mendez family worked with a solar consultant to calculate their energy needs and the maximum number of panels their 500-square-foot roof could support. They prioritized solar placement on the sunniest roof sections and opted for high-efficiency panels to get the most power from limited space. They didn’t remove or downsize any outdoor features; their deck and small rooftop garden remained intact by strategically placing panels only where necessary.
Given that the initial home energy audit cost $350, what was the total out-of-pocket investment for all the upgrades, and how long did it take for the family to see the impact on their monthly energy bills?
The total out-of-pocket investment for all the upgrades, including the energy audit, solar panel installation, smart thermostat, LED lighting, upgraded insulation, and efficient appliances, was about $29,500 before any rebates or incentives. The family started noticing significant reductions in their monthly energy bills within the first billing cycle after the main upgrades were completed, which was about two months after the project began.
I’m curious how the Mendez family dealt with the limited roof space for solar panels. Did they have to make any trade-offs in system size or prioritize certain appliances to stay net-zero, or were the panels alone enough with all the other upgrades?
The Mendez family definitely had to work around their limited roof space. To make the most of it, they installed high-efficiency solar panels and combined them with significant insulation upgrades, energy-efficient appliances, and a smart home system. This approach allowed them to keep their energy use low enough that the solar array, even though not oversized, was enough to offset their needs and achieve net-zero. They didn’t have to prioritize specific appliances, but overall efficiency was crucial.
I’m curious about the role that smart home technology played in reducing the family’s energy usage. What types of devices or systems had the biggest impact, and did they have to change their daily habits much to see results?
Smart home technology made a big difference by helping the family monitor and control their energy use in real-time. The most impactful devices were the smart thermostat, smart plugs, and automated lighting. These systems adjusted heating, cooling, and lighting based on occupancy and time of day. The family only needed to make small habit changes, like checking energy dashboards and letting the automation handle most adjustments, so the transition was quite smooth.
You mentioned a $350 home energy audit—was that expense covered by any local rebates or incentives, or was it entirely out-of-pocket? For someone on a tight budget, are there ways to offset those initial assessment costs?
The $350 home energy audit in the case study was paid out-of-pocket, but many local utilities and government programs do offer rebates or discounts for energy assessments. If you’re on a tight budget, check with your city or utility provider—they often provide subsidized audits or even free basic assessments. Nonprofits and state energy offices can also sometimes help cover these costs, especially for income-qualified households.
I have an older city townhouse with shared walls and old windows too. Did the family run into any issues with noise or comfort after boosting insulation and switching off electric resistance heating? Any advice on avoiding unintended side effects?
The family in the case study did pay special attention to comfort when upgrading insulation and replacing their old heating. Improved insulation helped keep rooms quieter by blocking outside noise, and careful air sealing prevented drafts. They also chose a modern heat pump for even, quiet heating and cooling. For your townhouse, consider using high-quality window inserts or secondary glazing to further reduce noise and drafts. Make sure your ventilation is well-balanced to avoid stuffiness after sealing up the home.
Did the $350 energy audit lead to any surprising recommendations, or was most of the inefficiency from areas they already suspected? I’m wondering if a full audit is worth the investment for a similar home.
The energy audit in the article did confirm some inefficiencies the homeowners already suspected, like poor attic insulation and drafty windows. However, it also revealed a few unexpected issues, such as hidden gaps around plumbing penetrations and inefficient older appliances drawing standby power. So, while some findings were predictable, the audit uncovered areas they might have missed. For a similar home, a full audit could definitely be worth the investment if you want a comprehensive picture and to avoid overlooking less obvious problems.
How did the Mendez family choose which smart home technologies to prioritize, given their limited roof space and budget? Were there specific brands or features that made a noticeable difference in overall energy usage?
The Mendez family focused on smart home technologies that directly reduced their largest energy loads, starting with a learning thermostat and smart plugs for major appliances. They selected brands with proven compatibility and energy-tracking features, like the Ecobee thermostat and energy-monitoring plugs. These choices helped them optimize usage and avoid unnecessary waste, making the most of both their limited solar generation and budget. Prioritizing devices with real-time monitoring and automation made the biggest impact on their energy savings.
Could you share more about the challenges with limited roof space for solar panels? Did the family have to make trade-offs in panel size or type, or look for alternative places to mount panels in their urban setting?
The family did face challenges with limited roof space, which meant they couldn’t install as many solar panels as they might have liked. To make the most of the available area, they chose high-efficiency panels that generate more power per square foot. They also explored options like mounting panels on a small garage roof and a vertical wall to supplement the main roof installation. These choices allowed them to maximize energy production despite the space limitations.
With the Mendez home having less than 500 square feet of usable roof space, I wonder how they determined the right size and type of solar panels to actually reach net-zero. Were there any trade-offs between panel efficiency and upfront cost?
The Mendez family worked with a solar consultant who analyzed their annual energy usage and available roof space to recommend high-efficiency panels. Because of the roof’s limited size, they chose panels with a higher wattage per square foot, which cost more upfront but generated enough electricity to reach net-zero. The main trade-off was accepting a higher initial investment to ensure the system could fully offset their energy needs within the small space.
With the original home being from the 1980s and having single-pane windows plus minimal insulation, did the retrofitting process require permits or face any issues with Portland’s building codes, especially since it’s a shared-wall rowhouse?
Retrofitting an older 1980s rowhouse in Portland does usually require permits, especially for significant upgrades like insulation and window replacement. The case study team worked with local authorities to ensure all work met current building codes, particularly important for shared-wall homes to maintain fire safety and structural integrity. No major code issues arose, but close coordination with the city and clear communication with neighbors helped the process go smoothly.