Introduction: Why Home Battery Energy Storage Matters
As the demand for sustainable living solutions rises, more homeowners are investing in renewable energy systems such as solar panels and small-scale wind turbines. However, generating clean energy is only half the equation. Efficiently storing that power for use during the night, cloudy days, or grid outages is essential for maximizing self-sufficiency and minimizing reliance on fossil fuels. That’s where home battery energy storage systems (BESS) come into play.
Battery energy storage systems allow you to capture excess electricity generated by your renewable sources and use it when you need it most. Whether you want to reduce your energy bills, protect your home from blackouts, or take a big step toward off-grid living, installing a home BESS is a practical and increasingly affordable solution. But before you dive into installation, it’s crucial to understand the tools and equipment required for a safe, efficient, and code-compliant setup. Using the right tools not only ensures proper system performance but also protects your investment and keeps your household safe.
This in-depth guide will walk you through every tool and piece of equipment you’ll need to set up a home battery energy storage system. We’ll cover essential safety gear, electrical tools, installation aids, and monitoring devices, as well as tips for selecting the best products for your project. Whether you’re a seasoned DIYer or a sustainability enthusiast preparing for your first install, this guide will help you approach the process with confidence and expertise.
Understanding Home Battery Energy Storage Systems
What is a Home BESS?
A home battery energy storage system stores electricity, usually generated from solar panels or other renewables, for later use. The main components typically include one or more deep-cycle batteries (lithium-ion or lead-acid), a battery management system (BMS), an inverter/charger, and a monitoring interface.
Key Benefits
- Energy Independence: Use stored renewable energy when the grid is down or during peak rate times.
- Cost Savings: Reduce or even eliminate electricity bills by maximizing your use of self-generated power.
- Backup Power: Maintain critical loads during blackouts or emergencies.
- Grid Support: Participate in utility demand response programs or sell excess energy back to the grid.
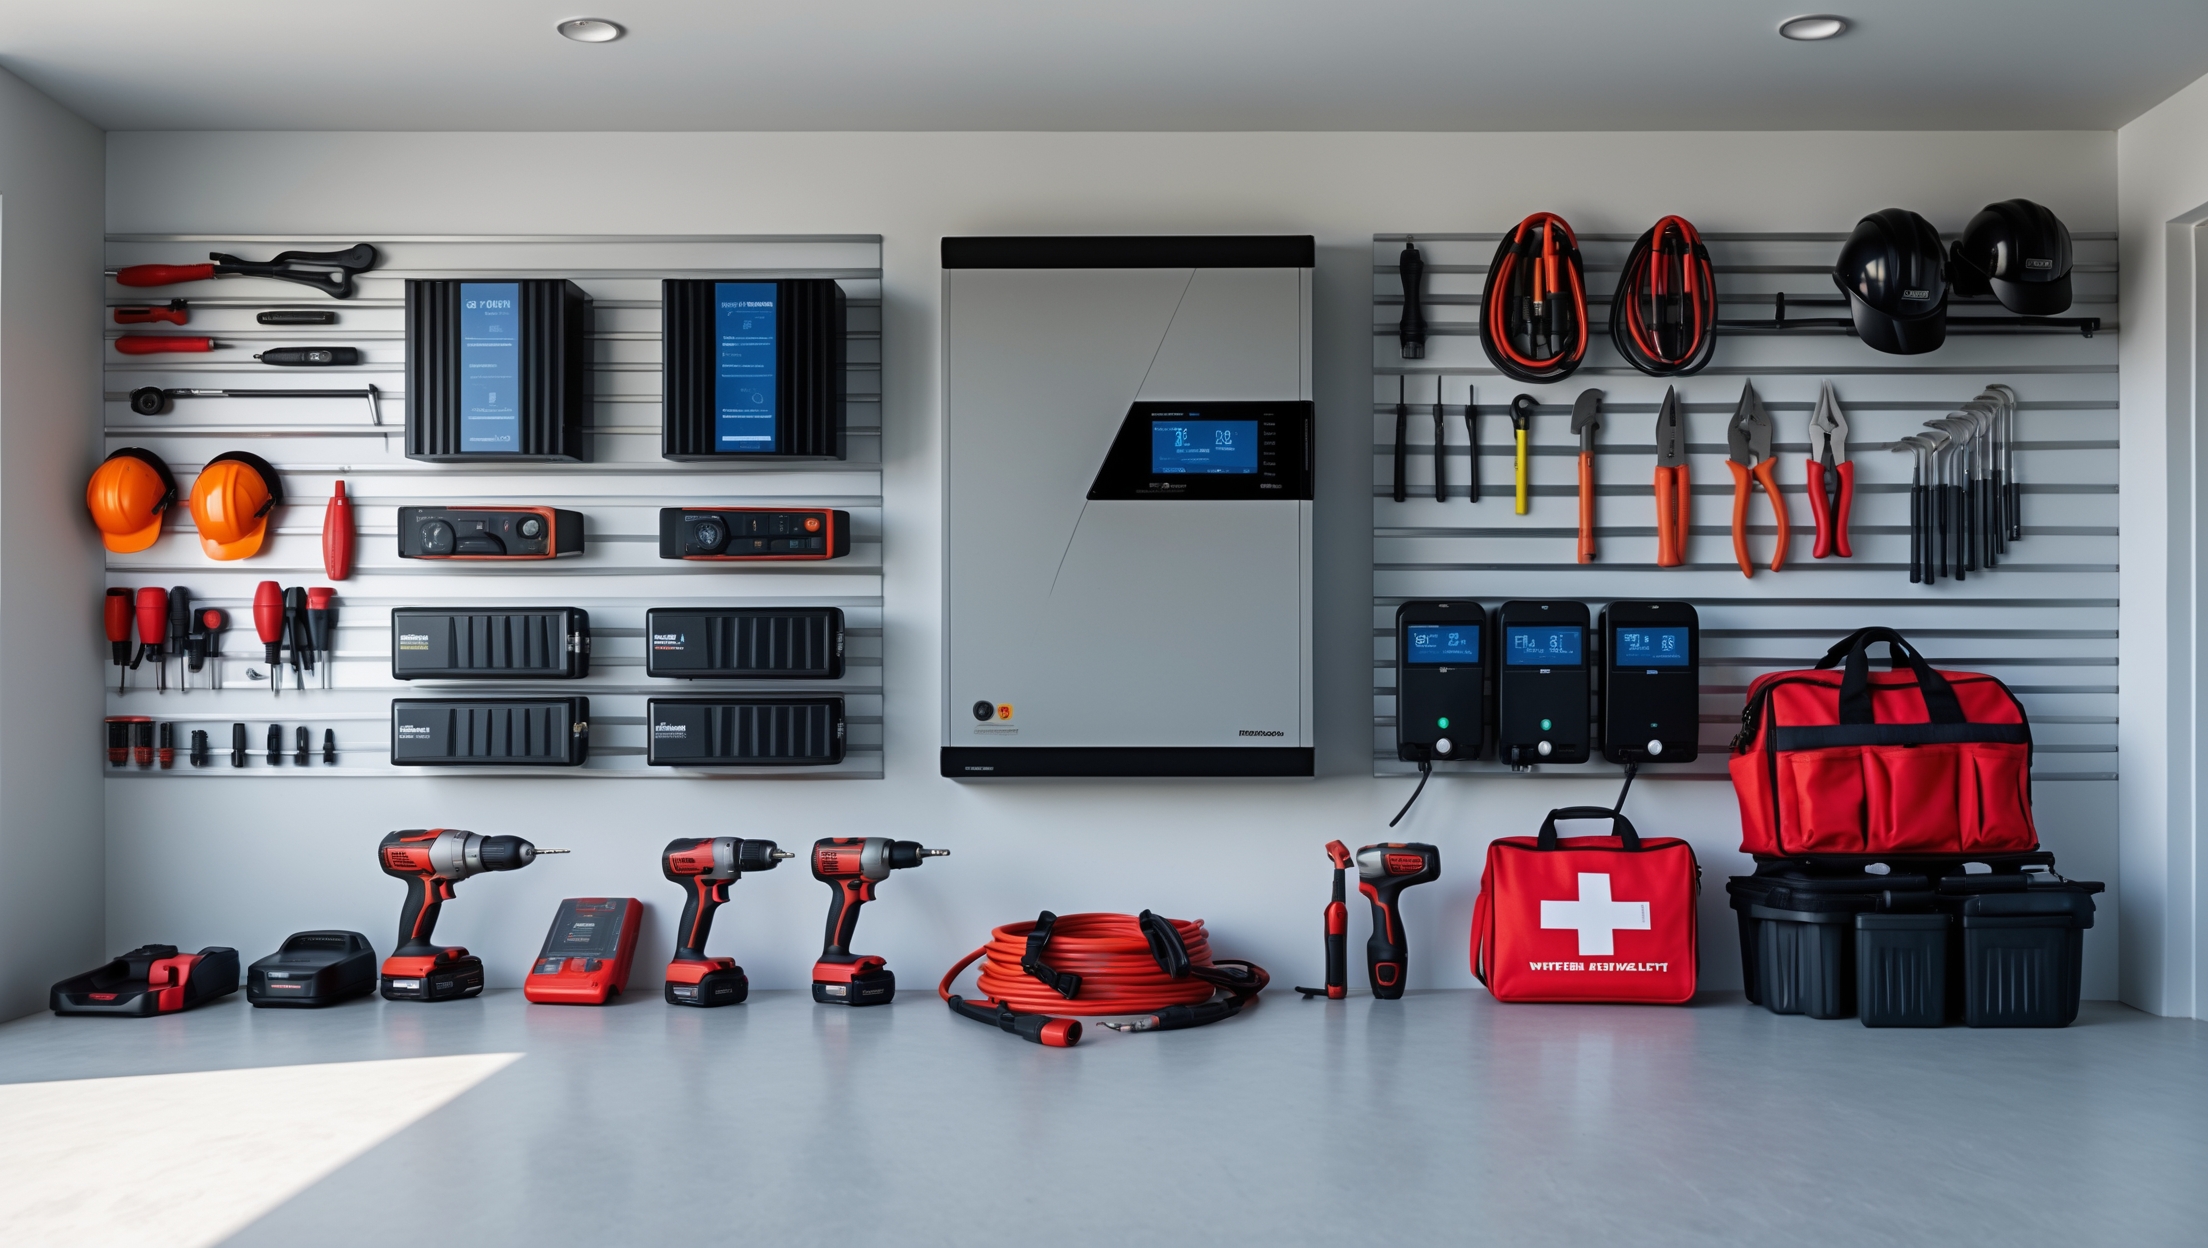
Essential Tools for Home BESS Installation
Safety First: Personal Protective Equipment (PPE)
- Insulated Gloves: Protect against electrical shock when handling live wires or battery terminals.
- Safety Glasses/Goggles: Guard against sparks, battery acid, or flying debris during installation.
- Fire Extinguisher (Class C): Keep a suitable extinguisher nearby, especially for lithium-ion or lead-acid battery setups.
- Respirator Mask: Recommended for enclosed spaces or when working with lead-acid batteries.
- Steel-Toed Boots: Essential for moving heavy equipment and batteries safely.
Core Electrical Tools
- Multimeter: For measuring voltage, current, and resistance throughout your system.
- Clamp Meter: Allows for non-contact current measurements, crucial for troubleshooting and system verification.
- Non-Contact Voltage Tester: Quickly checks for live wires during installation and maintenance.
- Wire Strippers and Cutters: Cleanly strip insulation and cut wires to length for safe connections.
- Crimping Tool: Ensures reliable, strong connections for lugs and terminals on heavy-gauge battery cables.
- Screwdrivers (Insulated): Phillips and flathead, rated for electrical work.
- Socket Set: For securely tightening battery terminals, busbars, and mounting hardware.
- Torque Wrench: Guarantees all connections are tightened to manufacturer specifications, reducing risk of overheating.
Installation Tools and Hardware
- Drill/Driver (Cordless): For mounting battery racks, brackets, and electrical enclosures.
- Level and Stud Finder: Ensure wall-mounted systems are safely secured to structural members.
- Measuring Tape: Accurate placement of components and cable runs.
- Fish Tape or Cable Puller: For routing wires through walls or conduits.
- Conduit Bender: Shapes electrical conduit for a neat, code-compliant installation.
- Cable Lugs and Heat Shrink Tubing: Provides professional, insulated terminations for heavy cables.
- Cable Ties and Mounts: Keeps wiring organized and reduces strain on connections.
- Label Maker: Clearly marks all circuits and components for future maintenance and code compliance.
Battery-Specific Tools
- Hydrometer (for lead-acid batteries): Measures electrolyte specific gravity to assess battery health.
- Battery Lifting Straps/Handles: Safely transport and position heavy batteries without straining your back.
- Thermal Camera: Optional but useful for detecting hot spots or imbalances in battery banks.
Monitoring and Commissioning Tools
- WiFi or Bluetooth Monitoring Interface: Many modern systems include a remote app or display for real-time performance data.
- Data Logger: Records energy flow, battery state of charge, and usage patterns for system optimization.
Choosing the Right Equipment for Your Home BESS
Battery Types and Considerations
Not all batteries are created equal. Your choice will affect the tools and installation process:
- Lithium-Ion (LiFePO4, NMC): High energy density, long cycle life, lightweight, and low maintenance. Requires a BMS and careful compliance with manufacturer guidelines.
- Lead-Acid (Flooded, AGM, Gel): Lower upfront cost but heavier, require regular maintenance, and are less tolerant of deep discharge.
Match your tools (hydrometer, lifting gear) to the battery chemistry and physical size.
Inverters and Charge Controllers
- Hybrid Inverter: Integrates solar, batteries, and grid power for seamless energy management.
- DC-to-DC Converter: For systems integrating batteries of different voltages or chemistries.
- Mounting Brackets and Racks: Securely anchor batteries and inverters to minimize vibration and ensure safety.
Wiring and Electrical Hardware
- Appropriately Sized Cables: Battery cables must be thick enough to handle high currents. Use an online calculator and check local code requirements.
- Fuses and Circuit Breakers: Essential for protecting against short circuits and overloads. Select DC-rated devices compatible with your battery voltage and capacity.
- Disconnect Switches: Allow safe isolation of batteries for maintenance or emergencies.
- Conduit and Junction Boxes: Protects cables and connections from mechanical damage and meets code.
Step-by-Step: How to Use Your Tools for a Professional-Quality Install
Step 1: Site Preparation
- Use a measuring tape to identify the installation area, ensuring clearances per manufacturer and code.
- Employ a level and stud finder to locate secure mounting points for wall-mounted batteries or racks.
- Set up adequate lighting and keep a fire extinguisher within reach.
Step 2: Mounting and Securing Equipment
- Use a cordless drill/driver with appropriate bits for mounting racks, inverters, and enclosures.
- Secure all hardware with a socket set and torque wrench, tightening to the specified values.
Step 3: Running and Terminating Cables
- Cut and strip cables with wire cutters and strippers, taking care to avoid nicking conductors.
- Use a conduit bender to route cables neatly and protect them from damage.
- Attach lugs using a crimping tool and insulate with heat shrink tubing; check for secure connections with a gentle tug.
- Organize wiring with cable ties and label each connection clearly for compliance and future troubleshooting.
Step 4: Electrical Connections and Safety Checks
- Before connecting batteries, use a multimeter and non-contact voltage tester to verify circuits are de-energized.
- Connect batteries in series or parallel as per the design; use lifting straps for heavy units and wear insulated gloves and safety glasses at all times.
- Install fuses, disconnects, and circuit breakers according to your wiring diagram.
- Double-check all connections with a torque wrench.
Step 5: System Commissioning
- Power up the system and use a multimeter and clamp meter to confirm correct voltages and current flows.
- For lead-acid batteries, check electrolyte levels with a hydrometer. For lithium systems, verify status via the BMS interface.
- Configure the monitoring system and perform a functional test using your data logger or app.
- Record all settings and measurements for your records and future reference.
Expert Tips for Selecting and Maintaining Your Tools
Invest in Quality
Choose tools from reputable brands that meet or exceed relevant electrical safety standards. High-quality tools not only last longer but also provide more accurate and reliable results—crucial for a system that could one day power your entire home.
Tool Maintenance
- Clean your tools after each use, especially when working around corrosive battery electrolytes.
- Store tools in a dry, organized area to prevent rust and accidental damage.
- Regularly check the calibration of measuring instruments such as torque wrenches and multimeters.
Safety Practices
- Always de-energize circuits before working on connections.
- Keep PPE in good condition and replace damaged items promptly.
- Never use damaged or worn electrical tools; replace them immediately to minimize risk.
Advanced Tools and Upgrades for Serious Installers
- Insulation Resistance Tester (Megger): Checks the integrity of cable and insulation, especially important for large or outdoor installations.
- Remote Thermal Monitor: Permanently tracks battery temperature for early warning of overheating or cell failure.
- Portable Battery Analyzer: Offers advanced diagnostics for battery capacity and internal resistance.
- Automated Label Printer: Rapidly creates durable, standardized labels for complex systems.
Conclusion: Building a Safe, Efficient, and Sustainable Energy Future
Setting up a home battery energy storage system is one of the most impactful steps you can take toward sustainable living. With the right tools and equipment, you not only ensure the safety and reliability of your installation, but also set the stage for years of efficient, clean energy use. This guide has laid out the essential and advanced tools required for the job, explained their uses, and provided actionable tips for both selection and maintenance.
Remember, investing in quality tools and following best safety practices pays off in the long run—protecting both your equipment and your home. As home energy storage technology evolves and becomes more accessible, being prepared with the correct gear empowers you to confidently take control of your energy future. Whether you’re installing your first system or upgrading an existing setup, let this guide serve as your reference for a safe, code-compliant, and sustainable battery storage installation.
Ready to get started? Assess your project scope, gather the right tools, and take the next step toward energy independence. Your commitment to sustainable living not only benefits your household, but also contributes to a greener, more resilient world for generations to come.


How long does the installation process typically take for someone setting up their first home battery system, and are there any common troubleshooting issues to watch out for during or after installation?
For most first-time installations, setting up a home battery energy storage system usually takes one to three days, depending on the complexity and your home’s existing electrical setup. Common troubleshooting issues include incorrect wiring, communication errors between the battery and inverter, and problems with system configuration. It’s important to follow the manufacturer’s instructions carefully and, if possible, work with a certified installer to reduce risks and ensure the system operates safely.
Could you provide more details on what kind of safety gear is absolutely essential when installing a home battery energy storage system? I want to make sure my setup is both safe and meets any required codes.
When installing a home battery energy storage system, essential safety gear includes insulated gloves, safety goggles, and flame-resistant clothing to protect against electrical shocks and battery acid. A properly rated fire extinguisher should be nearby. Use insulated tools and make sure you have a voltage tester. Always follow local electrical codes and, if possible, consult or hire a licensed electrician to ensure your installation meets all safety standards.
I noticed you mentioned both lithium-ion and lead-acid batteries for home storage systems. For someone totally new to this, how do I decide which type is better for long-term maintenance and safety?
Lithium-ion batteries are generally better for long-term maintenance and safety. They last longer, require less upkeep, and have built-in safety features to reduce risks like overheating. Lead-acid batteries are cheaper up front but need more frequent checks and maintenance, and they’re heavier and less efficient. For most homeowners, lithium-ion is the more convenient and safer choice, though the initial cost is higher.
You mention both lithium-ion and lead-acid batteries for home storage. Could you expand on the key factors to consider when choosing between these two types, especially in terms of long-term maintenance and safety?
When choosing between lithium-ion and lead-acid batteries, key factors include lifespan, maintenance, and safety. Lithium-ion batteries last longer (often over 10 years), require little maintenance, and have built-in safety features but need proper installation to manage thermal risks. Lead-acid batteries have a shorter lifespan, need regular checks and topping up of electrolyte, and are heavier. For long-term use and minimal upkeep, lithium-ion is usually preferred, though it is a higher upfront investment.
I’m curious about the safety gear you recommend for installing a home BESS. Are there specific items that should be prioritized to comply with US electrical codes, especially for DIY installations?
For installing a home battery energy storage system (BESS), prioritize insulated gloves rated for electrical work, safety goggles, flame-resistant clothing, and insulated tools. A voltage tester and appropriate hearing protection are also important. Complying with US electrical codes means using gear rated for the system’s voltage and current, and following lockout/tagout procedures. Always de-energize circuits before starting work, and consult your local code requirements to ensure full compliance.
If I plan to add more solar panels down the line, should I select tools and components with future expansion in mind now, or is it better to wait and upgrade as needed when I’m ready to scale up my system?
It’s wise to select tools and components now that allow for future expansion. Choosing an inverter, charge controller, and battery system that can handle additional solar panels will save you time and money later. Even if you don’t use the full capacity right away, planning ahead means you won’t have to replace or rewire major parts when you scale up your system.
The article says battery energy storage is increasingly affordable—how long does it typically take for a home system to pay for itself in energy savings, especially if you’re pairing it with a solar panel setup in the US?
On average in the US, a home battery energy storage system paired with solar panels can pay for itself in about 7 to 12 years. The exact timeframe depends on factors like your local electricity rates, available incentives or rebates, the size and cost of your system, and your household’s energy usage. Solar-friendly states with good incentives can see payback periods on the shorter end of that range.
When considering the initial setup costs, how do expenses for the recommended tools and monitoring devices compare to hiring a professional installer for a typical home battery storage system?
Buying the recommended tools and monitoring devices for a DIY home battery storage setup usually costs less than hiring a professional installer. The main expenses you’ll face are for items like safety gear, wiring tools, and monitoring equipment, which might add up to a few hundred dollars. In contrast, professional installation fees can run into the thousands, as they include labor and sometimes markup on materials. However, hiring a pro ensures proper installation and may be required to meet local safety codes or maintain warranties.
After installing a home BESS as described, how do you test and monitor the system for optimal performance, especially during the first few weeks? Any specific monitoring devices or apps you recommend?
Once your home battery energy storage system is installed, most modern BESS units include built-in monitoring, accessible through dedicated apps or web dashboards. Check if your system’s manufacturer offers an official app—these usually display battery charge, usage data, and error alerts. For third-party solutions, energy monitors like Sense or Emporia can track your entire home’s consumption, helping you spot inefficiencies. During the first weeks, regularly check these stats and set up alerts for unusual activity so you can adjust system settings for optimal performance.
After installation, what routine checks or maintenance steps would you recommend to make sure the battery system continues to perform efficiently and safely over time?
To keep your home battery system running smoothly and safely, check the system’s state of charge and health regularly using its monitoring app or display. Inspect for any visible damage, loose wiring, or excessive dust around connections. Clean vents or filters if present, and ensure the area stays dry and well ventilated. Test backup functionality periodically, and have a professional perform an annual inspection to catch issues early.
For someone who’s never tackled a big electrical project before, which of the tools or equipment you listed would be absolutely necessary to buy new, and which could I potentially rent or borrow for a one-time install?
For first-timers, it’s best to buy new basic safety gear like insulated gloves and voltage testers, since you’ll want reliable protection. Essential hand tools such as screwdrivers, wire strippers, and pliers are also worth buying, as you’ll likely use them again. Larger or specialized equipment like a heavy-duty drill, conduit bender, or cable crimper can often be rented or borrowed for a one-time install, saving you money and storage space.
Could you elaborate on which monitoring devices you recommend for keeping track of battery health and energy usage in a home BESS? Are there particular brands or features that are especially reliable or user-friendly for beginners?
For monitoring a home battery energy storage system, look for devices that provide real-time data on battery health, charge cycles, and energy usage. Brands like Victron, Tesla, and SolarEdge offer user-friendly monitoring solutions with intuitive apps and clear dashboards. Key features to consider include mobile app access, customizable alerts, data logging, and compatibility with your battery system. For beginners, a system with a straightforward interface and good customer support can make ongoing monitoring much easier.
After setting up the home battery system, what are some common issues homeowners might encounter in the first few months, and are there specific tools or equipment that help with troubleshooting these problems?
In the first few months after setting up a home battery system, homeowners sometimes notice issues like battery not charging fully, unexpected power dropouts, or inverter error messages. Common troubleshooting tools include a digital multimeter for checking connections and voltage, and a battery monitoring app or system provided by the manufacturer to track performance. Keeping the manufacturer’s manual handy can also help identify and resolve specific error codes quickly.
The article mentions monitoring devices as part of the setup. Could you explain what key features or functions homeowners should look for in a monitoring interface to get the most value from their battery system?
When choosing a monitoring interface for your battery system, look for features like real-time tracking of energy use and storage levels, historical data graphs, and alerts for issues such as low charge or system faults. A user-friendly dashboard, remote access via a smartphone app, and compatibility with other smart home devices can also make managing your energy storage much easier and more effective.
You mention both lithium-ion and lead-acid batteries for storage systems. Are there specific tools or safety precautions that are different depending on which battery type I choose?
Yes, there are some tool and safety differences between lithium-ion and lead-acid batteries. For lead-acid batteries, you’ll want acid-resistant gloves, eye protection, and ventilation to avoid exposure to hydrogen gas and acid spills. Lithium-ion batteries require insulated tools, fire extinguishers rated for electrical fires, and careful handling to prevent short circuits or punctures. Always follow the manufacturer’s safety guidelines for your chosen battery type.
If I’m on a tight budget, which tools or pieces of equipment would you recommend buying new versus possibly borrowing or renting for a home battery storage installation?
For a home battery storage setup on a tight budget, it’s smart to buy new only essential safety items like insulated screwdrivers, a multimeter, and personal protective equipment, since safety is critical. More expensive or infrequently used tools, such as heavy-duty drills or wire crimpers, can often be borrowed or rented. This approach helps keep costs down while ensuring your installation is safe and effective.
What should I look out for when choosing a battery management system for my setup? Are there entry-level BMS options that are still reliable for someone just getting started?
When choosing a battery management system (BMS), pay attention to compatibility with your battery type (such as lithium or lead-acid), voltage and current ratings, safety features like overcharge and short circuit protection, and ease of installation. For beginners, there are several entry-level BMS options that are both affordable and reliable, especially from well-known brands. Just make sure the BMS matches your battery’s specifications and has clear user support or documentation.
When it comes to choosing between lithium-ion and lead-acid batteries for a home BESS, what are the main trade-offs in terms of longevity, safety, and overall maintenance requirements? I’d like to make a decision that fits my small business budget and reliability needs.
Lithium-ion batteries generally last much longer than lead-acid ones, often up to 10 years or more, while lead-acid batteries may need replacing after 3–5 years. Lithium-ion systems are safer when properly installed but require built-in management systems; lead-acid can be less stable if deeply discharged. Maintenance-wise, lithium-ion batteries are mostly hands-off, whereas lead-acid needs regular checks for water levels and corrosion. Although lithium-ion costs more upfront, their longer lifespan and lower maintenance often make them more cost-effective for reliable, long-term use.
What kind of budget range should someone expect for purchasing all the required tools and safety gear listed in your guide, if they are tackling a typical residential-sized BESS project?
For a typical residential battery energy storage system project, you can expect to spend between $400 and $1,000 for all the essential tools and safety gear. This includes basic electrical tools, a multimeter, insulated gloves, safety glasses, fire extinguishers, and protective clothing. The final amount will depend on the brands and quality of items you choose, but this range should cover the basics for most home installations.
After setting up the system with all the recommended equipment, what are the key steps or checkpoints to test that everything is working properly before I start relying on it day-to-day?
Once your system is set up, start by double-checking all electrical connections for tightness and correct polarity. Power up the system and verify that the battery is charging and discharging as expected. Monitor the inverter display for normal operation and check for error messages. Test the system’s ability to run your essential loads by switching off grid power briefly to ensure backup works. Finally, review system data logs to confirm all components are communicating properly and the battery state-of-charge readings are accurate.
How much time should I realistically set aside for the installation if I’m fairly new to DIY electrical projects, and are there any steps that usually take longer than expected?
If you’re new to DIY electrical projects, expect the installation to take a full weekend—around 12 to 16 hours in total. The steps that often take longer than expected include safely mounting the battery unit, running and securing wiring, and double-checking all electrical connections. Allow extra time for reading the manual and possibly troubleshooting, especially if you’re integrating with your home’s existing power system.
As someone considering going off-grid, I’m wondering how to estimate the right battery storage capacity for extended outages. Is there a straightforward way to factor seasonal weather changes or longer stretches of low sunlight into the calculations?
To estimate the right battery storage for off-grid living, first calculate your daily electricity usage in kilowatt-hours. Then, multiply this by the number of days you want backup—often 3 to 5 days for cloudy periods. To cover seasonal changes, look at your area’s lowest expected solar production months and plan for more storage during those times. Consulting local solar data and adding a 20-30% buffer can help ensure reliability during longer low-sunlight stretches.
I’m interested in setting up a battery storage system mainly for blackout protection, but I’m not sure how the setup would differ if I also want to maximize my solar savings. Does the guide explain how to prioritize between these goals when choosing equipment?
The guide touches on the differences between prioritizing blackout protection and maximizing solar savings. It explains that some battery systems are optimized for backup power only, while others are designed to store excess solar energy for regular use. The equipment choice and system setup may vary depending on which goal is more important to you, and the guide offers advice on selecting inverters, battery sizes, and system controls to match your priorities.
Could you explain a bit more about the main electrical tools required for the installation? I’m worried I might miss something crucial the first time around.
Absolutely, having the right electrical tools is essential for a safe and effective installation. You’ll need a multimeter for testing voltage and continuity, wire strippers and cutters, insulated screwdrivers, pliers, a torque wrench for proper tightening, and a drill for mounting hardware. Safety equipment like insulated gloves and safety glasses is also important. Depending on your system, you may also need a conduit bender and fish tape for routing wires. Double-check your project’s requirements to ensure you have all the necessary tools before starting.