Introduction: Why Solar Dehydration Matters in Sustainable Living
As the global conversation around sustainable living and food waste intensifies, more households are turning to time-tested preservation methods with innovative, eco-friendly twists. Solar dehydration—a process that harnesses the sun’s natural energy to remove moisture from fruits, vegetables, herbs, and even mushrooms—stands out as a highly accessible, low-impact solution. Home-scale solar dehydrators offer a way to extend the shelf life of garden harvests, reduce reliance on commercial packaged snacks, and support a zero-waste lifestyle. Unlike electric dehydrators, which consume significant energy, solar dehydrators are powered by renewable sunlight, making them a perfect fit for those looking to shrink their carbon footprint. Whether you’re an avid gardener, a food security enthusiast, or simply passionate about green technologies, learning to build and use a home solar dehydrator can help you preserve excess produce, cut down on food waste, and enjoy seasonal flavors year-round. This guide dives deep into the essential tools and equipment needed, setup best practices, and thoughtful DIY tips to ensure your solar dehydrator is both efficient and durable.
Understanding Solar Dehydration: The Science and Benefits
How Solar Dehydration Works
Solar dehydration relies on the sun’s radiant heat and airflow to gradually extract moisture from food. Properly designed dehydrators balance direct exposure to sunlight with adequate ventilation, resulting in safe, flavorful dried goods without artificial preservatives or added energy costs.
Benefits for Sustainable Living
- Energy Efficiency: No electricity or fuel required—just sunlight.
- Zero-Waste: Reduces food spoilage and packaging waste.
- Nutrient Preservation: Gentle dehydration helps retain vitamins and minerals versus other processing methods.
- Cost Savings: Lower grocery bills by preserving homegrown or bulk produce.
- Resilience: Emergency-ready shelf-stable foods for power outages or disruptions.
Types of Home-Scale Solar Dehydrators
Direct vs. Indirect Solar Dehydrators
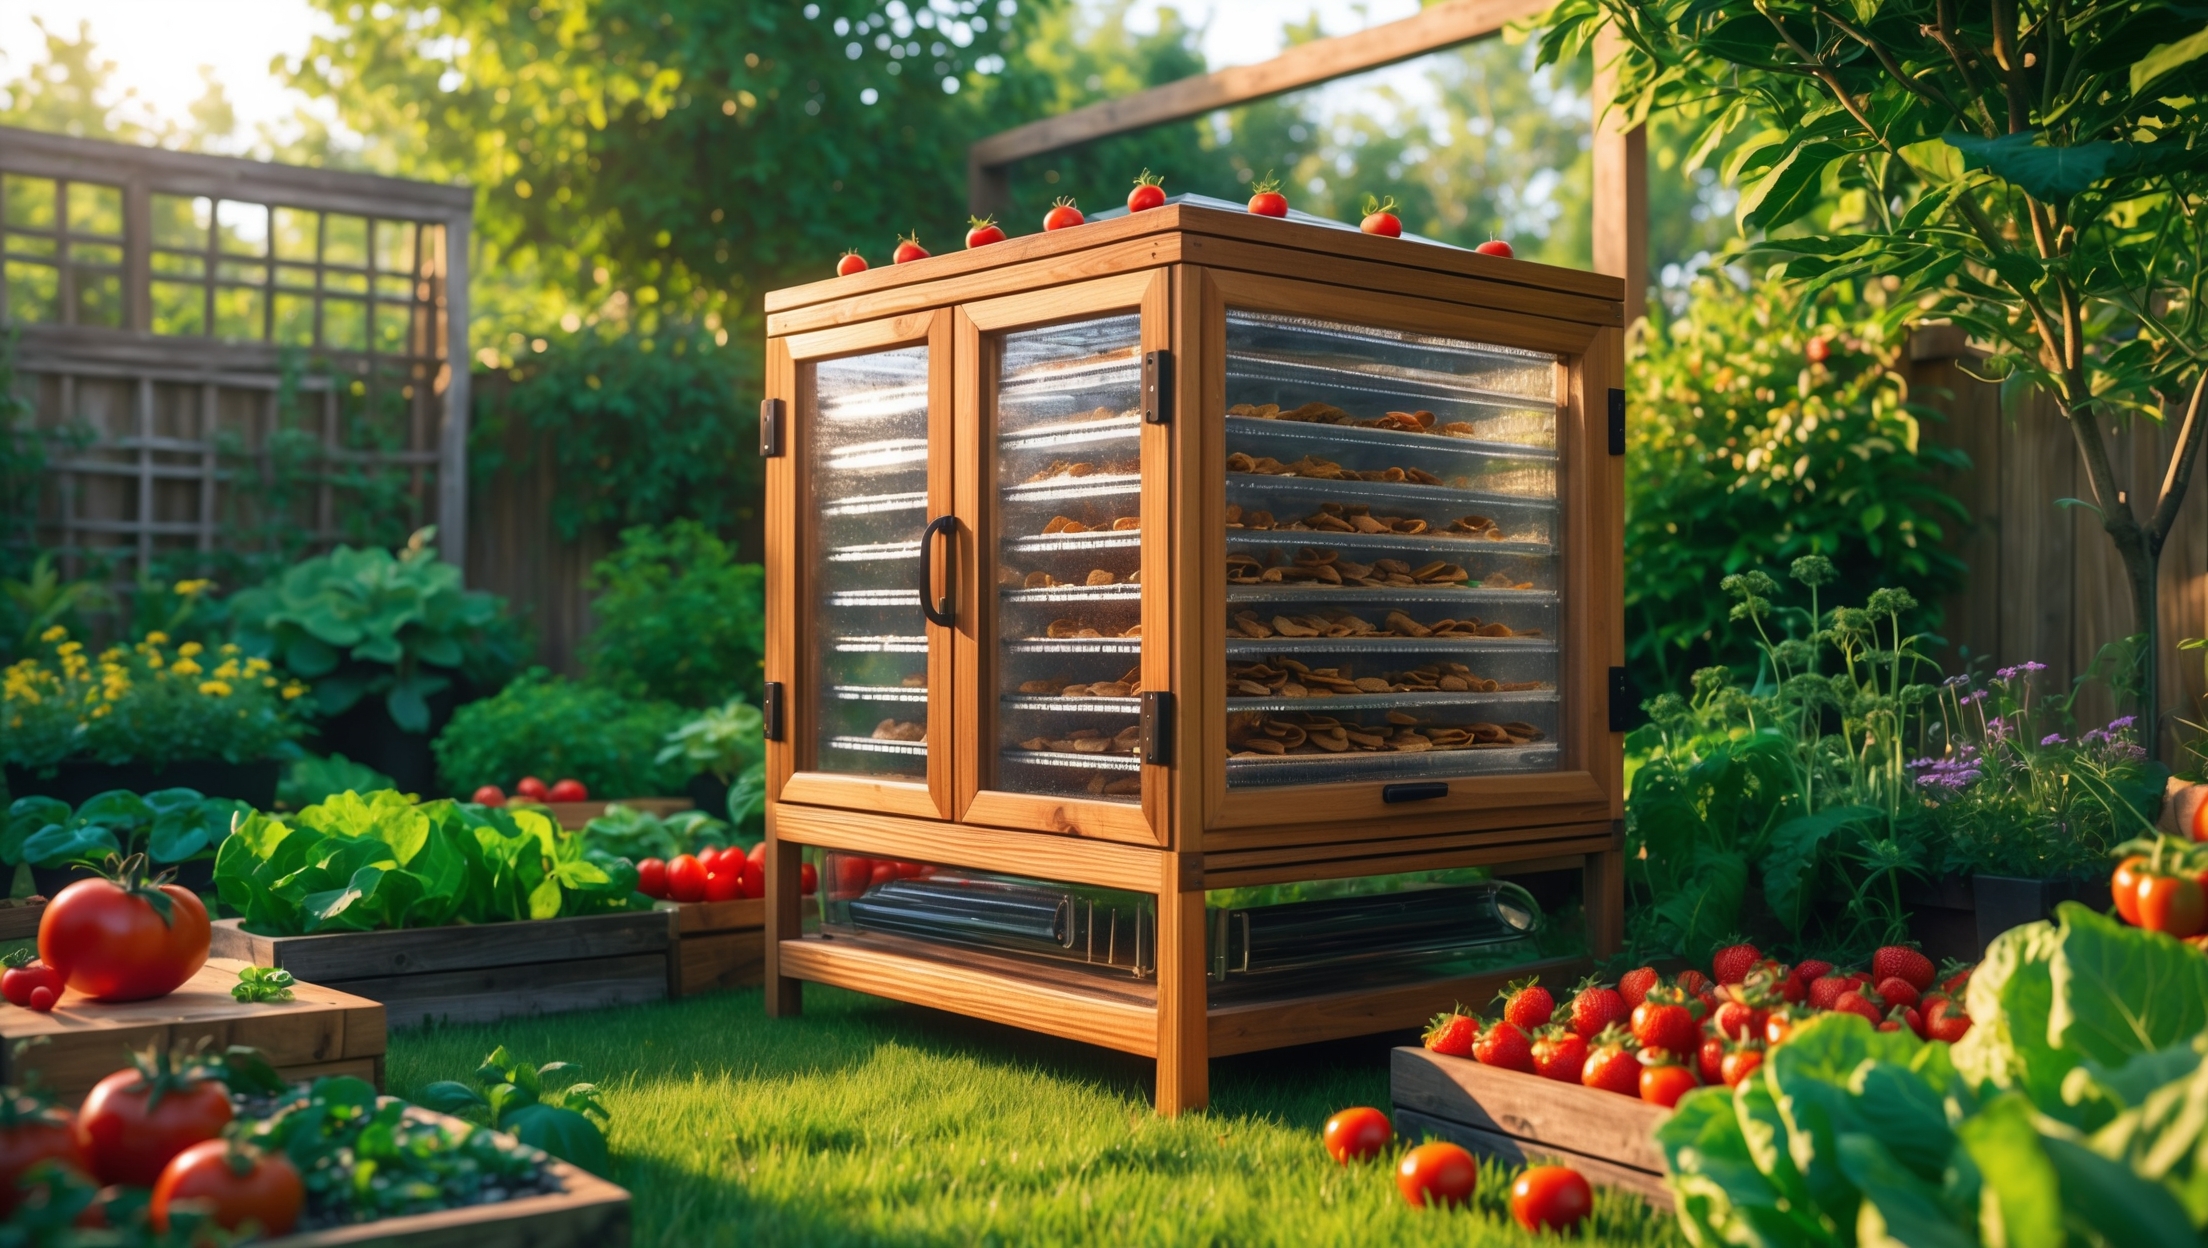
- Direct Solar Dehydrators: Place food directly in sunlight behind clear glazing. Simple but can risk nutrient loss or uneven drying.
- Indirect Solar Dehydrators: Heat air in a solar collector, then channel it to a drying chamber. More consistent, protects food from direct UV, and often yields higher-quality results—ideal for most home applications.
Passive vs. Active Airflow
- Passive: Relies on natural convection (warm air rises, cool air enters below). Simpler, no moving parts.
- Active: Uses solar-powered fans to boost airflow. Faster drying, especially in humid climates, but adds complexity and cost.
Essential Tools for Building a Home Solar Dehydrator
Measuring and Layout Tools
- Tape Measure and Ruler: For precision in cutting and assembling panels and trays.
- Square: Ensures accurate right angles, critical for airtight construction.
- Marker or Pencil: For marking cut lines on wood, metal, or polycarbonate sheets.
Cutting Tools
- Hand Saw or Circular Saw: To cut plywood, framing timber, or reclaimed wood.
- Utility Knife: For trimming mesh screens or vapor barriers.
- Jigsaw: Useful for custom vents or curved openings.
Assembly Tools
- Cordless Drill/Driver: For driving screws, drilling pilot holes, and installing fasteners.
- Screwdrivers: Both Phillips and flathead for adjustments and assembly.
- Hammer: For nailing wooden components or tapping joints into place.
- Staple Gun: Attaching mesh or screening material securely to wooden frames.
Finishing Tools
- Sandpaper or Power Sander: To smooth rough edges and prevent splinters.
- Paintbrush: For applying food-safe sealants or exterior weatherproofing.
Safety Gear
- Safety Glasses: Protect eyes from sawdust, splinters, or debris.
- Dust Mask: Especially when sanding or cutting treated wood.
- Work Gloves: Prevent blisters and protect hands during assembly.
Key Equipment and Materials Checklist
Structural Materials
- Wooden Planks or Plywood: For the dehydrator’s frame and drying chamber. Consider FSC-certified or reclaimed wood for sustainability.
- Insulation (Optional): Thin, food-safe insulation (e.g., cork or wool) boosts efficiency, especially in cooler climates.
Glazing for the Solar Collector
- Polycarbonate Sheets: Durable, UV-resistant, and lightweight. Better than glass for backyard use.
- Old Glass Windows: Repurpose if available, but handle with care and check for lead paint or cracks.
Drying Trays and Mesh
- Food-Grade Mesh: Stainless steel or BPA-free plastic mesh lets air circulate while supporting food. Avoid hardware cloth with toxic coatings.
- Removable Wooden or Metal Frames: Make cleaning and loading easier.
Ventilation Components
- Adjustable Vents: Simple louvered vents or sliding covers to fine-tune airflow.
- Solar-Powered Fan (Optional): For active airflow models—choose a waterproof, low-voltage fan compatible with small solar panels.
Fasteners and Hardware
- Stainless Steel Screws and Hinges: Resist rust and last longer outdoors.
- Weatherproof Sealant: Food-safe silicone or caulking for sealing joints and gaps.
- Handles and Latches: For easy access and secure closure of doors or access panels.
Finishing Materials
- Non-Toxic Paint or Oil: For exterior surfaces, use natural finishes like linseed oil. Avoid treating interior surfaces that touch food.
Optional Accessories
- Thermometer and Hygrometer: Monitor internal temperature and humidity for optimal drying.
- Shade Cloth: For hot climates, can help prevent over-drying or scorching.
Step-by-Step Guidance: Planning and Building Your Solar Dehydrator
1. Selecting the Right Size and Location
- Size: Consider typical batch sizes and available garden space. A standard home dehydrator holds 4–8 trays, each 12″ × 18″.
- Location: Place in a sun-drenched spot with minimal shade, ideally south-facing (in the Northern Hemisphere).
- Access: Ensure easy access for loading/unloading and maintenance. Avoid placing directly on soil—use pavers or a raised platform.
2. Designing for Maximum Efficiency
- Airflow: Design for intake vents at the bottom and exhaust at the top. Use mesh to keep insects out.
- Angle: Tilt the solar collector at roughly your latitude + 10°, optimizing sun exposure.
- Modularity: Removable trays and panels simplify cleaning and storage.
3. Cutting and Assembling Components
Measure and cut your frame, collector box, and drying chamber according to your plans. Pre-drill holes to avoid splitting wood. Assemble using stainless steel screws and brackets for stability. Attach glazing to the collector box with weatherproof sealant, ensuring a tight, draft-free fit. Install mesh trays inside the drying chamber, leaving 2–3 inches between trays for airflow. Add handles and latches for convenience.
4. Installing Vents and (Optional) Fans
Mount adjustable vents at the intake and exhaust points, using mesh screens for pest protection. If using a solar-powered fan, mount it at the exhaust vent and wire it to the solar panel, following manufacturer instructions for safe, waterproof connections.
5. Applying Finishes and Weatherproofing
Sand all exposed edges to prevent splinters. Apply a food-safe finish to exterior wood surfaces. Inspect all joints and seams, sealing with food-safe silicone where needed to keep out rain and bugs. Allow finishes to cure fully before use.
Using Your Solar Dehydrator: Tips for Efficient, Safe Operation
Preparing Produce for Drying
- Wash and slice fruits and vegetables thinly and uniformly for even drying.
- Blanching certain vegetables (e.g., green beans, carrots) before drying can preserve color and texture.
- Arrange pieces in a single layer on each tray, leaving space between items for airflow.
Best Practices for Solar Drying
- Start early in the day to maximize sunlight hours.
- Rotate trays occasionally to ensure uniform drying.
- Monitor temperature and humidity inside the chamber. Ideal drying temperature is 120–140°F (49–60°C).
- Check progress every few hours—drying time ranges from 6 hours (herbs) to 2+ days (thick fruit slices or humid weather).
Storage and Shelf Life
- Allow dried foods to cool before storing to prevent condensation.
- Store in airtight glass jars or reusable vacuum-sealed bags in a cool, dark place.
- Label jars with contents and date for best rotation.
Maintenance and Troubleshooting
Regular Maintenance Tasks
- Clean trays and mesh with mild soap and water after each use.
- Inspect for mold, insect nests, or weather damage monthly during the season.
- Reapply food-safe sealant or oil to wood annually for longevity.
Troubleshooting Common Issues
- Uneven Drying: Rotate trays and check for blocked airflow.
- Condensation Inside Chamber: Increase ventilation, dry smaller batches, or add a fan.
- Pest Intrusion: Check mesh screens for tears and repair as needed.
- Low Temperatures: Optimize collector angle, insulate, or add reflective surfaces inside the collector box.
Green Upgrades and Innovative Add-ons
- Solar-Powered Temperature Sensors: Monitor internal conditions remotely.
- Rainwater Harvest Integration: Use rain barrels nearby for garden irrigation—complementing your food preservation efforts.
- Stackable Modular Designs: Easily expand capacity as your needs grow.
- Natural Pest Deterrents: Incorporate aromatic herbs around the dehydrator’s base to repel insects.
Conclusion: Embracing Solar Dehydration for a Greener Future
Integrating a home-scale solar dehydrator into your daily life is more than a practical DIY project—it’s an active step toward a more resilient and sustainable household. By selecting the right tools, sourcing eco-friendly materials, and applying careful craftsmanship, you can create an effective preservation system that minimizes waste and maximizes the bounty of your local harvests. Solar dehydration not only empowers you to enjoy dried fruits, vegetables, and herbs year-round but also aligns perfectly with broader goals of reducing energy consumption and supporting circular, zero-waste living. As food security and climate resilience become ever more important, these small-scale solar technologies offer tangible benefits: less reliance on store-bought, packaged foods; reduced landfill contributions; and lower household energy bills. Moreover, each batch of sun-dried produce is a flavorful reminder of the sun’s power and our capacity to harness it responsibly. Whether you start with a simple direct solar dehydrator or invest in a more sophisticated, fan-assisted design, the investment in tools and thoughtful design will reward you with years of sustainable food preservation—and the satisfaction that comes from building a greener, healthier future for yourself and your community.


For someone with limited DIY experience and a tight budget, what are some practical recommendations from your guide about sourcing materials or modifying an existing structure to create a functional solar dehydrator?
If you’re new to DIY and watching your budget, consider repurposing items like old picture frames or window screens for the dehydrator trays, and use cardboard boxes or wooden crates as the main structure. You can also adapt an existing bookshelf or cabinet by removing the back and adding vents for airflow. Just make sure to use food-safe materials and place the dehydrator in a sunny, well-ventilated spot.
For busy families with limited time, how long does it usually take to dry a typical batch of fruits or veggies in a home solar dehydrator as described here compared to an electric one?
Drying times in a home solar dehydrator usually range from one to three days for most fruits and vegetables, depending on sun conditions and humidity. In comparison, an electric dehydrator can often finish a batch in 6 to 12 hours. If your family needs faster results, an electric model is more predictable and quicker, but solar dehydrators are a great low-cost, eco-friendly option if you can plan ahead.
I’m interested in setting up a solar dehydrator for my produce stand, but I’m in a region with a lot of humidity. Do you have any tips on how to adjust the design to ensure safe and effective drying in damp climates?
High humidity can make solar dehydration more challenging, but there are ways to adapt your setup. Focus on maximizing airflow by incorporating extra ventilation both at the intake and exhaust points of your dehydrator. Use a solar-powered fan to boost air circulation if possible. Consider using mesh trays and spacing produce out to allow for better drying. Starting with smaller, thinner slices will also help. Always monitor moisture levels to ensure food is thoroughly dried and safe for storage.
I noticed you mentioned using solar dehydrators for mushrooms. Are there special precautions or steps you take to ensure safe dehydration and storage of mushrooms compared to fruits or herbs?
Yes, mushrooms do require a few extra precautions. First, slice them evenly and thinly to ensure thorough dehydration. Unlike fruits or herbs, mushrooms should be pre-cleaned with a damp cloth, not washed directly to avoid excess moisture. Make sure they dry completely until brittle to prevent mold. Once dried, store them in airtight containers in a cool, dark place, and check occasionally for any signs of moisture or spoilage.